Showing posts with label Nail Decal. Show all posts

Tuesday, December 19, 2017

6:00 AM

Holiday Fluid Nail Art


     The Holiday manicures continue today on the blog. This time I'm bringing you a look that takes minimal effort but a bit of patience. Sound familiar? It's almost the exact opening line I used for my last fluid nail art look. The difference is, this time it's even easier to create the look! And all it takes is a few colors of nail polish, a nail art mat and time.


     Doesn't it look neat? I just love how this turned out and it was so so simple to do! I used 4 different polishes from Sinful Colors It's a Wrap (gold) Under 18 (red) Whipped Frosting (white) and HD Nails (green) to create this look. 


    Now for the easy part of the manicure. All I did was place random drops of each polish on my mat. I'd recommend using one of the mini mats for this technique simply because it's easier to work with than the full sized ones. Make sure the drop are close enough to run together, making sure to cover approximately a 2-inch by2-inch area. You may need to cover more area if your nails are really long. If you don't get the entire area covered with polish don't worry, a few bare spots can be fixed in the next step. 

     After you're satisfied with the polish drops, all that's left is to pick up your mat and fold it in half twice. Once horizontally and once vertically. This step helps fill in any blank spots you might have and, smooshes the polish together to create a really cool marble effect. Plus it's much easier than tilting the mat back and forth. Now comes the tough part, waiting for the design to dry so you can move on to the next step. 

     I allowed the polish to dry for about 2 hours, this time around I skipped the step of applying topcoat before peeling the polish off my mat. This helped cut down on dry time and made it easier to cut out nail sized pieces.  


     After you've cut your decals down to the right sizes all that's left is to apply them to the nail. I used a base of Orly Bonder and let it dry to a tacky state but not fully dry before placing my decal on the nail. After that, all I had left to do was a little cleanup and to add a layer of top coat. My go-to is Girl on the Run by Pure Ice but any top coat will work. 

      Have you tried the fluid nail art look yet? What do you think about this technique vs the other technique I used to get the same effect? I hope you've enjoyed this post, thanks for stopping by and Happy Polishing! 


Thursday, November 30, 2017

6:00 AM

Dry Brush Decals


     Hey everyone. I've got a new nail art look to share with you today featuring some returning favorites from Literary Lacquers. These polishes returned to the shop on October 19th along with the newly released Faulkner Duo. Since they are returning shades I decided to skip the swatches (for now) and try my hand at making some decals using the dry brush technique.

     While I will admit this isn't the best way to showcase all of the polishes it was something fun for me to do and I wanted to share that with all of you. Plus it gave me the chance to use my mini nail art mat from Uber Chic.


     Looking at this photo you'de be hard pressed to know that I used 4 different polishes to create this look. Like I said it's not exactly the best way to showcase these polishes but I do like the finished result. So just what are the polishes I used? The Raven Trio originally released in 2016 And this Mystery Explore, Sweet Lenore, and Soul Within Me Burning. 


     To get this look I randomly brushed small amounts of each polish onto my mini Uber Chic mat until I'd covered the entire nail outline.  Becuase my mat is the black version it was a little difficult to see if I'd actually covered the entire area. The Raven Trio consists of 3 glitter polishes and although they are packed full of glitter there was the possibility of bald spots. I added a layer of Sherlock (originally released in 2015 from Literary Lacquers) a milk chocolate creme finish nail polish. This served 2 purposes, to avoid any bald spots and, to help make my decals easier to peel up off my mat.


     Once my decals were dry I applied a layer of Orly Bonder to my nails and allowed it to dry until it was slightly tacky. All that was left was to apply the decals to my nails, do a little cleanup and add a layer of top coat.  I know that bonder is supposed to be a sticky base coat but I like to apply my decals before it's fully dry. I seem to get better adhesion that way. You do have to be careful though, if the base coat is too wet it will dissolve your homemade decals, and they will split and tear easily. I learned that the hard way more than once. 

     Do you have any tricks for applying homemade decals? What do you think of my dry brush look? Would you like to see the Raven Trio swatched in the future? Let me know your thoughts in the comments. As always, Thanks for stopping by and Happy Polishing! 


     Be sure to follow Literary Lacquers so you never miss an update. 

Twitter-https://twitter.com/LiteraryLacquer

 Holos/Multichromes will be $12 and Shimmers/Cremes and glitters will be $10. 

Tuesday, November 28, 2017

6:00 AM

Watermarble with Julie G Bohemian Dreams Collection


     Now that the Thanksgiving dinners and Black Friday shopping hustle and bustle are over it's time to get back to my regular blogging. Until I start my Christmas posts that is. And while there is no snow on the ground and the sun has popped back out you could say I'm not exactly in the Christmas spirit yet. That's why today I'm bringing you a look that leans more towards an autumn feeling featuring the Bohemian Dreams Collection from Julie G


     The Bohemian Dreams collection consists of 6 polishes, all gorgeous muted creme shades. The colors are Aria, Eden, Faith, Harmony, Henna and, Karma. The collection was released this summer but I felt the colors lend themselves better towards fall especially with how dark they look in a watermarble.


     These polishes work perfectly for this technique. They spread beautifully and I was able to get 24 rings of polish before creating my design. I'm pretty sure that's a record for me! Also, I should mention that I only applied a layer of base coat, there are no undies for this look and I still have a very opaque design. The tiny bubbles you see were caused by my top coat. I was trying to use a bottle that has started to thicken up a bit and didn't notice the bubbles until it was time to photograph.


     In order to avoid the messy clean up that typically comes with doing a watermarble, I decided to try letting the design dry in my cup and then apply it like a decal.  This worked out pretty well for me. As you can see there are a few quirks I need to work out. Like the small wrinkles I have at the edges of my nails. But that will come in time just like when learning any other technique. 

     I also need to figure out a way to remove the design from the water without letting it fold inwards on itself. So if you have any tips for that I'd be appreciative. That's all I've got for you today. As always thanks for stopping by and Happy Polishing!

Monday, June 26, 2017

6:00 AM

Z Plate Decals


     Happy Monday everyone, wow where did the weekend go? I don't know about you but I was so busy it feels like I blinked and my weekend was gone. On a positive note, I was able to get my 2 new helmers built and my collection organized. My collection was starting to get out of control and I had bottles in little totes and covering my desk. Now everything is in its place and I feel like I can start focusing more on nail art instead of just swatching.  Afterall nail art is the reason I started this blog in the first place. Which brings me to today's post. I realized it's been over a month since I've shared any nail art with you, May 10th be exact when I shared my pink roses look.  This time I'm sharing some decals I created using Z Plate Image plates from Mundo De Unos.


     This look went a little bit outside of my comfort zone with the color pallet and I found that I really like it. Maybe I've been playing it a little too safe all these years and need to venture outside the box more often.... hmmm that's something to think about.

     To create the decals I used the reverse stamping technique and pulled out my Simply Neat Miracle Mat and image plate Abstractos 4 using Hit the Bottle polish Absinthe. A shimmery green polish that reminds me of summer.


    Once the image dried to used my smallest dotting tool and filled this image in. For the center, I went with Sinful Colors Vibrant Vida and the "petals" I used Taupe is Chic part of the Trend Matters collection. A collaboration with Kylie Jenner and Sinful Colors nail polish.


     I've found that the easiest way to create decals is to use a non-quick drying top coat. You can read about my failed attempt at making decals in this post featuring Smoky Mountain Lacquers Radiant in Orchid.  Trust me it's not a pretty site and I learned a lot from that attempt. My favorite top coat to use for decals is Sally Hansen Double Duty. It dries reasonably quickly but stays pliable so the decals are easy to work with.


     Do you have any tips for creating decals? How about a favorite top coat to use? Let me know in the comments and as always Thanks for stopping by and Happy Polishing!


Friday, September 16, 2016

6:00 AM

Queen of Hearts Nail Art


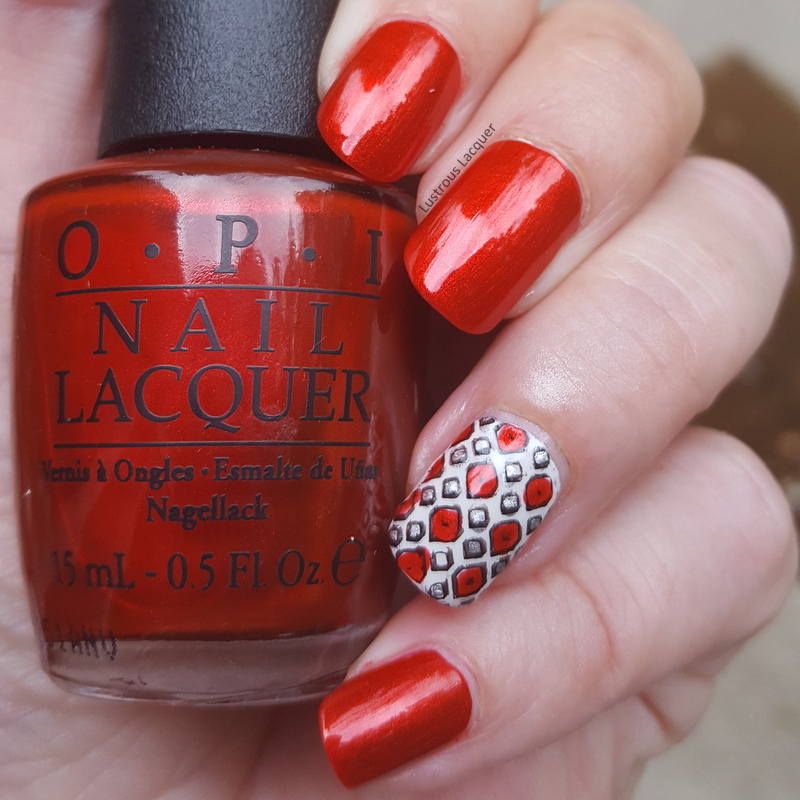
     I thought it might be fun to kick off the weekend with a nail art look on the blog. After all, I got into nail blogging because of nail art, not just swatching. I've titled today's look the Queen of Heart but probably not for the reasons you might think. First off, there isn't a single heart to be found, but the colors are what inspired the name. Black, red and white always brings to mind the unforgettable  cartoon character from Alice in wonderland to me. They are bold and striking together which makes an impact and classics to me. Plus, as you can tell from the theme of my blog I'm quite fond of the color combination. 


     When putting this manicure together in my head I wanted something bold and eye-catching. I knew the colors would stand out when put together so a simple accent nail would do the trick. 

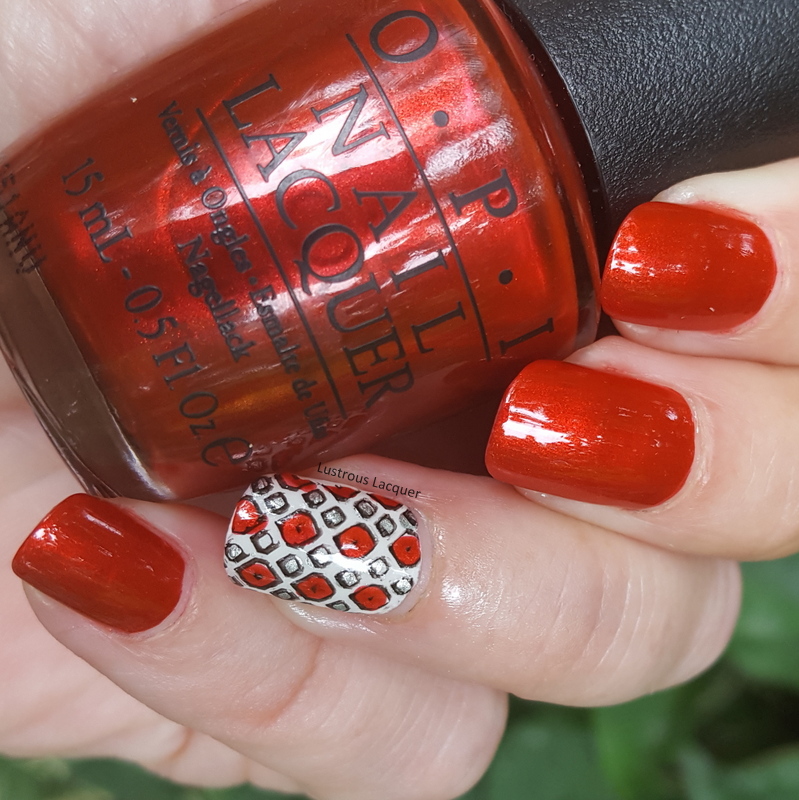
     I used OPI Die Another Day from Skyfall collection released in the winter of 2012 as my main color and Orly DayGlow on the accent nail. I could have opted for any of the white polishes in my collection but Dayglow has a hint of shimmer to it that I wanted to play off of the shimmer in Die Another Day. 


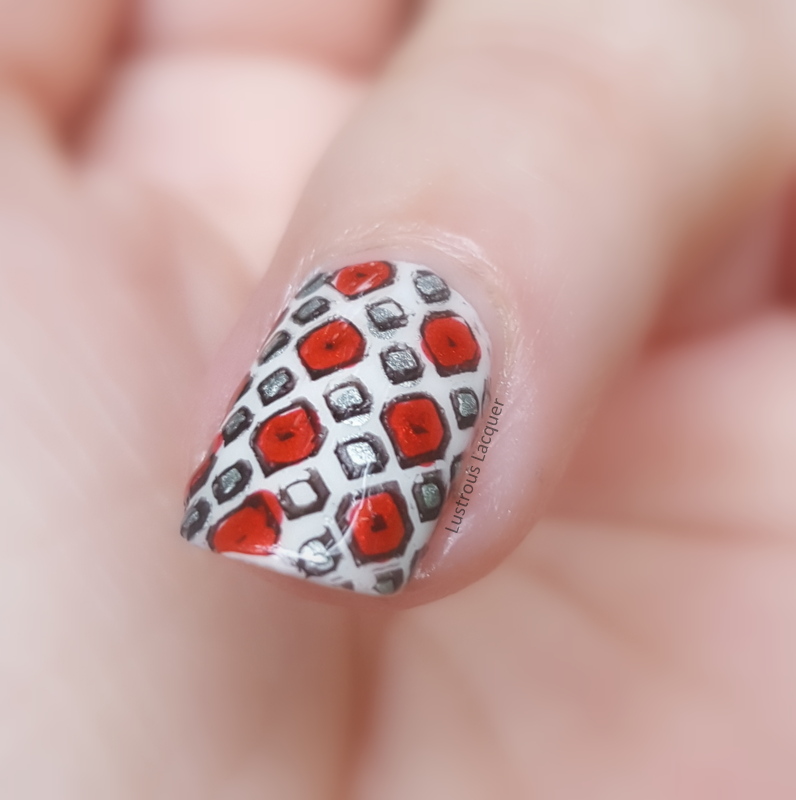
     The accent nail was created using the reverse stamping technique and my Simple Neat Miracle Mat (affiliate link) I know, I know I've raved about this mat before in a previous post so I won't do it again, but if you want you can certainly check that post out. The image is from Bundle Monster plate BM-223 and I stamped with Hit the Bottle As Black as Night. 


     Using my smallest dotting tool I filled in parts of the image using Die Another Day and Sally Hansen Silver Sweep. This was extremely easy to do without smudging my nails thanks to the Simply Set Tool Rests (affiliate link) I just picked up. If you're like me and tend to rush through to the nail art part before your base color is fully dry I encourage you to check them out. They make picking up my dotting tools or clean up brush worry free. And they are super cute too!

     I hope you enjoyed today's nail art look as much as I did. Tell me, what is your favorite color combination when you're feeling sassy or bold? Thanks for stopping by and Happy Polishing!


Friday, August 5, 2016

6:00 AM

Metallic Gradient with a Stamped accent


     Have you even be perusing Pinterest and stumbled across a pin that made you want to whip out your nail art supplies right then are there? Well, that's exactly what happened to me when I can across this pin. I loved the vintage look and feel of this manicure and the muted color scheme. Sadly it was the late hours of the night and my nail art would have to wait.  But as I lay there in bed supposed to be sleeping my brain just kept coming back to the manicure I was thinking of completely inspired by that pin. 

     I lay there for over an hour working out my color scheme, which plate I might want to use, and I knew that sleep would be impossible. Until I wrote my idea down that is. Which is exactly what I did. I ran to my desk, grabbed a pen and paper and jotted down the rough ideas I had, went back to bed and instantly fell asleep knowing my idea was safe from being lost to the hidden corners of my mom brain.  So what was this important manicure idea that caused my a restless night? Let's take a look

metallic-gradient-essie

    While I knew I didn't want to recreate that inspiration manicure completely I still wanted that muted earthy feel of the color scheme. I tossed around the idea of using 3 colors in the gradient, with blue adding a little pop of color but quickly discarded that thought. And I think I made the right decision. I like the way that Penny Talk and Good as Gold from the Essie Mirror Metallic's collection makes a subtle gradient allowing the blue in my accent nail to really pop.

essie-mirror-metallics-collection

      I should also mention that these metallic polish work best in a gradient if they are layered over a white base. I used Finger Paints Paper Mache as my base color. One thin layer was all I needed under the gradient but I used 2 on my accent nail for a completely solid base. And speaking of accent nails... here's a close up of mine!

Metallic-nail-art-gradient-essie

    I just love how this whole manicure turned out, but I'm mostly proud of the accent nail. I tried my hand at making my own decal again and it was so much easier using my Simply Neat Miracle Mat  (affiliate link) instead of just my stamper. Seriously this mat has made a huge improvement to my nail art process.  I feel like I have space to create looks and not worry about making a mess.  I'm getting a bit off track so I'll get back to how I created this look but seriously if you're looking at getting a mat for nail art I would highly recommend this one. 

   Ok so now that that shameless plug has been put in, back to the manicure. For my accent nail, I used MoYou London plate 03 from the Paradise Collection and Finger Paint Black Expressionism to create the outline. I then filled in the image with Penny Talk and Good As Gold trying to mimic the gradient effect in the petals. To get a small pop of color Blue Rhapsody also from the Mirror Metallics collection added the perfect touch. I topped it all off with Sally Hansen Double Duty which is the only top coat I've found that dries in a reasonable amount of time but is still pliable so that I can apply the decal to my nail without cracking. If you've been having the same issue with your decals give Double Duty a shot and I promise your frustrations will be over. Tuck that little tidbit away as my own little tip from me to you. You can thank me in the comments ;)

    I loved this manicure, I love the colors, the way the accent nail turned out but mostly I loved how proud of myself I was while wearing it. Because it was finally a manicure that turned out exactly how I pictured it in my head. And we all know that doesn't happen often for me. Now the only question I have for you is.... was my accent nail technique considered reverse stamping or just making a decal? I'm a little fuzzy on what the difference is and would love some clarification. Thanks for stopping by and Happy Polishing! 


Friday, March 25, 2016

6:00 AM

Hobby Polish Bloggers presents Spring


     It's time once again for the monthly link up brought to you by the Facebook group Hobby Polish Bloggers. This month's theme is spring! Now I know there are a lot of options to choose from and I could have done any number of things for this prompt but I just cant pass up an opportunity to do a floral manicure.  Now there isn't a whole lot to say about this manicure so this post is going to be short and sweet. Just what we need on a Friday right? 


    I decided to go with something simple yet classy for this manicure. I really like the clean look this manicure gave me. I started with a base of L'Oreal Charmed, I'm Sure and a generous layer of top coat. A neutral shade with just a hint of shimmer


     The rose is a water slide that I picked up from Born Pretty Store a few years ago and sadly, is no lover available. But I just checked their site and there are quite a few floral options to choose from. I don't know about you but I really like this finished look.  I think there is just enough contrast between the polish and the decal to keep it from being boring, but it's not in your face either.  I was tempted to add the flowers to each nail but I'm glad I kept it to just one. Anything more and I'd have lost the clean, classic look I was going for. 

     Well That's all I have for you today. I told you this post would be short and sweet. If you're looking for more information on Charmed, I'm sure I'll have that for you in a post next week. So be on the look out for that. And if you're going to place an order from Born Pretty Store be sure to use code LAUNX31 to get 10% off your entire order! In the mean time why don't you take a look at the other manicures included in the link up? Thanks for stopping and Happy Polishing!


Friday, July 3, 2015

6:00 AM

4th of July Fireworks


       I wanted to end this weekly dedication to 4th if July nail art with a bang. And what better way to do that than with Fireworks! Sadly this ended up as my least favorite manicure of the bunch and that's mainly due to the issues I had while creating it. 

     Let me tell you if something could go wrong it did, right down to me spilling my first bottle of nail polish all over my floor. Of course, it had to be a blue bottle of polish. Thankfully it was hardwood and not carpet so the sugar trick worked for cleaning it up, but I had to race upstairs with wet polish on my hands to get the sugar and that ended up looking like a comedy routine. I'm happy to report that the bottle didn't break and nothing ended up stained. But let's get to the manicure, shall we...


     I started everything off with 2 coats of Milani White on the Spot. I think my bottle must be getting old because it was 2 streaky, gummy coats. Even adding a few drops of thinner showed no real improvement. It might be time to let this bottle go, after one more try with thinner of course. 

     For my fireworks, I used Shandy plates SH04 and SH213 and made decals so I could have complete control over the placement. You would think after my recent Silver nail polish stamping comparison post I would have known which silver polish to use, but that didn't stop me from making 2 decals with Zoya Trixie after the first one was pretty much invisible on my nail. Lucky for me they didn't stick very well and I was able to switch to Sally Hansen Silver Sweep. It's not as sparkly as Trixie but you can see it and that's all that really matters. 


     For my red and blue, I used the same colors as my Patriotic French Tip Manicure with China Glaze Man Hunt and Seeing Red. That post, by the way, got me featured on Blogher's front page on Thursday. You can check out the new badge they gave me to show off over there in the sidebar, located just under the post archive. Getting that e-mail was a huge pick me up! I also notifications that both of my previous 4th of July looks had been recreated by readers. I'm not sure which one was more exciting for me, but the recreations felt more rewarding!


     Overall I don't think the final manicure is bad, just the experience was and I don't like it quite as much as my previous looks. And I still haven't decided what I'm going to wear on my nails this weekend! This is where I'm going to need your help. Should I wear the French Tips, The marbled accent, the Fireworks as is, or the Fireworks on a black base? Let me know what you think in the comments. Have a fabulous holiday weekend, stay safe and Happy Polishing!


Friday, May 15, 2015

6:00 AM

Hobby Polish Bloggers Presents: May Flowers


     On Monday I showed you my failed attempt at making my own decal and the feedback and suggestions I got was so great that I decided to try it again. I figured the Hobby Polish Bloggers May link up would be the perfect time since the theme is May Flowers.

     Now this is not my original idea but I loved the look and knew I needed to try it myself. The original manicure was done by  Nailartstampingmania. <----( click here for the original post.)  Here is my version.

Holographic-DIY-nail-decals

     I started with a base of Milani White on the Spot and while that dried I started on the decals. This was a long slow process for me as I had to make each decal one at a time. I only have one stamper that I like using at the moment. Good thing I was binge watching episodes of Heros on Netflix to pass the time. I love Netflix by the way, I get to watch all the shows I missed the first time around.

To create my decal I used:
Winstonia plate W-04 
 Zoya Black Swan
Parallox Polish April Holo from the April Subscription box 
 Zoya Penny
Sally Hansen Double Duty base/top coat
Small dotting tool


     As you might remember from my previous post I had a lot of trouble with the decal being stiff and hard to work with. I also had issues with it wanting to stay on the nail. That was because I used Seche Vite on the decal. A quick Dry top coat is what you want in most instances when it comes to nail art but not when making decals. Sally Hansen Double Duty was a dream come true for me. After letting it dry on the stamper for about 10 minutes I was able to easily peel it off, the decal was flexible, but not floppy and, adhered to my nail nicely.


     What a difference the top coat makes! What I once thought was a difficult technique is now so easy! I can see myself doing this over and over again. Of course I'll need to pick up a few more stampers so the process goes a bit quicker. But man o man am I impressed with my results. Now as much as I want you all to sit here and admire my work, it's time to check out what everyone else has come up with. Thanks for stopping by and Happy Polishing!


6:00 AM

Hobby Polish Bloggers Presents: May Flowers


     On Monday I showed you my failed attempt at making my own decal and the feedback and suggestions I got were so great that I decided to try it again. I figured the Hobby Polish Bloggers May link up would be a perfect time since the theme is May Flowers.

     Now, this is not my original idea but I loved the look and knew I needed to try it myself. The original manicure was done by  Nailartstampingmania. <----( click here for the original post.)  Here is my version.

Holographic-DIY-nail-decals

     I started with a base of Milani White on the Spot and while that dried I started on the decals. This was a long slow process for me as I had to make each decal one at a time. I only have one stamper that I like using at the moment. Good thing I was binge watching episodes of Heros on Netflix to pass the time. I love Netflix by the way, I get to watch all the shows I missed the first time around.

To create my decal I used:
Winstonia plate W-04 
 Zoya Black Swan
Parallax Polish April Holo from the April Subscription box 
 Zoya Penny
Sally Hansen Double Duty base/top coat
Small dotting tool


     As you might remember from my previous post I had a lot of trouble with the decal being stiff and hard to work with. I also had issues with it wanting to stay on the nail. That was because I used Seche Vite on the decal. A quick Dry top coat is what you want in most instances when it comes to nail art but not when making decals. Sally Hansen Double Duty was a dream come true for me. After letting it dry on the stamper for about 10 minutes I was able to easily peel it off, the decal was flexible, but not floppy and, adhered to my nail nicely.


     What a difference the top coat makes! What I once thought was a difficult technique is now so easy! I can see myself doing this over and over again. Of course, I'll need to pick up a few more stampers so the process goes a bit quicker. But man o man am I impressed with my results. Now as much as I want you all to sit here and admire my work, it's time to check out what everyone else has come up with. Thanks for stopping by and Happy Polishing!


Monday, May 11, 2015

6:00 AM

Smokey Mountain Lacquers - Radiant in Orchid


     How was everyone's weekend? Mine was busy busy and busy with some fun thrown in but now it's time for me to get back into the work week mindset. Today I have a pretty nail polish and a personal mani fail to share with you. Let's start off with the good stuff, shall we?

     Radiant in Orchid was released by Smokey Mountain Lacquers last year and I ordered it right away, but like a lot of the polishes I purchase it ended up in my helmer and forgotten. Until now that is. Radiant in Orchid is a dusty lilac creme that I thought would be perfect for this time of year. Especially since my lilac bushes are just starting to bloom and fragrance the air as I walk to and from my house. 


     The application was slightly tricky but that might have been because my bottle is over a year old and I didn't exactly mix it up really well after sitting for so long. This polish is sheer with the first coat and was prone to dragging when doing multiple strokes.  I was able to achieve full opacity after 3 thin coats. 

 As for my accent nail, well that's where the failure comes in for this post. I tried making my own nail decal for the first time and ran into a little trouble. I stamped the flip-flop image onto my stamper using Bundle Monster Plate BM-309 and Finger Paints Black Expressionism, filled in a few places with some striping polishes, added a top coat and waited for it to dry.


     While my decal was drying I painted 1 coat of Finger Paints Paper Mache on my ring finger and when it was tacky I added my decal. The only problem was my decal felt really stiff and didn't want to curve onto my nail. I thought a layer of wet top coat would help, but nope I was wrong.  The top coat made my base color mushy and it smeared over the sides of my finger when I pressed my decal on. 

     It was a fun mess to deal with let me tell you, and a little disheartening to be honest. I'm not sure if I let the decal dry too long or if it was the top cost I used. I haven't given up on this technique yet, but I'm not jumping at the bit to try it again soon. If you have any tips or tricks I'm all ears. Thanks for stopping by and Happy Polishing!

Monday, April 13, 2015

6:00 AM

Philly Loves Lacquer - Absecon


     Does anyone have a case of the Mondays? I had a very uneventful weekend but I'm still not ready to start the work week. I thought Id start out this week of posts with a polish I gave a sneak peek at on my page last week. Absecon was released by Philly Loves Lacquer as part of the Summer Down the Shore collection. Each polish in this collection held a special memory for Esther. Absecon is based off the Absecon Lighthouse in New Jersey.  Here's a little bit about this collection in her own words. 

"Growing up on the East Coast meant that most of my childhood summers were spent down at the Jersey Shore. From Atlantic City to Cape May, you could find me on the beach making sandcastles. With the Summer Down the Shore collection, I wanted to bring a bit of Jersey nostalgia back, so I picked all of my favorite places and used them as my inspiration for this summery collection."


     Absecon is a light icy blue with a hint of grey crelly polish with subtle linear holo that reaches full opacity in 3 coats.

Light-blue-holographic-nail-polish-from-Philly-Loves-Lacquer

    Application is easy and smooth with the first coat applying quite sheer. When I say smooth application I mean smooth application. I had absolutely no streaking which is impressive for such a sheer polish. 

  
     The holo effect in Absecon is not as strong as most holos but you can get a quick glimpse of the  flame effect in the right lighting. Unfortunately it decided to hide during the photo session and I wasn't able to capture it on film.


     And of course because I can't seem to wear just plain polish anymore I had to add an accent nail. If you've followed me for any amount of time you know I love floral manicures and I had the perfect item here to complete my look. 

     
      I picked these water decals up at Claire's a few years ago and they worked out perfectly. They add a little something to the manicure but still allow you to see all the sparkle. What do you think? 

     Absecon is still available for purchase if you'd like to add this beauty to your collection. You can pick up a bottle for $12 here. Thanks for stopping by and Happy Polishing!

Monday, December 15, 2014

6:00 AM

The 12 Days of Christmas Nail Art Challenge Day 8: Christmas Ornaments

     
     Monday brings us to the 8th day of the 12 Days of Christmas Nail Art challenge, with the theme being Christmas Ornaments. This year I went a totally different direction than last year's ornament theme with some water decals from Born Pretty Store. I would have loved to try my hand at free hand ornaments but my nails are kind of short right now and I didn't think I would have enough space to paint them.

     For this manicure, I started out with one coat of Milani White on the Spot as a base for my gradient. I then sponged on Sinful Colors Sugar Rush and Sally Hansen Silver Sweep to create my gradient. When that dried I added a quick coat of China Glaze Fairy Dust for added Sparkle. Christmas Ornaments have to sparkle after all!


     The water decals I used were from a variety of sets that I picked up last year. I used set BLE1755 on my pointer and pinky finger, BLE1754 on my ring finger and BLE1753 on my middle finger. I topped everything off with a generous coat of Out the Door.


     Right now Born Pretty store is running a sale where you can get up to 80% off select items. The same runs through Dec 17th, 2014 and you can use code MERRYXMASB10 for an additional 15% off your order. If you've had your eye on a few items I'd say now is the time to stock up!

     And now I think it's time to take a look at the designs everyone else came up with for today. Thanks for stopping by and Happy Polishing!


Friday, December 5, 2014

6:00 AM

The 12 Days of Christmas Nail Art Challenge Day 3: Snowmen

     Welcome to Friday and the third day of the Christmas Nail art Challenge. Today's theme is Snowmen.  For last year's snowman theme I did a traditional manicure and this time around I wanted to shake things up. Unfortunately, I was really stretched for time so while this isn't your typical snowman manicure, it didn't exactly test my nail art skills either.


      Trying to stick with my nontraditional color scheme for this challenge I started off with 2 coats of Carpe Noctem Literary Lady plus top coat. While that dried I tried to come up with the kind of snowman design I wanted to do and which colors I wanted to do it in. That's where I got stuck. Nothing I pulled out of my helmers seemed like the right polish to use and I was running out of time.


     And then I remembered I had these cute little snowmen decals that I picked up from Sally's last year on clearance. If you're looking for cute seasonal decals and stickers at a cheap price always go after the holiday has passed. You might not get the best selection, but the prices are pretty darn good! I don't know about you but I am all about saving those pennies.

     So there you have it my quick and easy snowman manicure for today's prompt. I'll see you back here on Sunday with my Santa/elves manicure but in the meantime make sure to check out the other snowmen manicures from today. Thanks for stopping by and Happy Polishing!


Wednesday, October 22, 2014

6:00 AM

Newspaper Nails with Born Pretty Store Decals

    
     Raise your hand if you want to see some nail art today! Did I get anybody to raise their hand? You'll have to let me know in the comments if you did. Today I have for you a manicure featuring another technique I've been wanting to try for a while now. The Newspaper nail.
     I actually found a kit from The New Black on clearance at TJ Maxx that was meant for this exact technique. Of course, I snatched it up because I'm all about making nail art easier.


     Let me just save you the money right now and tell you not to buy it. It's a gimmick that actually adds extra steps. Take that transfer solution for example. You're supposed to apply it to your nails, place the newspaper on your nail while it's still wet, Apply another layer of the solution on top and then place a cotton ball soaked in rubbing alcohol on top of that.  Umm, excuse me? Who has time for all of that!

     I did use the base color provided in the kit because it has that old worn out paper look that I was going for. I hate to say it but I'm not entirely sure what the name of that color is. The label on the bottom is printed really small. I think it's called Gold Grenade.

     After letting that dry completely I dipped each finger in rubbing alcohol and pressed sections of newspaper onto the nail. This turned out to be a little trickier than I had expected since the paper wanted to stick to my fingers more than the nail and moved a little as I tried to evenly disperse the pressure. But here is my finished result.

newspaper-nails-manicure

     Not bad but a little plain, and remember that old worn out paper feel I mentioned earlier? I really like the look of vintage manicures and decided that some flowers would complete my look.

Floral-newspaper-nails

     This was my first time using water decals. These are #G065 from Born Pretty Store. Apparently, the directions weren't exactly as clear as I needed them to be. I put the first one on backward! So off to Youtube, I went to see what I did wrong. Can I just say Thank God for Youtube and all the nail art vloggers out there! They sure have saved me on more than one occasion. 


     I'm really happy with how this all came together. It has that vintage feel that I was going for. I lucked out that the colors of the flowers played nicely with my base color.

     Have you had good luck with water decals? I'd love to hear about your experiences good or bad. If you'd like to purchase these exact decals you can follow the direct link here G065 and use code LAUNX31 to get 10% off your order. Thanks for stopping by and Happy Polishing!


Monday, July 28, 2014

6:00 AM

Darling Diva- Soubrette

   
     Today I have a beautiful polish from Darling Diva to share with you. Soubrette is a deep purple linear holo polish with flashes of teal, blue, purple, pink and yellow. Soubrette is part of the super multi-chrome holo collection and is available for sale on Big Cartel.

Darling-Diva-Soubrette-Mulit-Chrome-Linear-Holographic
The photo was taken in my lightbox
      Here I've used 3 coats of Soubrette plus top coat. I added a decal from Sally Beauty supply as an accent nail. Soubrette is so pretty on its own I didn't want to distract from it with too much as an accent.


Darling-Diva-Soubrette-Multi-Chrome-Linear-Holographic
The photo was taken in direct sunlight
      I love a good linear holo and Soubrette is no exception. The application was smooth and easy with complete control of where the polish went. It is a little on the sheer side but builds up nicely.

Mulit-Chrome-Linear-Holographic
    
     Of course, I had to include a macro shot of that holo. Just look at the sparkle!

Multi-Chrome-Linear-Holographic-Nail-Polish

The photo was taken in shade with natural light
     And of course, we can't forget about the color shift. For me, I was only able to truly capture the shift from teal to blue to purple with my camera. I was able to see some of the pink and yellow on my nails but it wasn't as intense as the other colors.

Mulit-Chrome-Linear-Holographic-Nail-Polish

          Be sure to check out Darling Diva on Facebook, twitter and Instagram to keep up with all the latest news about sales and collections.

     So what do you think of Soubrette? Are you going to pick up a bottle of your own?  Don't you just love that last picture! It's my favorite and I knew I wanted to add it to the end. Thanks for stopping by and Happy Polishing! 


Like what you see? Share it with your friends!

