Wednesday, November 27, 2013

8:31 AM

Beginning Blogger's Bootcamp Information

     Hi, there polish lovers! Today I wanted to take the opportunity to pass along a little information to you. Over the last few weeks, I have been pouring over a series of post by Will Paint Nails for Food.
Meghan the clever blogger behind the blog is hosting a Beginning  Blogger's Bootcamp. The Bootcamp consists of weekly posts, each one dedicated to different aspects of blogging.

     I have found these post to be extremely helpful even after running my own blog for a year now. I don't know how many of you have tossed around the idea of starting a blog of your own, or maybe you're like me and are looking for ways to improve. I personally tossed around the idea to start a blog for 3 months before I took the plunge. And I'm not too ashamed to admit I was a bit overwhelmed and still am at times. That's why I wanted to help get Meghan's information more exposure.

     These are the links to the posts that have been published so far.

Week One: Starting your blog
Week Two: Blogging Platforms
Week Three: Blog Design
Week Four: Taking Nail Photos
Week Five: Editing Nail Photos
Week Six: Developing Unique Content and Building a Following
Week Seven: Working with Brands and Writing Reviews
 

     Now I know that was a lot of information contained in those posts. And by now if this is something you're interested in you've followed her blog. But so I can have all the information contained in one tidy little place I will probably follow up and add the remaining links when they are posted.

      I hope you have found this little post interesting, and ask that if you've found the posts to be helpful to let Meghan know. I know I will be giving her many thanks myself. I'm sure she has put in a lot of hard work over the last few months to put all this together.

     Thanks for stopping by and Happy Polishing.


Monday, November 25, 2013

7:22 AM

What's in a finish?- Jelly


     Today on the What's in a finish series I take a look at the Jelly finish. So what is a jelly finish? Well, Jellies are like glazes and are basically pigment added to a clear base. They are often described as having a "squishy" texture. You might notice that a lot of glitter polishes have Jelly bases making them great for layering on their own or over a cream polish to give it a little extra Pizazz.

Photo Credit: Hot Pink Aurora
 
Loreal Tweet Me
Loreal Tweet Me

     Because Jellies are usually made in a clear base they tend to be sheer but have an extremely glossy finish. However, if you're looking for full opacity be prepared to apply several coats. One trick to avoid adding 5 layers (or more) of polish to your nails would be to use a similar color creme polish as "undies".

     Many nail Bloggers use Jelly polishes in what's called a "Jelly Sandwich" manicure. You need 2 polishes to make a jelly sandwich. The first one being the jelly polish to be used as the "bread". Normally this is a pigment only jelly. The other polish used is a glitter polish for the "meat".  A chunky glitter typically gives you more dramatic results, but any glitter would work.
  
Photo Credit: Goose's Glitter
     So what do you think of the Jelly finish? I only have a few in my collection and have yet to do a jelly sandwich. I should probably give it a try one of these days. If you missed the previous posts in this series you can catch up by following these links: Creme, Matte, Shimmer, Suede, and Satin. Or if you have questions about a finish I haven't covered yet, feel free to ask about it in the comments and I can make it the next one in the series. Happy Polishing!

Friday, November 22, 2013

8:45 AM

Cameo Colours- Indian Summer


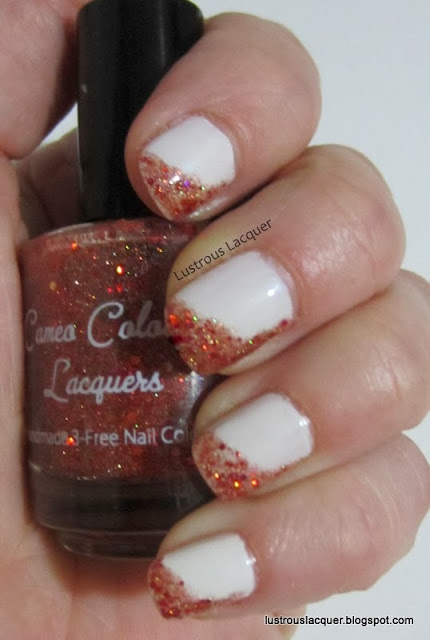
    Today's NOTD post is Cameo Colours Indian Summer. An intoxicating mix of red, gold, and copper colored glitters in a clear base, that look like sparks on your nails. I know I say I love a lot of the polishes I use but this one I love times 10. Depending on the lighting this polish can look red, orange or even a fiery shade of brown.

     The first time I wore this polish I attempted a twist on the glitter tipped manicure. I wasn't exactly happy with how it turned out but I'm going to try this look again, just with a different application.

Cameo Colours Indian Summer Orly Dayglow
Photo was taken in incandescent light

     For this look, I used Orly Dayglow as my base and sponged Indian Summer over the tips and down the side of my nail. I didn't get much fading of the glitter and I think that's why I'm not super thrilled with this look. But I do like the way these colors work together. I wore my nails this way for a day and then decided to add Indian Summer over the entire nail.


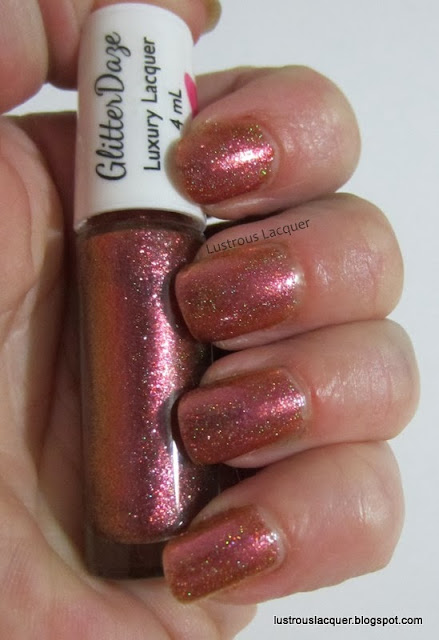
Photo was taken in natural light
     This is two coats of Indian Summer over white plus top coat. We had a semi-decent day here and I was able to take a few pictures outside. Unfortunately, this photo does not do this polish justice. I lost a lot of the sparkle with the natural light. But I was able to capture the way the individual glitters sort of "pop" within the polish. The first photo showed more of the sparkle. The application was pretty easy. There was no need to fish for any glitter and it applied pretty evenly on the nail. I did do some slight glitter placement on the second coat to cover a few sparse patches.

     Cameo Colours polishes can be purchased through her store. Prices range from $8 to $10 depending on the polish and come in a 15 ml bottle.

     Thanks for stopping by and Happy Polishing everyone! 


Wednesday, November 20, 2013

10:48 PM

The Versatile Blogger Award


     Holy cow, everyone, I was nominated for the versatile blogger award! This one, to be honest, is a complete shock to me. I still think of my blog as a little hobby and I need to start realizing that I reach more people than I think.


   Giving Thanks, I want to thank first and foremost Kagome Jaclyn Lam of Aisuru Nails for nominating me. Thank you so so much!. If you have yet to check her out then please do so soon! She is talented and amazing

What is the Versatile Blogger Award?
    The VBA honors those bloggers who bring something special to your life whether it's every day or only now and then.
Versatile Blogger Award rules:
If you are nominated, you’ve been awarded the Versatile Blogger award.
  • Thank the person who gave you this award. That’s common courtesy.
  • Include a link to their blog. That’s also common courtesy.
  • Next, select 15 blogs/bloggers that you’ve recently discovered or follow regularly.
  • Nominate those 15 bloggers for the Versatile Blogger Award — you might include a link to their page/blog and let them know they've been nominated.
  • Finally, tell the person who nominated you 7 things about yourself.
My Nominations

     I apologize if you've been nominated before. I just wanted to recognize the bloggers who have helped me, inspired me and made me feel welcome in the blogging community.
  1. Erica's Nails and More
  2. Xoxo Jenn
  3. My Daily Nail Designs
  4. Breezy the Nail Polish Lover
  5. Naked Without Polish
  6. Get Nailed Here
  7. Polished Away
  8. Pointless Cafe
  9. The Holographic Hussy
  10. Set in Lacquer
  11. The Polish Well
  12. A Polish Addict
  13. Oh So Lacquered
  14. Crystal's Crazy Combos
  15. I <3 Pretty Polish

7 Things About Myself
  1. I drink more Mt. Dew in a day than a normal person should. I can easily put away a 12 pack.
  2. I have no idea how to apply makeup or style my hair. 9 out of 10 days it's up in a ponytail and I have no make-up on my face.
  3. I need to learn how to apply makeup and quickly because I've been given the opportunity to review a not yet on the market eye pallet. Yep, that's right, my blog will be branching out every now and then to cover more than just nail polish.
  4. I was nominated for this award on my 1-year blog-aversary. That made this nomination even more special.
  5. I love to sing and have a semi-decent voice, but will only sing around my family or people I'm extremely comfortable with. I have horrible stage fright, I can't even talk in front of a group. I'm too worried about being judged. Not the best quality for a blogger to have right?
  6. Ironically enough both my parents were theater majors and my little sister travels all over the world giving speeches about her company project.
  7. I went into labor with all 3 of my children on a Wednesday, but my eldest was born in the wee hours of Thursday morning.

Monday, November 18, 2013

11:04 PM

What's in a finish ?- Suede and Satin


     Today on the blog I take a closer look at the Suede and Satin finishes.

     First up is Suede, often mistaken for a matte finish polish, the suede finish is it's newer hipper cousin. The one characteristic that sets a suede finish apart from the Matte is a slight shimmer to the polish without a shine.

Photo Credit: mariasnailblog.blogspot.com

     Generally, the suede finish requires less maintenance than a matte because it is slightly more durable. I would still add a matte finish top coat for added durability. What people tend to like most about the suede finish is that it gives a smooth, luxurious look.

     Some people will also call this a Satin finish but satin is yet another polish finish to add to the list. Finding a happy medium between a Matte and Suede finish the satin look has a slight shine but no shimmer. If looking quickly it is easy to get these two mixed up or think they are the same finish.

Photo Credit: letthemhavepolish.com


     As you can see the Satin finish has an almost waxy look. Over the last year, I have noticed this finish gaining popularity and a few polish makers have started offering a "wax" top coat that will give any polish this look.

     Thanks for stopping by and don't forget to check out my previous posts in this series where I break down the characteristics of a creme, matte, and shimmer finish. Happy Polishing!


Friday, November 15, 2013

7:31 AM

China Glaze: Heaven


     Hello, my fellow polish lovers! For today's NOTD post I dug into the archives with China Glaze Heaven. This is my go-to polish when I'm in the mood for a french manicure or the ever-edgy French Twist.  For me, this polish has the perfect amount of shimmer and just enough color for an almost nude base.

China Glaze Heaven

     This is 2 coats of Heaven without topcoat. The application can be a bit tricky with this one because the polish is pretty thin. I would recommend thin coats to avoid pooling at the cuticles.


    I did this manicure over a year ago and it's still one of my favorites. This is what I had to say about it at the time:
"This is the mani that I am so proud of! Base color is CG Heaven. Tips are done in Orly glitz. The black and white stripes are Kiss nail stripers. The dots I made with a dotting tool and Milani Black Swift. I did the entire thing free hand. I started out recreating the design I did on one of my nail wheels and ended up changing it as I went along. The white was a complete after thought. I think it's fun. It has a slight animalistic feel to it but also looks sort of elegant at the same time. As of right now this is the favorite design Ive ever done and I'm one happy girl!"
      If you're still on the lookout for a great "natural nail" color polish I would suggest giving Heaven a try. Thanks for stopping by and Happy Polishing!

Wednesday, November 13, 2013

10:19 AM

Glitter Daze


     About a month ago I was given the opportunity to purchase some GlitterDaze polishes at a discounted blogger price in exchange for my honest review. GlitterDaze polishes are 5-free, hand mixed and not tested on animals. Polishes are available in full size (15ml) and mini (4ml) and can be purchased here. Prices range from $6.50 to $11.50 depending on the polish and size of the bottle. I love how the store listings include a little story about each color. I think it adds a personal aspect that you don't find with every indie polish line.

     The polishes arrived quickly and came wrapped in pretty pink tissue paper. The packaging was so cute I couldn't help but take a picture of it.


    Here's a quick picture of the colors I chose to review. I tried to go for colors that were different from what I already have in my collection. But between you and me, I have a hard time staying away from the sparkly shimmery polishes.

 GlitterDaze Polish
     

     First up I have Twilight in Tucson a holographic mulitchrome polish that shifts from orange to pink.
"Twilight in Tucson is a holographic mulitchrome polish, which shifts from pink/red/orange/yellow with a hint of light purple. This polish is based on the sunsets in  Tucson, Arizona on a hot summer evening in the lush Sonoran Desert."

  
GlitterDaze Twilight in Tucson

     Here I have 2 thin coats of Twilight in Tucson without topcoat. The application was smooth and even. My bottle had a slightly wonky brush but I think that might have been a fluke since this was the only polish that had that problem. The polish dried to a nice smooth finish and as you can see I was able to capture a few flashes of green within the polish along with the other colors.

GlitterDaze Twilight in Tucson macro
         
     The macro shot really captured all the colors that make an appearance in this polish.

     Next up is A Boardwalk to Remember. This polish turned out to be my surprise favorite of the 4. Multi-sized hex glitters in neon pink,  neon purple, and neon blue combine flawlessly in a clear base.


"A Boardwalk to Remember was inspired by long summer evenings, when the sky is a swirl of pink and purple, and the reflection on the ocean gives the water a dark blue hue."


Glitterdaze A boardwalk to Remember
     Shown here is 2 coats of Boardwalk layered over a white base without top coat. The application was extremely easy with no fishing for glitters required. I did, however, do a little placement to get even coverage on my nails.

GlitterDaze A Boardwalk to Remember Macro

     Look at how fun this polish is! I really wish I had waited and swatched it last so I could wear it as a full manicure.


     Next, I have Jetsetter Lifestyle. A linear holo in an exquisite periwinkle blue.
"Jetsetter Lifestyle was inspired by the beautiful view when you look out of the airplane window in the evening; a dust blue sky with setting sun shimmering on the clouds-breathtaking, just like this polish! A cloudy light blue nail polish with glints of pink shimmer with a linear holographic finish."
GlitterDaze Jetsetter Lifestyle
 
     This is two coats of Jetsetter Lifestyle without top coat. The holographic effect was stronger in person, but my camera had a hard time capturing the true beauty. The application was flawless and dried to a smooth, shiny finish.

GlitterDaze Jetsetter Lifestyle macro
  
     This polish was seriously breathtaking. It would have to be my second favorite out of the 4. The slightly purple undertone makes this one stand out from the other light blue holos I've come across in the past.

     Last but not least I have pictures of Nightfall in NYC. A holographic duochrome with a strong orange to purple shift.
"Nightfall in NYC is a holographic multichrome polish, which shifts from blue/purple/red/orange. This polish is based on the sunsets of New York City and truly captures the beauty of night falling over the New York skyline."

GlitterDaze Nightfall in NYC

     This is 2 thin coats if Nightfall without top coat. The application was again flawless. The polish dried to a smooth, shiny finish.

GlitterDaze Nightfall in NYC macro

     I had a hard time capturing the purple color shift with my camera, but it was apparent in real life. You can get a glimpse of the purple shift in the bottle on the previous photo. When I had my fingers at certain (unphotographically friendly) angles the purple was stronger making a fun element to this polish.

     All in all, I am very happy with the polishes I picked out, the quality was consistent with all 4 polishes. It was a lot of fun browsing through the selections and reading the descriptions. I like knowing how an artist was inspired.


    The other thing that sets GlitterDaze apart from all the indie polish lines is her rewards program. There are 2 ways of earning rewards points once you become a registered customer. One way is by making a purchase, the other is to rate the products. The points can then be used to earn discounts on future purchases or even a free polish! Hows that for customer appreciation!

     There are several ways to keep up with news from GlitterDaze. You can follow the blog, like them on Facebook, check out the shop, or sign up for the newsletter.

     I really hope you liked this post, thanks for stopping by and checking it out. Id love to hear your comments on these polishes, or if you love a GlitterDaze polish that you think I should check out. Happy Polishing!
 *The polishes in this post were purchased by me at a discounted price in exchange for my honest review. All opinions and photographs are my own.*


Monday, November 11, 2013

7:03 AM

What's in a finish? -Shimmer


     For this post, I'm going to take a closer look at the shimmer finish. When I was a little girl I was in love with this finish. I have to admit that about 90% of my collection consisted of shimmer polishes when I first started out. To this day I'm still drawn to them on the store shelves. So what is it about these polishes that have me transfixed?

     A shimmer polish is most commonly spotted by the very fine metallic or sparkly particles mixed evenly in the base color. Ordinarily the base color and "shimmer" color have been in the same color family for a subtle feel but recently, polish makers have been combining contrasting colors, giving the polish more character.  The typical color balance of a shimmer polish has more pigment than shimmer giving these polishes a "lit from within" look.


Shimmer polish with subtle shimmer Revlon Captivate

Photo Credit Stylecraze. Shimmer polish with contrasting colors

     The Shimmer finish is almost a popular as the creme finish but that's not all they have in common... Similar to a crème finish shimmers dry to a smooth, shiny finish. However, the opacity level can vary. I own some that reach full opacity in 2 coats and others that can take 4 or 5.

    Some say there is a sub-category to the shimmer polish called Micro Shimmer but everything I read about this subcategory seems to have the same description as a regular shimmer. I'll have to do a little more research on the subject and will update this post if I find something new.

    Are you still wondering why shimmer polishes hold a soft spot in my heart? The short answer is they sparkle and women like sparkly things. Besides how can you not feel pretty when your fingers sparkle?


     I hope you've enjoyed this post and will come back to check out the next one in this series when I take a look at the suede finish and how it's different from a matte finish.

Thursday, November 7, 2013

7:24 AM

(S)He Picks my Polish -November Challenge


      Hello everyone and welcome to the November edition of the #hepicksmypolish challenge.  This month we decided to mix things up a bit a do a she picks version. My idea for this manicure kind of came about accidentally. The other day I posted on my FB page about wearing a lot of blue polish lately and asked for a color suggestion. I got 3 responses and decided to use them for this challenge.

     The color suggestions were green, orange and pink. The easy this to do would be to use the green as the base and make pink and orange flowers. I didn't want to do an easy everyday manicure. Then I remembered a post I read from Anita of intensepolishtherapy about an amazing gradient she did. If you click on the link you can view her post.

     I used Zoya Josie, Jancyn and, Jolene for my colors. I just realized that all 3 start with J as I typed that. That's kind of funny! =)  I should also mention that I used Milani White on the Spot as a base because I really wanted my colors to pop.

Zoya Gradient

     I think my ring finger turned out the best but I'm pretty happy with the entire manicure. Clean up was a huge PITA though. I wish I had been able to do a better job with that but my poor fingers couldn't take any more acetone.

     
     I think I may have lucked out this time with colors that paired so nicely with each other. This is a manicure I can see myself wearing again in the summer months or anytime I need a pick me up from those winter blues.

     My daughter wants to pick my polish colors for me next time so I should have another post like this one later in the month. I hope you enjoyed this post. If you'd like to participate you're more than welcome. And don't forget to see what the other ladies did for the challenge this month. Happy Polishing!


Wednesday, November 6, 2013

8:11 AM

Put Up Your Dupes - Zoya Thandie vs Sally Hansen Sun Kissed


     About a week ago someone posted on facebook asking for a comparison of Zoya Thandie and Sally Hansen Sun Kissed. It just so happens that I have both polishes in my collection so I quickly swatched them and posted a pic on their page. I soon realized that I haven't done a comparison post in a while and really should share my findings with all my lovely readers.

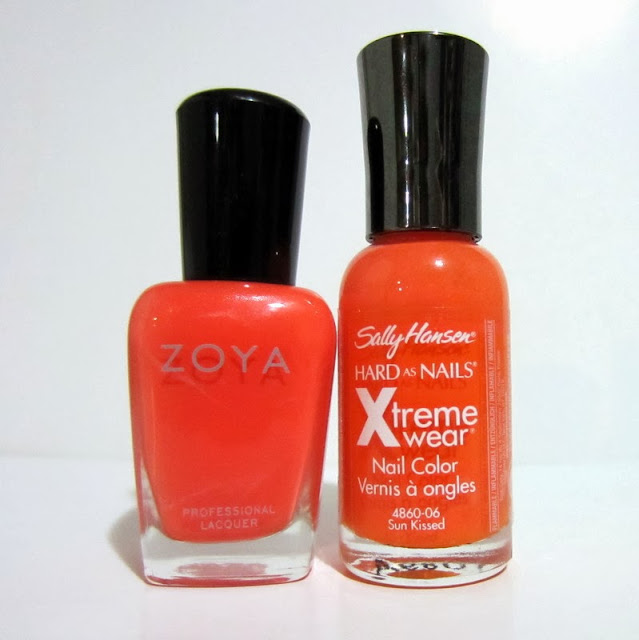
     As you may have noticed I like to start these post out with a bottle shot. I'm sure most of you have had a polish look one color in the bottle and look different once it dried on the nail.

Zoya Thandie Comparison Sally Hansen Sun Kissed Comparison

     Just looking at these two in the bottle I thought that they were extremely similar. The slight difference being that Thandie has an almost pinkish undertone that becomes more obvious when placed next to Sun Kissed. The one time I wore Thandie I did notice a touch of coral to it. You can see Thandie on my nails here.

     But how do the polishes compare when they are dry? Well, let's take a look...


     The coral influence in Thandie is very apparent on the nail wheel while Sun Kissed has more of a "true orange" look to it. In the end, these colors are not dupes. In fact, I might not go as far as to say they are similar either because of the different undertones.  Thandie being pinker and Sun Kissed being more yellow. (That might just be me though. My job, after all, is to look at paint samples all day and tell people what's different about them and why one would look better in their space vs the other.) I'm sure lots of people would consider these polishes similar. Do you need both in your collection? I'll leave that up to you to decide.


The differences in the bottle are less noticeable than on the nail

     As far as application goes both polishes flowed off the brush nicely. Thandie was closer to full opacity in one coat but still had some slight streaking. Full opacity was reached after 2 coats for both polishes. And the final result was a smooth shiny finish all around. I don't really have a favorite out of these two, to be honest. I can see using Sun Kissed for a Halloween manicure and Thandie in a sunset gradient.

     Am I crazy for not considering these polishes to be similar? Would you buy both to have in your collection?  Do you have any requests for comparison posts? If I have the colors I'm more than happy to put a post together. Thanks for reading my post. Id love to hear your thoughts on these two. Happy Polishing!


Tuesday, November 5, 2013

4:01 PM

What's in a finish?- Matte


     For this installment of What's in a finish, I take a closer look at the matte finish. If you missed the first post in this series you can see it here where I talk about creme finish polishes.

      So what is a matte finish? Well, the easiest characteristic to spot is the lack of shine. Matte polishes usually dry quickly and can be streaky. While this is a newer nail trend it does have some downsides. Some companies recommend skipping the base and top coat to get a truer matte finish leaving the polish more vulnerable to chipping.


     Many companies are now offering a matte finish top coat that can help your manicure last longer and turn any nail polish into a matte finish. I would avoid hand lotion if you want to rock a matte look manicure as the lotion tends to ruin the effect.

     I have heard that you can add cornstarch to a bottle of nail polish to turn it matte. I have not tried this myself and don't really recommend it, to be honest. Especially since I don't know if it will work and you can get the same look by using a matte finish top coat.

     Until recently all matte polishes were pure color polishes. Meaning they had no additives for sparkle or shimmer. With the increasing popularity of the matte finish, companies are starting to offer a wider variety. Orly recently came out with their matte finish flakies.


     While the flakies do give off a flash when the light hits them, they still dry to a dull matte finish giving an entirely new look to the flakies top coat.

     So what are you're thoughts on the matte finish? Have any of you tried the cornstarch trick and willing to share? As always thanks for stopping by and Happy Polishing!


Like what you see? Share it with your friends!