Showing posts with label Maybelline. Show all posts

Friday, February 2, 2018

6:00 AM

Groundhogs Day Prediction 2018 - I'm hoping for spring!


     I'm posting outside of my regular schedule for a special reason today. The members of The Stamping Shop group on Facebook have gotten together for a fun little collab for Groundhogs day and I thought it was a fun idea. Everyone who participated did a manicure with what they thought Punxsutawney Phil’s prediction would be. If they thought he would predict 6 more weeks of winter you did a winter themed manicure, if you thought he would predict an early spring you did a spring themed manicure. I am desperately hoping for an early spring. I've got the urge to go camping already and am over the cold temps of my Minnesota winter. It's been a mild one for snow but the temps have been brutally cold. And I'm cheating a little bit because I did this manicure back in early November but didn't have an appropriate time to share it until now. Hence the lush green grass for my background and beautiful sunlight to capture the shimmer. Oh, spring....hurry up and get here, I miss you!


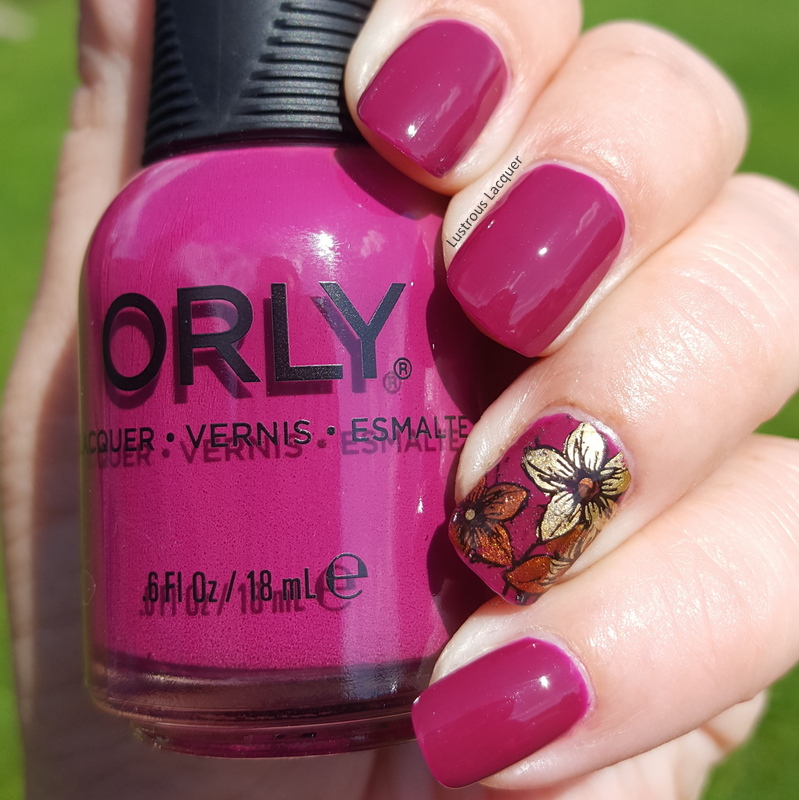
     For this manicure, I started with a base of Black Cherry from the Orly Velvet Dreams Collection. This deep rich color was the inspiration for my entire manicure and has started a slight obsession of polishes similar to this. You might remember I recently shared with you Con Artist from Nvr Enuff another polish in this color family. Plus I may have ordered a few more recently that will be on the blog soon.


      For my accent nail, I went with the advanced stamping technique using Hit the Bottle As Black as Night and a plate I ordered from Amazon called Flowers 01 by Meidus. Sadly this plate is currently out of stock with no date for when it will return.


     To fill in my flowers I used Maybelline Bold Gold and Milani Bijou Bronze. I just love this color combo! Sadly it was really humid in my house when I did this and it caused my top coat to bubble. I guess I learned my lesson about painting my nails when the dryer has been running all day. For clarification, my office now has to share space with my laundry room. We recently bought new machines, they are bigger than our previous set and no longer fit in the same space. Our solution was to flip the hookups to the other side of the wall and move them into my office. The result is no more swatch fests on laundry day. That's all I've got for you today, Thanks for stopping by and Happy Polishing!


Tuesday, November 7, 2017

6:00 AM

Gold Nail Polish Stamping Comparison


     Even though I haven't been blogging lately doesn't mean I haven't been painting my nails and trying new things. I still don't have a lot of time to devote to blogging but I'm trying to work it back into my schedule and share some things I've been working on. For right now my plan is to get 2 posts up a week on Tuesdays and Thursdays until things settle down on my end and I can devote more of my energy to the blog. I thought a comparison post was a great way to start things off and let people know that my blog is still here.

    We all know that stamping plays a big part in nail art and people are always on the lookout for regular polishes that work for stamping. Helping people find those rare drugstore brands that stamp well was the idea behind my stamping comparison series. Sadly, I drifted away from it while trying to work on my swatching and polish reviews. Now it's time to get back to the fun stuff, comparisons and nail art!

     The polishes I'll be comparing for you today are Finger Paints She's a Beaut, Essie Good as Gold, Hit the Bottle To Have and To Gold and Maybelline Bold Gold.  I decided this time around to show each color over black and white using an image from Uber Chic Plate UC 10-02


    As you can see each of the polishes I picked worked well for stamping. Yay! But there are subtle differences to each one. For example To Have and to Gold from Hit the Bottle is more of a yellow gold and She's a Beaut from Finger Paints is the lightest.


     I have to say out of the 4 polishes used I like Essie's Good as Gold the best because of the color and vibrancy.  It looks the most like gold in my personal opinion and works the best over both black and white. Although the Maybelline Bold Gold is a close second. 


     Which one is your favorite? Do you have a gold polish in your collection that works great for stamping? Let me know in the comments. And don't forget to check out my previous stamping comparison posts of Black, White, and Silver. Thanks for stopping by and Happy Polishing!

Friday, February 5, 2016

6:00 AM

40 Great Nail Art Ideas- Aqua or Turquoise


     It's time for another look from the 40 Great Nail Art Ideas Challenge! I don't know if you know this but I am actually really enjoying this challenge. Normally I get stressed during a challenge and struggle to get my looks done. But not this time! And you want to know why? This challenge is set up a bit differently than most. For starters there is the option to do weekly manicures with one week dedicated to themes, and one to colors. Or you can do every other week and stick with themes only or colors only. For the color portion of the challenge each person is also assigned a pattern. The end result is 40 different looks all done in the same colors. As most of you know I opted to do the color challenge and you can see my previous looks using TealOrange, Purple and GreenBlack and WhiteGreyGlitter toppersPale Blue and 3 shades of Purple.  This posting every other week is just my speed and helps keep me relaxed and stress free for the challenge. 

     This week the color theme is Aqua or Turquoise  and my pattern prompt is water color. The water color technique is one that I love but have been afraid to attempt until now. And to be completely honest this is one look that I didn't nail, but now I have a little more confidence and look forward to trying again. After I watch a few more YouTube videos on how's it's done of course. 


     For this manicure I started with Parallax Polish Arctic Ice from the newly released Secret of the 7 Seas Collection. You know how I mentioned watching some Youtube videos on how to do the water color manicure, yeah I probably should have watched a few before I attempted this manicure. I had no idea really what I was doing, but I jumped right in! I used the same technique as I did for my black and white swirl manicure from earlier in the challenge. 


    Doing one nail at a time I placed random dots of Milani Fresh Teal and Maybelline Day Glow Teal on the nail. Then I took a nail art brush dipped in acetone and dabbed at the center of the dots. I was going for a more translucent look for the centers rather than removing the color completely but as you can see that didn't work out. And I knew the more I tried the more frustrated I would become and end up ruining the whole thing. We've all had days like that right?

    
     While this manicure didn't turn out exactly as I planned I still like it. Its kinds funky and fun, and very different from any manicure I've done before. Next time I try a water color manicure I'll be sure to use a few more colors and overlap the dots a bit more. See if I can get it to look a bit more like floating bubbles. For those of you who have successfully done this technique, do you have any words of wisdom or tips for the water color novice? Let me know in the comments and then be sure to check out the other looks created for the Aqua or Turquoise challenge. Thanks for stopping by and Happy Polishing!


Friday, October 9, 2015

6:00 AM

40 Great Nail Art Ideas - Teal


      Today is the start of a 52-week nail art challenge put together by the Crumpet. Now I know what you might be thinking.... but Katie, you're not posting very much lately. How the heck are you going to pull off a 52-week challenge? Want to know the secret? I only have to post every other week. That gives me two weeks to get a mani painted and a post done, and that should help get my mojo back. 

     The first prompt I am doing is teal. Now all the other ladies will be doing teal manicures also but the catch is we each have a different pattern. I can't wait to see what everyone comes up with, but first, let's get to my manicure.


     For the teal color, I went with Maybelline Antique Teal from the Vintage Leather Collection. A matte finish dark teal with scattered flakies. The application was a little tricky when doing multiple strokes on one nail. The flakes wanted to drag and cause streaks. I had no issues with dragging when only doing 3 strokes per nail. You might notice that the flakies are highly visible in the bottle but on the nail, they tend to disappear. 

     However, it works great for stamping! I used 2 images from Bundle Monster plate BM-11 to create this look. A positive and negative of the same image so to speak. For my white polish, I used Sinful Colors Snow me White.


     I really like how this turned out, with the stripe of image going down the center of my nail instead of a full coverage. How do you feel about using both the positive and negative sides of an image in a manicure? Or didn't you notice that until I pointed it out? Let me know in the comments and then check out the other amazing manicures. Thanks for stopping by and Happy Polishing!

Friday, August 7, 2015

10:59 AM

Cult Nails - In A Trance


     It's Friday! I really want to be excited about that but I'm too tired, it's been a long week. Anyone else feel the same? Today's I'm continuing my posts on those indies who have closed up shop with In A Trance by Cult Nails. 


     In A Trance is an army green polish with golden micro shimmer. A unique shade that I never thought I would wear but couldn't help ordering after seeing gorgeous swatch photos floating around the internet. 

The application is smooth with the first coat being sheer but even. Full opacity can be reached in 2 shimmer filled coats. Shown here is 2 coats plus top coat. 


    Such a beautiful deep, rich green and that shimmer! It just glows on the nail. I have to admit that when I first put this on I wasn't completely sold on it. It's a color that's quite out of my comfort zone. But as I looked at my nails I fell in love. 

      I decided to try a little stamping over this and loved the results. I used Maybelline Bold Gold and Messy Mansions plate Lilly Anna 08 to create this look.


     The stamping did take away some of the shimmer in the polish but it could still be seen in direct sunlight. If you read my original review of the Lilly Anna plate you will know that it got slightly damaged in shipping. I was able to bend it back for the most part but it's still not entirely smooth and that caused the little bald patches in my stamping. I don't think they are too bad though and really like this look. 

     I actually own quite a few more Cult Nails polishes that have yet to make it onto the blog. Even though they are no longer available they are too pretty to ignore and who knows you might find one or two in a destash sale. Thanks for stopping by and Happy Polishing!


Monday, April 6, 2015

10:17 AM

Put Up Your Dupes - Battle of the Greys. China Glaze Intelligence, Integrity & Courage vs. Elephant Walk vs. Sea Spray


     Over the weekend I was sent an e-mail asking if I could compare 3 grey nail polishes I own by one of my readers. Naturally I was thrilled! Someone had taken the time to look through The Collection tab and ask for my help in a polish purchase decision. The polishes in question? Intelligence, Integrity & Courage, Elephant Walk and Sea Spray by China Glaze. 

L-R Intelligence, Integrity & Courage, Sea Spray and Elephant Walk


     At first glance these 3 look fairly similar in the bottle, but when placed right next to each other you start to notice the differences. But do these differences carry over once applied to the nail? We've all had those polishes that look one way in the bottle, and completely different dried on the nail.


      Let me start off by saying that as far as application goes all 3 are pretty even. Kind of what you'd expect from nail polishes from the same company, even though that doesn't always happen. (I'm looking at you Essie!) I had nice smooth application with the first thin coat having some minor streaking and full opacity reached after 2. Shown here is 2 coats of each polish plus top coat.

     On the nail these 3 don't look much different than they do in the bottle. Elephant Walk is still the darkest and Sea Spray is still lighter. Sea Spray has a slight blue under tone to it, while the others look more like a true grey. What you don't see in the bottle is that Elephant Walk and Sea Spray both have some subtle micro shimmer to them. Intelligence, Integrity & Courage is the only straight creme in the bunch. 


     In this picture it's a little easier to see the micro shimmer, Especially in Elephant Walk. Needless to say these 3 are not dupes, not even in the slightest so if you're into grey's Id say it's a safe bet to have all 3 in your collection. But my comparison isn't over yet. In my previous post on Intelligence, Integrity & Courage I showed you how well it worked as a stamping polish.  Since then I have rediscovered my love of stamping. I also wanted to have this post go beyond the typical comparison post where I only shared about the color and formula. Can you guess what's coming next? That's right I also compared how these 3 will work for stamping.


     Now this was a hard picture to capture thanks to the glossy finish my Out the Door top coat provided! I applied Bleached in Peach from the Maybelline Bleached Neons Collection as my base color. I wanted something besides white to showcase the grey.  The image I used I think is supposed to look like snake skin from Shandy plate SH213. It's an interesting pattern but not one I can see myself using over and over again. I liked it for this post though because it had a lot of tiny details that would really test the polish.  Id say all 3 passed the test and worked as a stamping polish. I knew with Elephant Grey being the darkest it would show up the best but I was surprised to see that Sea Spray stood out more than Intelligence, Integrity & Courage. 

     Big shout out to Cassi for making my day and helping me to remember that people do actually read my blog and find it helpful! I want all my readers to know that if they'd like to see a certain polish swatched or compared Id be happy to do it if I own it. I have all of my polishes listed on The Collection Tab up top for you to browse through. If I've already posted about a specific polish , the name links directly to that post for easy convenience. 

     I hope you've enjoyed this post, thanks for stopping by and Happy Polishing! 

Friday, April 3, 2015

9:31 AM

Spring Manicure with Water Marble


     I've got a real quick post for you today. You may remember that I recently broke a nail on my swatching hand. Well it broke down pretty low and I had to resort back to super nubbins. When my nails are short I tend to be uninspired when it comes to painting my nails. Which also means that I didn't have anything lined up to post about. Enter my impromptu visit to a salon/spa yesterday to get my nails nicely shaped and painted. Why go to a Salon when I paint my nails all the time for free? Well the answer is simple. No matter how much I try or how patient I am I can never get my nails shaped nice and even on my own and usually end up with much shorter nails than I want. 

     My experience at the salon was so much different than it normally is. For one and I mean no disrespect to anyone when I say this but the girl painting my nails was not of Asian descent and I didn't have to try and navigate a heavy accent when asked questions. And I was asked a lot of questions. Before she even touched my nails we had a lengthy discussion about how I wanted my nails done. She asked about length, shape, my typical nail polish practices. And double checked that everything was to my liking every step of the process. I felt very involved and in charge of my manicure even though I was not the one doing the work. Even though this Salon is 45 minutes away from where I live I know I will be going back there. 

     This particular Salon only uses CND polishes which is a brand I have never used before. I wanted something springy so I picked out one called Desert Poppy from the Vinylux line. A pretty coral with subtle shimmer.  Like all coral polishes this one was hard to photograph and get the true color. In the picture below the color on my pinky in most accurate. 


    I love the color of Desert Poppy but I needed something else, since starting my blog I have a hard time wearing just one color on my nails. 

     I haven't done a water marble in a long time and I think they are actually kind of fun to do. Time consuming but fun so I added one as my accent nail. I used Citrus Collide and Ultra Violet from the Maybelline Bleached Neons collection, Sinful Colors Snow me White and a Wet N Wild clear for the design. 


    That's all I've got for you today. I told you this post would be a quick one. Although it got a little bit longer winded than I had planned on. Thanks for stopping by and Happy Polishing!

Monday, October 20, 2014

6:00 AM

Julie G- Santorini

  
     Today I have Julie G Santorini from the Cruise Collection for Summer 2014. I know this is not your typical fall colored nail polish but, today I'm shaking things up and throwing the rulebook out the window!
 
      Santorini is a light cornflower blue nail polish that reminds me of a beautiful cloudless sky. There was a hint of shimmer that caught my eye in certain lighting but was so subtle that my camera couldn't capture it.

Julie-G-Santorini

     The application was pretty good, This polish was a little thicker than I am used to and I had some small splotches at the base of my nails with the first coat. I had to wait for the first coat to dry completely before applying the second or I got some slight dragging. Everything dried to an even, smooth, glossy finish. Shown here is 2 coats without top coat.

Summer-2014-Cruise-Collection

     This is such a pretty shade of blue. I can't wait to wear this again with some glittery tips. I just got the perfect glitter polish in the mail to use. How's that for luck! Speaking of glitter polishes, I used Santorini as a base color for a glitter topper earlier this year. Check out this image from my review of the Veils Collection by Maybelline.


     Don't they look made for each other? How would you wear Santorini? Alone, with glitter, or as a base for nail art? Thanks for stopping by and Happy Polishing! 


Wednesday, September 10, 2014

6:00 AM

Maybelline- The Veils Collection

    
     Today I have for you the Veils Collection from Maybelline. This collection consists of 5 polishes, 2 shimmers, and 3 glitters. Maybelline advertised this as a textured collection but I think those of us in the nail polish community can agree that these are nothing like the textured polishes we are used to. I guess you could say they have a slight texture because of the glitters, but nothing more than a typical glitter polish. All polishes are shown with 2 coats over a base color and without top coat.
 
     Crystal Disguise is a milky based polish with teal and blue shimmer.  I've layered it over OPI 4 in The Morning.

Blue-shimmer-nail-polish

     The application was smooth and easy. Each coat packed a ton of shimmer.

Teal and blue shimmer nail polsh

     Rose Mirage is a clear polish with rose gold colored micro glitter. I chose to layer it over Pretty & Polished Carrigan.


Rose gold glitter nail polish

     Application with this one was a little tricky. I was able to get semi-decent glitter coverage if I used very light brush strokes. I think the dabbing method would have worked out better. I didn't have to fish for glitters, but they did want to slide around on the nail.


Nail polish with rose gold glitters in a clear base.

     Blue Glaze is a dusty blue micro-shimmer polish. I layered this one over OPI 4 in The Morning.

dusty blue micro shimmer nail polsh

     The application was again smooth with a lot of shimmer in each coat. I like how this has an almost icy look to it on the nail. 

Blue micro shimmer nail polish

     Amethyst Aura is a clear base polish with dark blue circle glitter and light blue micro-shimmer. I layered this one over JulieG Santorini.


Blue glitter nail polish in a clear base

     The application was easy with this one. No playing around with the glitters was required to get nice even coverage. Although I do have to say when I hear the word Amethyst I think of purple and not blue. So the name is slightly confusing to me.


Blue glitter  nail polish with micro shimmer

     Teal Beam has blue and gold micro glitters in a clear base. I chose to layer it over JulieG Tahiti.

Blue and gold glitter nail polish

     The application was really good with this one. I was able to get even glitter coverage without fishing or dabbing. 


maybleeine glitter nail polish in gold and green

      Overall I like this collection of nail polish toppers. There were no application issues,  and the colors seem to go well with a variety of base colors. I don't know if I have a favorite but Rose Mirage and Blue Glaze are up there at the top of the list. Do you have any favorites from this collection?

      I picked this collection up at Wal-Mart but have come across them wherever Maybelline nail polishes are sold. I didn't see limited edition anywhere on the display or online, but I'm not sure if they are going to be part of the core line. If I find out for sure I will update this post. Thanks for stopping by and Happy Polishing!


Thursday, August 28, 2014

11:30 PM

Let's Go Camping Nail Art Challenge Day 1: Under the Stars

   
     It's once again time for another nail art challenge brought to you by the Facebook group Challenge Your Nail Art. This time around the theme is "Let's go Camping!" and today's prompt is "Under the Stars".

    
     For this manicure, I had the vision of a wonderful night sky scene by the lake with the stars twinkling and some waves crashing against the shore. But then I got real and remembered that my nail art skills are severely lacking. I did manage to create at least part of that image on my nails!

blue-and-black-gradient-manicure

    I decided to recreate the night sky from a camping trip I took back when I was about 11. My family sat up almost until dawn watching the Northern Lights dance across the sky. And because we were so far away from any city lights the colors were amazing!

     To get this look, I started out with one coat of Sally Hansen White On so that my gradient colors would really pop. I used Sally Hansen Black Out, L'Oreal After Hours and Maybelline Blue Bombshell for my gradient.  I really wanted to capture the way it looks when the first rays of light start to change the sky from Black to blue.

Gradient-manicure-black-and-blue-nail-polish

     After letting my gradient dry I used a glow in the dark polish from Sinful Colors to make my Northern Lights. By removing almost all of the polish from the brush I was able to create the sort of wispy effect I remembered from my childhood.

     The stars are my absolute least favorite part of this manicure and the reason I don't "love" the finished look. I used my smallest dotting tool and went in with Sally Hansen White On to add them. I think they just look too much like dots instead of stars and that's my issue. Someone will have to give me tips on how to make them look more star-like.

      My favorite part of this manicure is that the Northern lights actually glow! I wanted to get a picture of that for you but realized that it just looks like glowing blobs. I did manage to get a picture where you can see some of the glowing effect and the rest of the manicure at the same time.


     I think it looks really cool this way, and really captures the look I was going for. So what do you think on my "Under the Stars" manicure? Make sure you stop back tomorrow to see what I came up with for "Nature". In the meantime let's check out what the other talented ladies came up with for today. Thanks for stopping by and Happy Polishing!


Friday, June 6, 2014

6:00 AM

Maybelline Bleached Neons Collection


     Welcome to my 150th blog post! Today I have for you the very fun, very bright Beached Neon Collection by Maybelline.  Maybelline posted that these polishes would only be available in stores until the end of May, but my Walgreens still had quite a few of them left earlier this week. However these are limited edition so if you want them, I suggest snatching them up if you see them.

Maybelline Bleached Neons Collection

     When I first started seeing swatches of this collection online I knew I had to have them all. And for once my Walgreens had them right away. I think I might have shrieked a little in the store when I found them and scared the sales clerk.  But you don't want to hear about my feelings when I saw the bottles do you, you want to see the Polish! I'll warn you this post is going to be very picture heavy. Now let's get to it.

 Pink Punch is a muted neon pink the dries to a semi-matte finish. It's a little on the runny side and I had a slight issue with it pooling at my cuticles.

Maybelline Pink Punch Bleached Neons Collection Creme

     The first coat was very sheer but it built up nicely. This is 2 coats without topcoat.

Maybelline Pink Punch Bleached Neons Collection

     Coral Heat is a neon coral polish that dries to a semi-matte finish. This one was also on the runny side.

Maybelline Coral Heat Bleached Neons Collection
    
     Again the first coat was on the sheer side. Shown here is 2 coats without top coat. I actually really liked this color and can see myself wearing it a lot this summer.

Maybelline Coral Heat Bleached Neons Collection

     Ultra Violet is by far my favorite from this collection. It's a bright light purple with a pink undertone.


Maybelline Ultra Violet Bleached Neons Collection

     Ultra Violet is almost a 1 coat polish, but I've shown it here with 2 coats no top coat. Again it dries to a semi-matte finish. This color is also the most popular post on my IG by the way.

Maybelline Ultra Violet Bleached Neons Collection

     Citrus Collide is a lemony yellow. I wasn't too sure about this one at first since most yellows look horrible against my skin tone. 

Maybelline Citrus Collide Bleached Neons Collection

     Turns out that wasn't what I should be worried about. The color is a pretty decent one on me considering it's yellow. The formula, on the other hand, was a bit tricky. Citrus collide was very streaky but surprisingly still highly pigmented. Shown here is 2 coats without top coat. Again it dries to a semi-matte finish.


Maybelline Citrus Collide Bleached Neons Collection

     Lime Accent is a neon lime green polish that dries to a semi-matte finish. This would have to be my least favorite from the collection. Mainly because I don't see myself wearing it all that often.

Maybelline Lime Accent Bleached Neons Collection

     You might be wondering why I bought it if I don't think I'll wear it. I originally thought it would look great in some nail art. Only problem is it's extremely sheer. I used 3 coats without top coat for these photos. Also I skipped the base coat, because I don't normally used base coat when swatching. Now I only wore this polish for about 20 minutes but... I had no staining! In my book that's a big Ole check in the plus column for a green polish.

Maybelline Lime Accent Bleached Neons Collection

     I bet this color would make for a fun accent nail so I'm not giving up on it just yet.


      Bleached in Peach is a bright peach polish that dries to a semi-matte finish. Application was on the streaky side but built up nicely. Shown here is 2 coats without top coat.

Maybelline Bleached In Peach Bleached Neons collection

     This one was hard to get a color accurate picture of. However after being persistent I was able to get one. I wasn't quite so lucky with my macro shot however.

Maybelline Bleached In Peach Bleached Neons Collection

     Rounding out the collection is Day Glow Teal. This one looks more on the blue side to me than a true teal. Again I had some streaking with application. This is 2 coats without top coat.


Maybelline Day Glow Teal Bleached Neons Collection

      Remember me saying that Lime Accent didn't stain my nails? Well I decided to test my luck again and lost. This one is a stainer so make sure you use a good base coat.


Maybelline Day Glow Teal Bleached Neons Collection

     Over all I'm very pleased with this collection. There are a few that appear sheer on the first coat but reach full opacity after 2. The colors are fun and fresh for the summer season. I like the bleached twist to the neon color pallet. My favorites are Ultra Violet and Coral Heat.

     What are your thoughts on this collection? Do you have any favorites, or any that you just wouldn't wear? Thanks for stopping by and Happy Polishing!


Like what you see? Share it with your friends!