Showing posts with label Make-up. Show all posts

Thursday, December 4, 2014

6:30 AM

Limited Edition One Direction Make-up Kits


     Recently I was given the opportunity to review the limited edition One Direction make-up kits from Markwins.  The kits consist of 3 colored mascara's, 3 lip glosses and 3 nail polishes with matching glitter.
     ELECTRO GLAM MASCARA

Give your look a jolt of electric colour, with this limited-edition trio of ultra-bold coloured mascaras for hair and lashes, in three heavily pigmented, buildable colours.
FOR LASHES- Make a subtle statement by adding a pop of colour to the tips of your lashes, or add coats to your entire lashes for a shockingly chic look. The more the better!
AS A HAIR MASCARA- Apply to small sections of hair and swipe through for instant ELECTRIC highlights.

Why don’t we go there- Shock of blue
Does he know?- Pinkest hot pink
Story of my life- Amped canary yellow


 LIQUILIGHTS GLOW GLOSS

Liquilights Glow Gloss sparkles brilliantly during the day and illuminates under UV black light after dark. Enriched with natural oils and vitamin E to keep your lips soft and hydrated all day and all night.
Gloss can be worn alone for a pop of sparkle and color, or paired with One Direction crème lipstick for a bolder look.

Through the Dark- Electric glitter poppy lip gloss that glows to neon red-orange under UV light
Kiss You- Orange glitter rush lip gloss that glows to neon yellow under UV light
Taken - Powerhouse glitter pink lip gloss that glows to neon orange under UV light


 ROCK ME NAIL KIT

ROCK ME NAIL KIT, featuring NEON UV-REACTIVE Nail Varnish and UV-REACTIVE GLITTER nail toppings that add even more sizzle to your mani, for nails that light up day and night.
Sprinkle the glitter over wet polish for a subtle accent, or go for the glitz and dip your entire wet mani in mega-watt sparkle!

Nail Varnish:
Happily– UV iced blue glitter
Moments- UV neon pink
Diana- UV 3D holographic

Glitter Toppings:
Kicks- UV snow cone blue
Not afraid- UV electrified pink glitter
Star-- UV holo glitter

Makeup by One Direction will hit the follow stores November 15th!
Macy's
Dillards
Boscov's
Stage Stores
Beauty Brands
Lord & Taylor
*The products in this post were provided to me for my honest review by Brand Backer and Markwins. All opinions are my own. *
Tuesday, November 4, 2014

6:00 AM

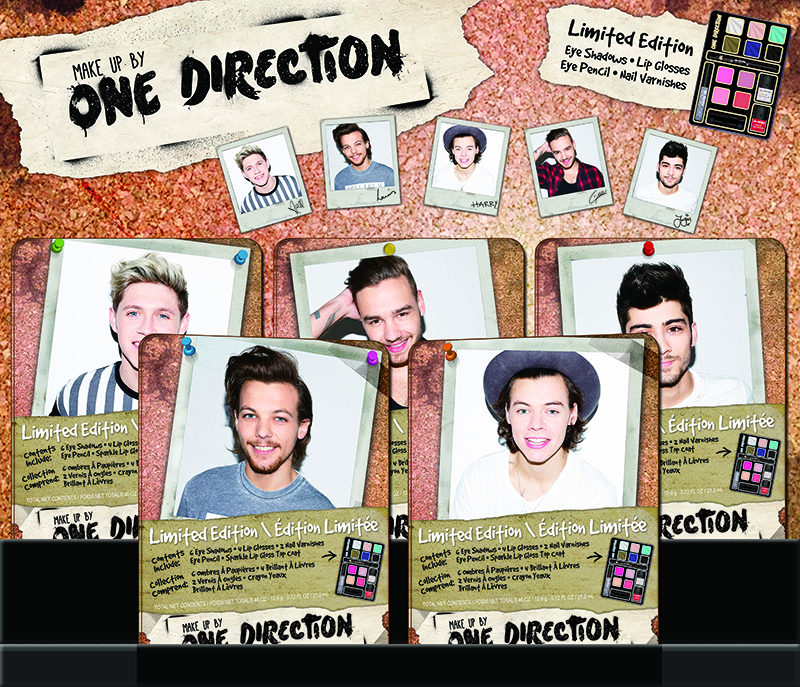
Giveaway!!- Make-up by One Direction Limited Edtion Kit

     Hi there everyone. Today I've got a little giveaway to share with you. And what's the prize? A limited Edition Make-up kit by One Direction! To introduce you to the quality you can expect, check out the review I did for the Up All Night kit. Good Luck!


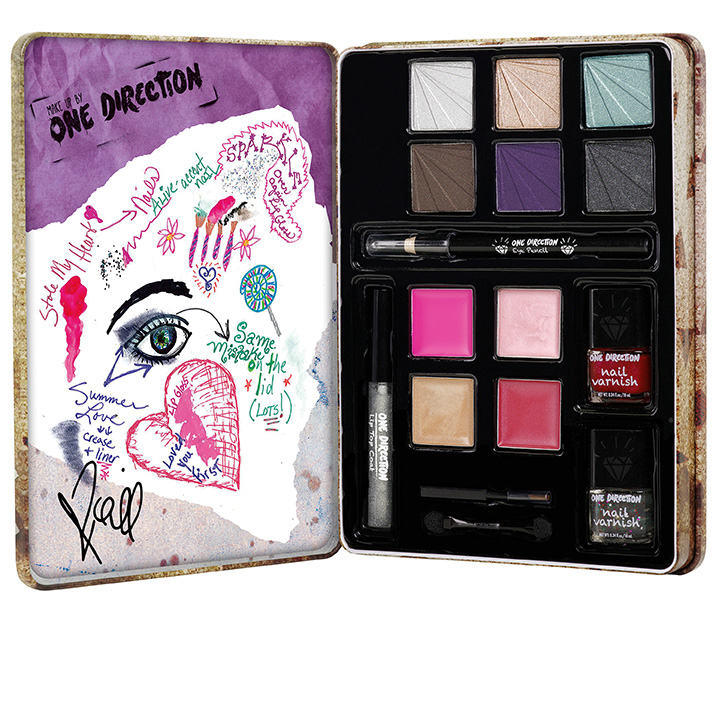
5 Limited Edition Tins are available (1 for each band member). Tins include:

Eye Shadows:
Nobody Compares- Metallic silver
Tell Me A Lie- Metallic nude pink
Same Mistakes- Metallic mint
I Would- Smokey brown shimmer
Summer Love- Smokey purple haze
Everything About You- Smokey black shimmer

Eye Pencil:
I Want- True matte black

Lip Gloss:
Loved You First- Bubble gum pink
One Thing- Frosted pink ice
Irresistible- Shimmered pearl
Heart Attack- Creamy rose shine

Lip Gloss Top Coat:
Over Again- Silver glitter sparkle

Nail Varnish:
Stole My Heart- Magenta pink shimmer
Alive- Multi-coloured glitter flakes

;

Wednesday, August 13, 2014

6:00 AM

Make-up by One Direction- The Up All Night kit

    
     Today I'm breaking from my normal nail polish post to bring you a new makeup kit from One Direction. There is a nail polish in the kit so I'm not straying too much.
     Makeup by One Direction is a range of makeup and cosmetic products celebrating youth, style, and the uninhibited lifestyle of a new generation. Celebrating life with bold shades, unique formulas and infused with limited edition collectible packaging, Makeup from One Direction is fun, bold, often irreverent, with a touch of cheeky mischievousness. Offered at prices that every girl and woman can afford.
The Up All Night Collection

     “The Looks Collection” comprises three keepsake tins inspired by One Direction’s globe-conquering albums, “Up All Night, “Take Me Home” and the latest chart-topper, ‘Midnight Memories.” Each tin comes complete with everything you need to show off your personality. Are you a rock n’ roll girl, a fun party girl or the girl next door? We have just the right collection for you and illustrations to help show you just how to get your perfect look. All your beauty essentials are housed in a LIMITED EDITION collectible keepsake tin with removable sleeve, complete with ONE DIRECTION doodle stencils to decorate your keepsake tin and make it uniquely your own!

Illustrations inside of the tin

     I decided to go with a simple but still pushing my comfort zone look. I'm not normally a blue eyeshadow type of girl and that lipstick was a bit bright for me personally.


     See what I mean about the lipstick. Very bright and could be fun for the right occasion. And I have a feeling it is perfect for the One Direction fan demographic or someone with the confidence to pull it off.


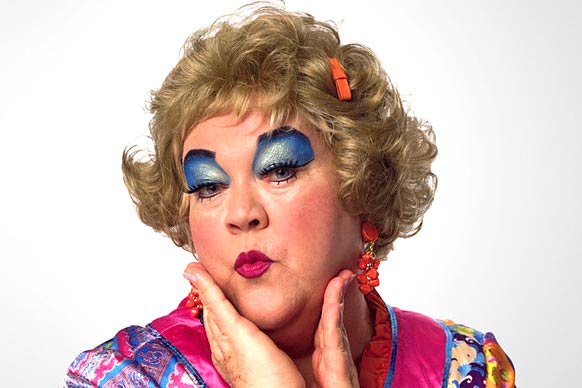
The eyeshadow applied nicely and blended really well. I like that fact that I wasn't left with bright blue eyeshadow that I may have shamelessly rocked back in the '80s. Think Mimi from the Drew Carey Show.

Photo credit to antidotemag.com


     There is a sophistication to this kit that takes it from '80s wow to appropriate to now. Even with lining the bottom of my eye with blue I still felt like it was a look I could wear out.


     And this make-up has staying power right down to that bright pink lip. I applied this look when I first woke and it was still going strong at dinner time lips and all.


     The nail polish that came in the kit is called Na Na Na and is a nice shimmery aqua that shifts to turquoise. The application was smooth but the polish is really sheer. I used 4 coats and you can still see some thinner patches.  I do love the color and will probably wear this again, but I'll be using undies for sure.

Showing the color shift
     DISTRIBUTION:
The line will be available worldwide starting in the U.S.

US RELEASE DATES:
Macy's - August 11th
Stage Stores – August 25th
Dillards – August 25th
Beauty Brands – August 25th
Lord and Taylor - August 25th

*International release dates TBD. We'll keep you posted! 
    

      Overall I think the quality of this kit is right up there with the big name brands. It's not colors that I would normally choose for myself, but I do like the way adding the blue under my eyes make their blue color really pop. I would have missed out on that if  I hadn't been given this opportunity. My only real complaint is that the product is hard to remove from the packaging. I think it took me 2 minutes to get the mascara out and I seriously thought I was going to break a nail.

      Thanks for stopping by and Happy Polishing!

*The products reviewed in this post were provided to me through Brand Backer for my honest review. All opinions are my own and not influenced in any way*


Friday, May 2, 2014

6:00 AM

BA STAR smokey eye pallet review


     *Press Sample*


     Today I have another opportunity from Brand Backer to share with you. This time around I have the Smokey Eye pallet from BA STAR.

      "BA STAR is the #1 Performance Makeup! Sing, Dance, Strut, Perform- Shine Like a Star! These affordable Palettes contain 5 High Pigment Eye Shadows + Eye Shadow Base for All Day Hold! Available in 2 color combinations: Midnight Smoky and Natural."
                             
BASTAR-Smokey-Eye-Pallet
A pallet in Midnight Smoky

    This pallet contains several shades of grey from pale to almost black and one intense blue.

BASTAR-Smokey-Eye-Pallet

     On the back you can find the web address of some helpful videos on how to use this pallet to create different looks as well as make a purchase.


     I actually watched a few of the videos and tried to recreate one of the looks. I will show you how mine turned out a little bit farther into the post. First I want to show you the brush.


     I have never come across a makeup brush like this. It has these semi-rough nylon bristles. I had 3 loose bristles in mine that I pulled out with my fingers, and give it one more good tug to see if there were any more but the rest were nice and secure. I noticed in the videos that I watched that they weren't using this kind of brush, but felt that I should as part of my review.

     I liked the way this brush let me apply the eyeshadow exactly where I wanted it to go on my eye. I was finally able to get a nice ending "line" at the outer edges of my eye. Normally my eyeshadow seems to go lower than I want it to and I have to clean it up. The downfall of this brush is that stiffness irritates the delicate skin around my eye. You might notice in the next picture that the skin at the outer edge of my eye (right below my watermark) looks slightly red. This is also the picture where I show my attempt at recreating the look I saw in the video.


    Looking at it like this I would call it a success. The colors are placed where they should be. The eyeshadow is highly pigmented and blend well together. I have a nice shimmer highlighting my brow bone. As far as application goes I was very happy. But......


     When I opened my eye I noticed it looked more like I had a black eye than a smokey eye. The 2 darkest shades are way too dark for my skin tone. I kind of had a feeling they might be so I didn't even touch the darkest shade. And you'll notice that I only have one eye done. I couldn't stop laughing at myself long enough to do the other eye.

     I di, however,r try out another look to share with you because I was having fun with this pallet. I always thought I was getting to be too old to wear sparklyeyeshadoww, but these seemed different so I went for it. I noticed that I didn't have any shadow getting caught in my creases and that helped to no accentuate them like most sparkly things do.


     This time around I tried out the silver and blue shades, along with the pale white/beige along the brow bone. I even tried out adding a little shadow along my lower lashes. I've tried doing that once before and the shadow seemed to go under my lashes and "flake off" onto my cheek. Not this time. The shadow went where I wanted it and no where else.

     Because I wanted to feature the eye pallet I didn't add any other makeup except a little mascara and lipstick. I like this look and imagine I would love it had I done my full routine.

     Now normally I don't let my daughter wear make-up but we had a dress up day today since it's been raining for 3 days now and she wanted me to show you her look. I might be bias but I think she looks pretty darn cute.


     BA STAR products can be purchased at http://bastar.com  you can also follow them on Face Book, IG and Pinterest.


*The products in this post were provided for my honest review. All opinion and photographs are my own. I am in no way affiliated with Brand Backer or BA STAR.*


Friday, April 11, 2014

10:15 PM

Studio Grear CC Cream


     Today I have the opportunity to share with you a new  Hydrating CC Cream from Studio Gear Cosmetics.
"Micro encapsulated pigments deliver a fresh dose of color that adapts to your own skin tone creating the most natural looking coverage. This lightweight, oil free cream is infused with Hydra-Extend technology that provides up to 72 hours of continuous hydration. Skin nourishing and brightening ingredients help to correct and maintain a youthful complexion."


     This Hydrating CC Cream is available in 3 shades; Linen, Natural and, Wheat. I have a very fair complexion thanks to my red-headed father and Irish heritage so I went with Linen. My first thought before the application was that I somehow had chosen a shade that was too light for me. Which was shocking given my ghostly pallor, but the cream is almost white to start off with.


Studio-Gear-CC-Cream-Linen-Product-Shot

     Once I started the application process I realized that I had nothing to worry about. The CC Cream really does adapt to match your skin tone, in fact, I think it even gave me just a hint of "color". Which I could really use right after the winter months.  To show you what I mean let's start with an awkward before photo. This is a big old close up of my naked face to show that I have a few freckles and *gasp* some wrinkles starting to form.


     I wanted to include a profile shot too because it gives a better representation of my uneven skin tone.


     Normally I wouldn't go around pointing out all of the "character" that my face has, but I was curious to see what the CC Cream would do for my complexion. I  also want to make sure to draw attention to some of the things it was able to correct no matter how small and unnoticeable they are to everyone except me.   So in this image, you will see that I have a dark spot in the corner of my eye. I'm starting to get a few lines around my eyes. I have some redness around my cheekbone area and a few sparsely scattered pale freckles which seem to intensify in the summer months. Would you have noticed all that if I hadn't pointed it out?

     Well enough of that, now time for the results. In this next image, you can start to get an idea of how this product worked. The redness on my cheeks is almost nonexistent and I think I look slightly younger.  My skin has a softer appearance, without that caked on makeup look.


     In this profile image, you can get a better idea of my results. Those freckles are completely gone, my skin looks soft and has a healthy look to it. The lines under my eye are gone. I still have the dark spot in the corner of my eye, but it's lighted slightly. (I have yet to find a product that will conceal that completely.)


      I wanted to include a few side by side pictures so it was easier for you to compare the before and afters.


     Over all I'd say this product works very well. It blended nicely, didn't feel heavy on my skin, and still had a nice "dewy" look  hours after application. I did only wear it for 5 hours so I can't comment on the 72 hour wear time. The only down side for me  personally was that I noticed a slight "make-up" scent for the first hour I was wearing it. Kind of a powdery, talcum scent that a lot of foundations seem to have. The foundation that I normally wear has no scent which is why I noticed this one.

     Studio Gear Cosmetics can be found in the beauty departments of Bloomingdales, Macy's, Dillard's, HSN and ULTA, and also in the everyday woman's makeup bag. Studio Gear has also graciously allowed me to share with you a discount code for 10% off of  your shopping cart at www.studiogearcosmetics.com. Please use code bloggercc to redeem.

     What did you think of my results? Is this a product you'd like to try for yourself? I'd love to hear your thoughts. Thanks for stopping by and Happy Polishing!

* This is a sponsored post, the items were sent to me for my honest review. All opinions and photos are my own.*

Wednesday, April 9, 2014

6:00 AM

Younique Pigments

     *Press Sample*

     I'm Back!!!! And today I have another makeup post to share with you. I know, this is primarily a nail polish blog but I like to branch out every once in a while. I hope you enjoy these posts as much as I enjoy experimenting with the products.

     A little while ago Vanessa a Younique Independent Presenter was looking for people to try out the mineral pigments the Younique offers. I jumped at the chance. If you read my last make-up review you know that I don't usually wear makeup but have recently started experimenting with it. I figured anything that would make the application process easier for me would be something worth trying out.

     After looking at Vanessa's site I decided to try out 3 pigments; Regal (purple), Devious (grey), and Curious (white).
 
Younique-Eye-Pigments
Samples of Younique Pigments
   
     Younique products are all 100% naturally based, hypoallergenic, paraben free and cruelty-free as well. The mineral pigments do not have any talc which means you'll have; no creasing during wear, longer wear time, and brighter richer pigmentation in the colors.

      I have to admit I never thought I'd wear purple eyeshadow. Give me neutral browns and I'm a happy girl. After all, my mom always told me the best way to wear make-up was to look like you weren't wearing any. I still think that's a good philosophy for an everyday look, but I want to be able to have fun with my make up from time to time.

Younique-Eye-Pigments-Review-Lustrous-Lacuqer

     I actually had a lot of fun playing around with these, and they weren't kidding about having bright, rich pigmentation. You don't need very much pigment on your brush to get a pop of color on your lid. I actually only used the pigment that was stuck to the lid of the container. I found the pigments very easy to work with and they blended extremely well. The main issue I've always had with my eyeshadow was getting them to show up as vibrantly and I wanted, without having a harsh line between colors. While I still have some learning to do when it comes to eye makeup I'm very pleased with how this turned out.


     As you can see I'm still not comfortable taking pictures of my own face, but I'm getting better. This is my completed look and I couldn't be happier. I finally have a semi-dramatic eye look, that doesn't look clownish!


     Younique pigments can be purchased from Vanessa's site and will run you $10 per pigment (1.1g). Or you can do  4 pack for $35. If I almost lost you with that price, trust me I think it's worth it, and I am the mayor of Cheapsville when it comes to make-up. Because you don't need to use very much with each application these pigments will last you a very long time. Remember that first picture in this post, and the amount in each container? Well, my containers look pretty much as full now as they did when I got them.
    
     Also for the month of April, Vanessa has offered my readers a 15% discount on any order. All you have to do is like her Face Book page and send her a message to redeem it. Just a little heads up, currently Regal and Curious are out of stock but should be back in stock next week.

     I hope you have enjoyed this post. It's good to be back blogging again. If you have any questions about these products or any products that Younique offers please don't hesitate to contact Vanessa. She it such a sweetheart to work with, and was very prompt in responding to any and all of my questions. Thanks for stopping by!


Friday, December 6, 2013

12:00 AM

Studio Gear Cosmetics Review


    Welcome back fellow polish lovers. Today's post is different from any other post I've ever done before, Why you might ask? Well, thanks to Brand Backer I was given the opportunity to review Studio Gear Cosmetics new Holiday Smokey Eye palette.

*Warning this post is going to be very pic heavy*

Studio Gear Smokey Eye Palette

     This was a wonderful and scary opportunity for me. As you may have read is a previous post I don't normally wear make-up. But when the opportunity presented itself for this review I jumped on it. Specifically, because I saw that instructions for application were printed right there next to the colors.


     I really like that there's a diagram included with the instructions for novices like myself. It made the application process go smoothly. And the colors were fun to play around with. Even though I don't wear makeup except for special occasions I do own quite the collection of eyeshadow. Mostly shades of brown and a few pinks, so this was a nice addition and quite a change from my very neutral look.


      Still going with a neutral theme these colors blend together for a smokey eye look that I didn't know could create. Because I don't own any eye primer the colors weren't as vibrant on me as they would be on some but I was still happy with the look I got and can't wait to play around with this some more.


     You'll have to forgive my expressions in these photos. I wasn't completely comfortable taking pictures of my face this close up. Her is my completed look using only the colors provided on the palette. I opted for a softer smokey eye look to start out with. The blush is pinker than I would normally wear, but still a decent color for my skin tone.


     I only did one side of my face so you could see the before and after shots all at once. Not a dramatic difference but I still like the results.


     And one more angle to show the colors on my lid. I think I might go for a little heavier hand next time just to get a more dramatic look. What do you think?

     Now for the fun part... Studio Gear Cosmetics wants to give you all a chance to try out their product at a discounted rate. Simply go to their site and use code SGHOLIDAY
 to receive 10% off your entire order. And guess what, the code doesn't expire!

     Thank you all for stopping by and reading my post. If you've got any tips on makeup application I'm all ears. What did you think of this eyeshadow palette? Have you used any of Studio Gears products before?

This post was sponsored by Brand Backer. The products shown were sent to me for my honest review, Any Opinions and Photos are my own and were in no way influenced by an outside source.


Like what you see? Share it with your friends!