Showing posts with label Messy Mansion. Show all posts

Thursday, May 10, 2018

6:00 AM

Parchment Manicure


     Hey Everyone, I'm back today with some nail art and a tutorial video to share with you. Yes, you read that right, I made a video! It's been so long since I've done one that I bet most of you didn't know that I had a YouTube channel. The inspiration for today's nail art was the Messy Mansions stamping plate I picked up from the March Polish Pickup Books theme. The minute that plate was in my hand I knew I wanted to do an antique paper/parchment look. And I have to say I'm very pleased with how it turned out. 


     I started out with a base of Sinful Colors Coco Bae which is a new addition to their core line for 2018. To get the aged parchment look I sponged around the edges of my nails with two shades of brown acrylic paint using the double ended sponge wand from Clear Jelly Stamper. The lighter color is Golden Brown and the Darker one is just called Brown. 


     For my lettering, I used Hit the Bottle polish The Drunken Elf and the Messy Mansions plate mentioned earlier. If you missed out that plate, any plate with lettering will work. I finished everything off with a layer of Matterial Girl from Blush Lacquer. 


     Now I will warn you this is a messy look to create so make sure to cover your cuticles with a latex barrier or similar product if you have an allergy to latex. My current favorite is the Un-Frog-gettable cuticle cover in Plain Toad from Ribbits Stickits. I wish I would have had this back when I did my newspaper manicure in 2014! 

      And as mentioned above, here is my tutorial video. I hope you enjoy it. 


     I hope you enjoyed today's post. I'll be back next week with my letter J polish for the Untried A-Z Challenge. Thanks for stopping by and Happy Polishing! 


Monday, September 14, 2015

9:07 AM

Thermal Nail Art


     How was everyone weekend? I feel like I could use an extra day to get caught up on all the everyday things I put off.  Our town festival was once again a great time and I got to catch up with some high school friends that came into town. Now it's back to the every day and I've got a million things to do so today's post is going to be a quick one. 

     Today's I'm revisiting a few items that I've blogged about before but never in the same post. Actually, we can thank my daughter for this nail art look since she is the one who picked everything out for me.

      First up is Pygmy Seahorse from My Sirens Call. This was originally sent to me back in July of 2014 as a Gloss 48 exclusive. And I have to say I love it now just as much as I did back then.

*Edit* It was brought to my attention this morning that since Gloss 48 is no longer in business My Sirens Call now has this polish available for purchase on Etsy. Here is the direct link. https://www.etsy.com/listing/248045030/pygmy-seahorse **


     Actually, I think I might love it more. When I wore it the first time my nails were much shorter and I couldn't fully appreciate the color shift. But Sydney wouldn't let me stop there. She said I needed to dress it up.  At almost 7 she is already turning into quite the polishaholic and has some definite opinions on nail art. 

     After we talked for a bit about why she picked out a thermal polish for me we decided that stamping would be the best nail art to go with. And my Messy Mansions plate MM18 was chosen.  Along with Sinful Colors Enchanted to stamp with. 


     I love how this turned out and will be having Sydney pick a few more of my nail art options in the future. You have to admit the girl's got a pretty good eye!


    I ended up wearing this look for a full week and it held up pretty well. I only had a little tip wear, but it had grown out quite a bit and one nail chipped pretty badly. Now I'm sitting here with naked nails wondering what to do next. Well while I figure that out I better get going. my laundry isn't going to fold itself. Thanks for stopping by and Happy Polishing!


Friday, August 7, 2015

10:59 AM

Cult Nails - In A Trance


     It's Friday! I really want to be excited about that but I'm too tired, it's been a long week. Anyone else feel the same? Today's I'm continuing my posts on those indies who have closed up shop with In A Trance by Cult Nails. 


     In A Trance is an army green polish with golden micro shimmer. A unique shade that I never thought I would wear but couldn't help ordering after seeing gorgeous swatch photos floating around the internet. 

The application is smooth with the first coat being sheer but even. Full opacity can be reached in 2 shimmer filled coats. Shown here is 2 coats plus top coat. 


    Such a beautiful deep, rich green and that shimmer! It just glows on the nail. I have to admit that when I first put this on I wasn't completely sold on it. It's a color that's quite out of my comfort zone. But as I looked at my nails I fell in love. 

      I decided to try a little stamping over this and loved the results. I used Maybelline Bold Gold and Messy Mansions plate Lilly Anna 08 to create this look.


     The stamping did take away some of the shimmer in the polish but it could still be seen in direct sunlight. If you read my original review of the Lilly Anna plate you will know that it got slightly damaged in shipping. I was able to bend it back for the most part but it's still not entirely smooth and that caused the little bald patches in my stamping. I don't think they are too bad though and really like this look. 

     I actually own quite a few more Cult Nails polishes that have yet to make it onto the blog. Even though they are no longer available they are too pretty to ignore and who knows you might find one or two in a destash sale. Thanks for stopping by and Happy Polishing!


Monday, June 8, 2015

8:09 AM

Madam Glam - Found the One


     Good Monday Morning to you! I hope everyone had a fantastic weekend. Today I am rounding up my trio of posts featuring Madam Glam polishes. I saved my favorite one for last, Found the One. 

Photo was taken in incandescent lighting

     Found the one is a dark vampy red polish with a jelly finish. The application was good, with the first coat applying a little uneven. Everything smoothed out after 2 and dried to a super glossy finish.

Photo was taken in natural light

     While not a traditional red I still think Found the One gives my nails a classic look. And I love how the red color comes out in the sunshine. 

Photo was taken in incandescent lighting

Photo was taken in natural light
     I tried out a little nail art and am pretty happy with the results. I just wish the studs I used matched the gold polish a little better. 


     For the stamping, I used Messy Mansion plate MM18 and Essie Good as Gold.  The studs I picked up from Dollar Nail Art. Which if you haven't checked that site out I highly recommend that you do. You'll find a ton of nail art supplies, very reasonably priced. The only downfall is that there is a minimum purchase of $25. 

     If you're thinking about picking this polish up for yourself follow this link  http://madamglam.com/?utm_source=yt-lust 
and used code YT30 for 30% off your entire order.  Don't forget to check out my previous posts
featuring Disco Ball, Ibiza, and Paradise Fiesta. Thanks for stopping by and Happy Polishing! 

Friday, August 1, 2014

6:00 AM

Black Nail Polish stamping comparison

     Welcome to Friday! What do you think of the new look to my blog? It's so much brighter now. I wanted to make sure you noticed it. Anyway on to today's post.

     Most of us love the look of a stamped manicure. But when you're first starting out it can be hard to do. I know one of the problems I had was finding a good polish to use.


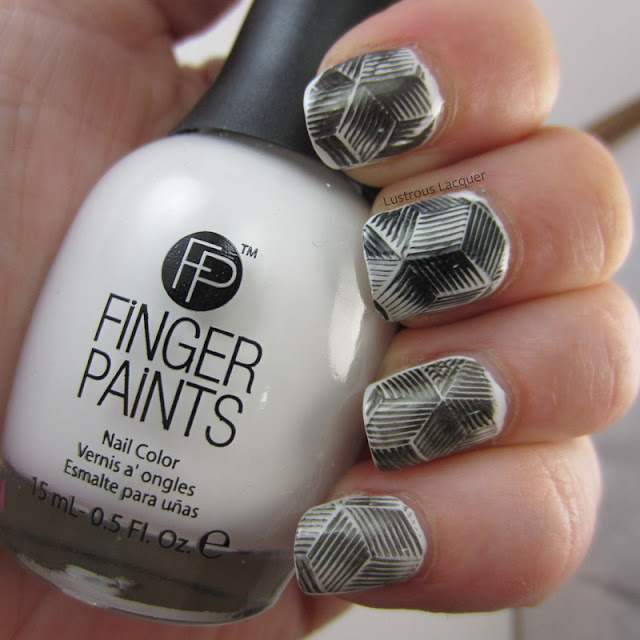
     In this post, I've compared 4 black nail polishes to see which one works the best. I tried to use a variety of price points so that everyone could find one to fit their budget. The polishes I used in order from pointer to pinky are Konad Stamping Black, Finger Paints Black Expressionism, Pure Ice Black Rage and Zoya Black Swan.


      I started out with a base of Finger Paints Paper Mache. The plate I used is Lilly Anna 08 from Messy Mansions.   (For a full review of this plate just click on the link)

      
     The results were slightly surprising. I expected the Konad Stamping black to perform the best. After all, it's sole purpose is to be used for stamping. Zoya Black Swan gave the cleanest image but was also the lightest. Finger Paints Black Expressionism is the darkest black, but as you can see it had some smearing. 

     All 4 polishes are opaque enough to stamp with so there are no winners or losers here. Out of all 4 though I'd say that Zoya Black swan is the one I'd go with for the sharpest image possible. Which one would you choose?

     On a side note while putting this post together I discovered that I don't own a black polish from China Glaze, or Sinful Colors. Which are the two brands I own the most polish from.   I'm still trying to decide if I need to remedy this, or if I've got enough black polishes in my collection.

      If you'd like to see another color group compared like this just let me know in the comments. Thanks for stopping by and Happy Polishing!


Wednesday, February 5, 2014

6:00 AM

LynBDesings- Nightmare Revisited


    Hi there everyone. Today I wanted to share with you an amazing polish from LynBDesigns. This one is called Nightmare Revisited. A raspberry pink jelly polish that is also a linear holo. Ummm can you say yummy! Nightmare Revisited is from the Nightmare Begins Collection and is based on the movie The Nightmare Before Christmas.


LynBDesigns-Nightmare-Revisited-Nightmare-Begins-Collection

     Here I have 2 thin coats plus topcoat of Nightmare Revisited. Even with my poor lighting, you can see how holographic this polish is. With the first brush stroke, I knew I was going to love this polish!  The application was super easy. The polish flowed nicely off the brush and I was able to control exactly where I wanted it to go. No messy cuticles for me this time, normally I have one nail that I always seem to make a mess of.

     I was lucky enough to have a little bit of sunshine so I took advantage and got a full sun shot to share with you.


LynBDesigns-Nightmare-Revisited-Full-Sun

     I wasn't able to capture the full holographic impact but this is the most color accurate shot I have. I kind of like the snow as my backdrop in this shot. I wish it wasn't so ridiculously cold here this year so I could use it more often. Too bad I haven't figured out how to take pictures with gloves on yet. Anywho back to the polish.

     After staring at my nails for a few hours I decided to see what some subtle stamping would look like. I didn't want to cover up all of this beauty so I went with an accent nail using my Messy Mansion Lily Anna 08 stamping plate and Sally Hansen Lively Lilac. And this is what I ended up with.


      Imagine my surprise when I discovered that standing under my kitchen light with a daylight bulb in it would give me my best picture of this polish. After using my DIY lightbox and facing the cold to try and do this polish justice, all I had to do was walk into my kitchen. Ugh, guess who's getting new lights for her light box soon!

     I like how this manicure turned out with the addition of the accent nail. People at work noticed the color right away and asked to see my nails. When they noticed the stamping the looks on their faces was like watching a child opening a present. I loved it! In fact, I loved it so much I actually wore this manicure for a full week. That doesn't happen very often for me.

     If you'd like to add Nightmare Revisited to your collection you can snag your own bottle on Etsy for $10 and don't forget to check out the other polishes in the Nightmare Begins Collection.  You can also find my previous post on another LynBDesgins polish here. Thanks for stopping by my blog and Happy Polishing!


Wednesday, December 4, 2013

12:00 AM

Messy Mansion Image plate review


     Hello everyone. I'm kind of excited about today's post. Why? Well, I was sent some image plates from Messy Mansion for review and I can't wait to share them with you. These plates can be purchased online at http://www.messymansion.com.au/. I received 3 plates to share with you.

     My package arrived in pretty rough shape with a letter from the postmaster stating they had an accident with my package and an apology. The edges of the plates got slightly bent, but I was able to bend them back for the most part. I wanted to let you know that because you will see it in my pictures and I don't want you to think that's how the plates are. And I also want to let you know that mine is a rare experience and your plates should arrive safe and sound.

     First up is Lilly Anna 08.  A rectangle shaped plate with 12 full sized images and 2 longer images. There is a variety of images on this plate, from geometric patterns to snowflakes.

Messy Mansion Image Plate Lilly Anna 08

     If you follow my blog or facebook page you know that stamping is not my strong suit but I'm getting better. This plate was really easy to work with. I wanted to try images with a delicate pattern and a wider one. And I was in love with the snowflake image from the moment I opened my package.


     I used China Glaze For Audry as my base and Konad White to stamp with. Every image I tried transferred to the nail with ease. And I was able to cover the entire nail. The one I'm most impressed with is my ring finger. I thought all those lines so close together would be tricky, but I had nothing to worry about.

     Next up I have plate MM18. A round plate with 4 full nail images, 6 individual images, and a long image.

Messy Mansion Image Plate MM18

     I used the bee theme as my inspiration for testing this plate.


     I used Sinful Colors Pull Over stamped with Konad Black. Again I was able to transfer the complete image to my nail on the first try. I love the little bee inside the honeycomb pattern.


     The last plate I have to show you is MM14. Another round plate with 4 full nail images, 3 individual images and 2 half nail images.


Messy Mansion Image Plate MM14

     My nails are short enough that the half nail image ended up filling up pretty much my entire nail. For this plate, I wanted to see how it would stamp using a regular polish instead of my Knoad stamping polishes.


     I used Orly Dayglow and stamped with Essie Blue Rhapsody for these cute birds. I knew I wanted to try out the peacock feathers and the little birdcage right away when I saw this plate. And as you can see my ring finger is completely covered by the birds on the branches image.  The peacock feathers are a little big for my small nails but I still really like that image. I'll have to play around with the placement a little bit to make it work for me.

     I found all 3 of these plates easy to use and the images all transferred very well. In fact, I've already added a few more plates to my Christmas list.

     To keep up with all the latest news from Messy Mansion be sure to check out the facebook page, and the shop.

     Which plate was your favorite? Are there any others I should check out? Thanks for stopping by and Happy Polishing!


*The products shown were sent for my honest review. All opinions and photographs are my own*


Like what you see? Share it with your friends!