Showing posts with label Sparkle. Show all posts

Friday, January 30, 2015

6:00 AM

Zoya- London


     How many of you are over the textured polish trend and are glad Zoya discontinued their Pixie Dust line? Well to those of you who feel that way I'm sorry because today's post is in fact about a Pixie Dust Polish, Zoya London to be exact. But good news for those of you still craving those textured tips, as I write this post, London is still available for purchase

     I have to admit when these textured polishes first came out I was not impressed. The thought of textured nails kind of made my skin crawl, not gonna lie. But swatches kept popping up everywhere I looked and people were talking about how much they liked them and so on and so forth. So one day at Ulta I found Vespa in the clearance bin and thought why not. Nyx followed soon after along with Dahlia. I was kind of hooked. 

     London, as described by the Zoya website is " a fog gray with a sugared sparkle, in the exclusive Pixie Dust matte sparkle formula."  I would call it a dark Grey with just enough sparkle mixed in to keep it interesting. 


London-From-the-Zoya-Pixie-Dust-Collection
  
     Like my other Pixie Dust polishes, the application is a breeze. There's no patchiness and I tend to get good coverage with the first coat. I always apply 2 to make sure I've covered the entire nail. I've chosen to show London here without top coat to show off the texture and because I used it as a base for my Ugly Christmas Sweater manicure.  I know people will wear it both ways, depending on what kind of look they are going for. 

  
     As you can see in this picture that the sparkles cause the shade to change slightly depending on how the light hits your nails. Shifting from lighter to darker adding, even more, interest to the finish. And as for the texture? The best way I can describe it is the finest grit sandpaper imaginable, but without the worry of snagging your clothes.

     Of course, no blog post would be complete without a killer macro shot. Here is London in all its textured glory.

  
     What are your thoughts on the textured polish? Should it stick around for another year or go the way of the crackle finish and just disappear? Thanks for stopping by and Happy Polishing!

Friday, August 15, 2014

6:00 AM

Lumina Lacquers- Soleil

   
     It's Friday! I think that calls for a fun, sparkly nail polish. So today I have just that for you. Ladies and Gentlemen feast your eyes upon Lumina Lacquers Soleil.

Gold-Glitter-Indie-Nail-Polish

      A golden micro glitter polish that is extremely holographic. Soleil is the sister polish to Maleficent and Silver Springs! While all 3 polishes are beautiful, Soleil is my favorite and the only one I own from the trio.  In fact, I fell in love with this polish and found myself hitting the purchase button before I was halfway through reading the review from Imperfectly Painted.


Micro-Glitter-Holographic-Gold-Nail-Polish
     
     The application was pretty good for a glitter polish. I was able to get lots of glitter on the brush and it flowed smoothly. If you're one to apply thin coats you will need 3 or 4 to reach full opacity. The glitter likes to move around on the nail with thinner coats. But if you're like me and tend to do thicker layers you can get away with 2. 

Gold-Hologrpahic-indie-nail-polish

     Soleil does dry to a rougher texture and is top coat hungry. I used 2 layers of top coat to get a nice smooth finish.

     Even though I absolutely love this polish wearing it alone as a full manicure can be a bit much so I decided to add some stamping on top. I used my new Winstonia plate W-04 and Finger Paints Black Expressionism for this design.

Black-Stamping-Over-Gold-Micro-Glitter-Nail-Polish

     Please forgive the picture quality, I took it with my cell phone after being at a BBQ all day. And my flash may have gone off, but you get to see just how sparkly Soleil is this way. I get bonus points for that right.

     What do you think of Soleil? This might just be the first polish I've purchased that I want to get a backup for. I can see myself using this all the time as an accent nail, or for nail art. Also, did you notice I use bigger pictures in this post? I'd love to hear your thoughts on that too. Should I stick with this size or go back to my original size?

     Thanks for stopping by and Happy Polishing!


Monday, July 28, 2014

6:00 AM

Darling Diva- Soubrette

   
     Today I have a beautiful polish from Darling Diva to share with you. Soubrette is a deep purple linear holo polish with flashes of teal, blue, purple, pink and yellow. Soubrette is part of the super multi-chrome holo collection and is available for sale on Big Cartel.

Darling-Diva-Soubrette-Mulit-Chrome-Linear-Holographic
The photo was taken in my lightbox
      Here I've used 3 coats of Soubrette plus top coat. I added a decal from Sally Beauty supply as an accent nail. Soubrette is so pretty on its own I didn't want to distract from it with too much as an accent.


Darling-Diva-Soubrette-Multi-Chrome-Linear-Holographic
The photo was taken in direct sunlight
      I love a good linear holo and Soubrette is no exception. The application was smooth and easy with complete control of where the polish went. It is a little on the sheer side but builds up nicely.

Mulit-Chrome-Linear-Holographic
    
     Of course, I had to include a macro shot of that holo. Just look at the sparkle!

Multi-Chrome-Linear-Holographic-Nail-Polish

The photo was taken in shade with natural light
     And of course, we can't forget about the color shift. For me, I was only able to truly capture the shift from teal to blue to purple with my camera. I was able to see some of the pink and yellow on my nails but it wasn't as intense as the other colors.

Mulit-Chrome-Linear-Holographic-Nail-Polish

          Be sure to check out Darling Diva on Facebook, twitter and Instagram to keep up with all the latest news about sales and collections.

     So what do you think of Soubrette? Are you going to pick up a bottle of your own?  Don't you just love that last picture! It's my favorite and I knew I wanted to add it to the end. Thanks for stopping by and Happy Polishing! 


Friday, July 25, 2014

6:00 AM

Mentality-Pinnacle

  
     Today I have the pleasure of showing you a gorgeous polish from Mentality. Pinnacle is a sheer blue polish with blue, purple and turquoise glass flecks. While this polish is meant to be used as a top coat I've chosen to show it on its own.

Mentality-Pinnacle

     Shown here with 3 coat alone the application was smooth and easy. Because Pinnacle is meant to be a top coat it is pretty sheer. You'll want to make sure you apply it in even layers and make sure that the first layer is dry before applying the second. I found that when I was in a hurry I experienced some slight dragging.

Mentality-Pinnacle

     I have to admit that I was a little surprised that I got this much opacity out of only 3 coats. I thought for sure I would need at least 5. Pinnacle dried to a semi-gloss finish. I have a feeling it would really come alive with the addition of topcoat.

Mentality-Pinnacle

     Pinnacle can be purchased online for $8 on Big Cartel. Or you can click here for a direct link. And be sure to check out the other amazing polishes Mentality has to offer.

     Thanks for stopping by and Happy Polishing!


Wednesday, June 18, 2014

6:00 AM

Stamped Gradient for Alissa


     Today I'd like to share with you a manicure that I am extremely proud of. I did these nails for a close friends bachelorette party. I kept my friend in mind with every detail of this manicure and the fact that it turned out just as I envisioned makes it even more special to me.
 
      For the Bachelorette party, Alissa requested that we all wear hot pink. Pink is after all her favorite color. I knew I didn't want to just have plain pink nails for this event. Plain pink was just too boring when celebrating a 25-year friendship. Then I remembered the bathroom in the first house she ever owned. I know, it sounds strange to say that I took inspiration from a bathroom to celebrate a friend. But let me explain. The first time I set foot in that house She gave me a tour and her face lit up when she got to the master bathroom. It was her favorite room in the house. When I saw it I  couldn't help but laughed. She had made it "Alissa's Bathroom" There was the brightest Pink accent wall I had ever seen! The other walls were painted white with a jet black floral pattern stenciled onto it. She finally had her pink, white and black room, something she had wanted since we were little.
  
     To recreate the feel of her favorite room I started out with a base of Finger Paints Paper Mache. Then I used Paper Mache and Lime Crime Pink Parfait to do a gradient. Pink Parfait is the brightest pink I own.


     I always have to have an accent nail lately so I did the ring finger in reverse. Nothing too dramatic to distract from the rest of the manicure, but still mixing it up a bit. Can I just tell you I LOVE this! And bonus, both hands turned out exactly the same. Score one for the nondominant hand.

     Then I pulled out my favorite black polish to stamp with lately, Finger Paints Black Expressionism and Shandy Plate SH18.


     I used a different image from the plate for each finger. I think the stamping gods knew that this manicure was meant to be special because the placement of each image is right where I wanted it to be.  Normally that's the part the trips me up with stamping. I was really happy with how this turned out but the more I looked at it, admired it, the more I realized that something was missing.

     It needed some sparkle! I added 2 coats of China Glaze Fairy Dust and it was perfect! A delicate, girly manicure that I showed off to everyone who would look.


     A few weeks afterward The best group of friends I could ever ask for celebrated the New Chapter in Alissa's life. With smiles on our faces and in our hearts.


     I love doing manicures that have a special meaning in my life and wanted to share this one with all of you. I hope you liked it as much as I did. I look forward to sharing many more meaningful manicures with you. Thanks for stopping by and Happy Polishing!


Monday, March 17, 2014

9:27 PM

The Get Lucky Nail Art Challenge: Day 4 Freestyle


     Happy St. Patricks Day! It's the last day of the Get Lucky Nail Art Challenge and today's theme is Freestyle. I decided to go with something very simple given since I've had such a busy week.


     For this mani I used 1 coat of Cult Nails Hypnotize Me over 1 coat of Carpe Noctem Green Goddess. The accent nail is Maybelline Bold Gold stamped with Sinful colors Last Chance and Bundle Monster Plate Bm03

     Thanks for sticking with me through this rushed challenge. I hope you enjoyed the manicures. Now let's see what everyone else came up with for today.


Monday, January 6, 2014

5:08 PM

Zoya Dahlia


     Today I have for you pictures of Zoya Dahlia one of the Pixie Dust polishes. When the textured polishes first hit the scene I wasn't too sure how I would feel about them. I'm normally a smooth nail kind of girl. But I picked up Vespa and Nyx to try out before I made up my mind completely. And then I was hooked. Since then I have only added Dahlia to my collection and have yet to branch out to other brands but that's going to change in 2014.

     Dahlia is a dark grey almost black polish loaded with sparkle. Fully opaque in 2 thin coats this beauty can stand on its own or make a fun base for decals or stamping.


Zoya Dahlia Pixie Dust
2 coats without topcoat
     The application was flawless. It was very easy to control where the polish went on the nail to avoid any pooling at the cuticles or overflow onto the sidewalls. Which is normally a huge problem for me since my nails have a dramatic curve at the sides. And now for a macro shot...

Zoya Dahlia Pixie Dust macro

     Even though this shot makes it look like I have a heavy grit sandpaper on my nails it's not that rough to the touch. I don't snag my clothing or bed sheets either. That was my biggest fear about trying textured polish in the beginning, all the things I could get snagged on, but I had nothing to worry about.

     Now back to that part I mentioned about it being a great base for stamping...

Zoya Dahlia Pixie Dust Stamping

     I used my Konad white with Shandy plate SH18 to make this skittled flower look. After all the Christmas nail art I needed something light and different. Plus I just LOVE flower manicures.

     So thoughts on the Pixie Dust polishes? Do you think the textured trend will continue into the new year or will we see them slowly phased out?

     Also, these are the first pictures I've taken with my new lightbox and I was wondering if you could noticed a difference. Thanks for stopping by and Happy Polishing! 


Saturday, December 14, 2013

8:05 PM

The 12 Days of X-mas Mani's day 7: Christmas Animals


      It's day 7 of the 12 Days of X-mas Mani's Challenge and today's theme is Christmas animals.


     I am again behind in this challenge and trying to squeak this one in under the wire so that I can say I completed all 12 days. My manicure I threw together in 5 minutes and it wasn't even dry when I photographed it. I decided to try my hand at some quick freehand art again. This time trying to create a reindeer and a penguin.


     Not my best work and the reindeer sort of looks like a brown pig with horns. But I still think he's cute, especially with his little baby antlers.

     Now let's see what everyone else came up with for today's challenge...


Monday, November 11, 2013

7:03 AM

What's in a finish? -Shimmer


     For this post, I'm going to take a closer look at the shimmer finish. When I was a little girl I was in love with this finish. I have to admit that about 90% of my collection consisted of shimmer polishes when I first started out. To this day I'm still drawn to them on the store shelves. So what is it about these polishes that have me transfixed?

     A shimmer polish is most commonly spotted by the very fine metallic or sparkly particles mixed evenly in the base color. Ordinarily the base color and "shimmer" color have been in the same color family for a subtle feel but recently, polish makers have been combining contrasting colors, giving the polish more character.  The typical color balance of a shimmer polish has more pigment than shimmer giving these polishes a "lit from within" look.


Shimmer polish with subtle shimmer Revlon Captivate

Photo Credit Stylecraze. Shimmer polish with contrasting colors

     The Shimmer finish is almost a popular as the creme finish but that's not all they have in common... Similar to a crème finish shimmers dry to a smooth, shiny finish. However, the opacity level can vary. I own some that reach full opacity in 2 coats and others that can take 4 or 5.

    Some say there is a sub-category to the shimmer polish called Micro Shimmer but everything I read about this subcategory seems to have the same description as a regular shimmer. I'll have to do a little more research on the subject and will update this post if I find something new.

    Are you still wondering why shimmer polishes hold a soft spot in my heart? The short answer is they sparkle and women like sparkly things. Besides how can you not feel pretty when your fingers sparkle?


     I hope you've enjoyed this post and will come back to check out the next one in this series when I take a look at the suede finish and how it's different from a matte finish.

Thursday, July 4, 2013

12:37 AM

My first ever 4th of July Manicure


     Hello everyone and Happy 4th of July. I have a quick NOTD post for you in honor of the Holiday. This is my first manicure for the 4th and I was stumped on what to do. I was browsing Pinterest looking for inspiration when I came across the perfect pin from Wacky Laki.

The photo is the property of Wacky Laki


     I knew I wanted to recreate the look. I'm glad I took the time to click through to the original post because I think it helped me more than just the pictures.  For some reason, I thought steps 4 and 5 involved a toothpick to wipe away the red glitter when I first saw this. And as you know I have a tendency to rush through my manicures and then am unhappy with the results. So reading the post forced me to slow down, take a deep breath and really focus on what I was doing. Ok let's be honest I can never really focus with my 3 kids in the room asking me to open chip bags or put a new movie in which they always seem to want the minute I finish with the first coat of polish. Anyway, I've started rambling and should probably just show you my results so, here's my picture......

4th os July Manicure


     I used Milani White on the spot as my base color. It's my go-to white polish. The red is Milani Red Sparkle. Pretty appropriate don't you think. And the blue is Sinful Colors Hottie.

     Ironically the lines on my right hand turned out straighter than the ones on my left but I couldn't get a picture of that hand to turn out and my 9 yr old son wanted nothing to do with photographing my nails. At first, I was a little bummed that my blue was a lighter shade but it's grown on me. My skin tone is so light that a darker blue would look too heavy. All in all, I'm pretty happy with how this turned out, proud even,  and I can't wait for the girls at work to see it,


     I hope everyone has a safe and Happy 4th of July. If you've done a manicure in honor of the holiday feel free to leave a link in the comments section of this post. Id love to see what you came up with.

Sunday, June 2, 2013

9:40 PM

OPI DS Magic


      Today on the blog I have for you OPI's DS Magic. I picked this beauty up at Ulta about a month ago for $11. So far out of the 3 that I own of the DS series I have to say this is my favorite. I love a good sparkly blue nail polish and this one is all that and more. I swear the more I look at it the more shades of blue I seem to find.

     Application of DS magic was smooth and easy. I was a little surprised at how sheer the first coat went on and was a little worried that it might need 3 for full opacity. Fortunately, the second coat covered in a deep rich layer. I only needed slight clean up with this as there was no pooling at the cuticles what so ever.


OPI DS Magic

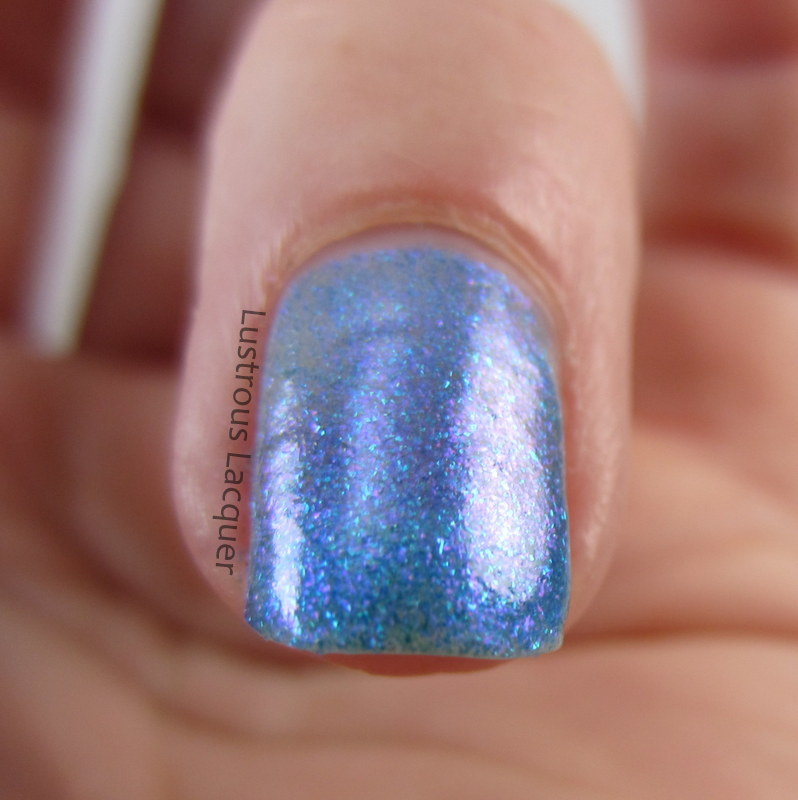
     Just look at that beautiful deep blue with light blue, dark blue, blurple, and a little purple thrown in. This is 2 coats plus top coat in direct sunlight. Anyone want to see a macro shot?

OPI DS Magic micro shot

     I can't get over how pretty this color is! (Or how nicely my pictures came out this time, to be honest. Hooray for sunny days finally!) It has rained here almost non stop for the last month so taking good polish pictures has been nearly impossible.
    
     Speaking of all the rain we've had here in Minnesota lately, I decided to add a little stamping to this. I went for a blue sky with a silver rain clouds kind of feel. Using Zoya Trixie and plate BM-222. The results were a subtle stamp that was very very hard to photograph. I ended up having to stick my hand under the leaves of my lilac bush to take away some of the glare.


     So what do you think of this color? Is it one you can see yourself wearing? Id love to hear if you have a favorite from the DS Series too.

      Thanks for checking out my post and as always comments are welcome, in fact, they are encouraged! =)

Like what you see? Share it with your friends!