Friday, January 31, 2014

6:00 AM

Ellagee- Stained Glass Collection Part 1


    Happy Friday everyone. Today I have the pleasure of reviewing 3 polishes from Ellagee's Stained Glass Collection. I was able to purchase these polishes at a discounted rate in exchange for my honest opinion. And I have to tell you I am in love. I plan on picking up the rest of the collection at a later date and will review those as well. hence the "part 1" portion of the blog title. Since I don't own the other polishes yet parts 2  and 3 will be at a much later date. =( Warning, this post is going to be pretty picture heavy.

Ellagee-Manganese-Glass-Sulphur-Glass-Obsidian-Glass-Stained-Glass-Collection

     Application of all 3 polishes was the same throughout the group so I'll talk about that at the end. Now let's get to the polish!

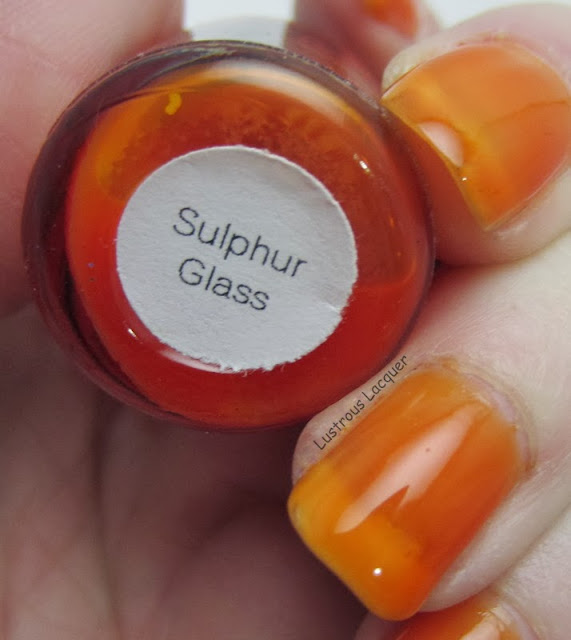
     First up I have Sulphur Glass. An orange jelly polish that builds in opacity with each coat. While being super shiny this polish is never meant to reach full opacity on its own.

Ellagee-Sulphur-Glass


     Show here is 3 coats if Sulphur Glass without top coat. Just look at that shine! Now I'm not usually an orange polish person but I picked this one up because I saw a ton of possibilities with it. I'm very glad that I did, it looks so soft and squishy on my nails. The Picture on Etsy showed a stamped image between layers. I thought it looked so cool that I had to do my own version.

Ellagee-Sulphur-Glass-With-Stamping

     I used my Konad polishes in Black and White with Bundle Monster plate BM01 for this look.The black polish actually looked brighter and more define layered between the polish. The white had the opposite effect. I'm not sure which look I like better. This is 4 coats of Sulphur Glass for the finished mani without top coat.

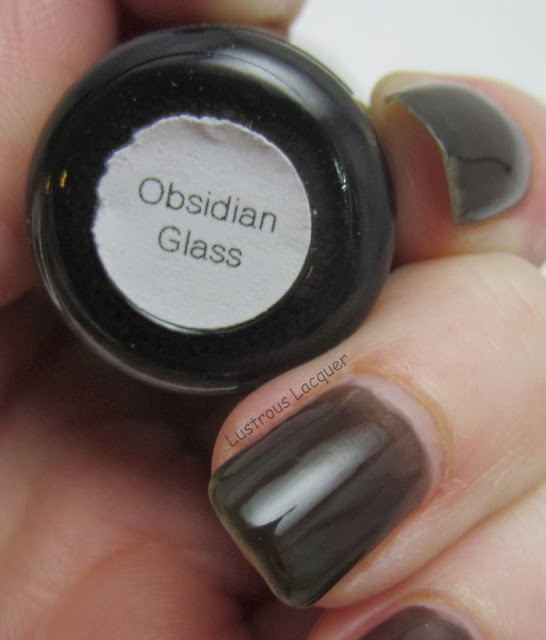
    Next up is Obsidian Glass. A Super shiny transparent black jelly. Obsidian glass also deepens in color as it's layered and with 3-4 coats, full opacity *should* be reached. I say should because I only used 3 thin coats total in my manicure and I still have slight VNL.

Ellagee-Obsidian-Glass

     Here I have 2 coats of Obsidian Glass without topcoat. Again we have an extremely shiny squishy polish.


Ellagee-Obsidian-Glass

     I knew the minute I saw this polish that I had to have it in my collection. There's just something about this black jelly that called to me. Maybe it was because it reminds me of the smoked glass table I had in my first apartment, or maybe it was because it's unlike any other polish I have come across. Whatever it was, I'm glad I followed my gut and snagged this one.

Ellagee-Obsidisn-Glass-with-stamping

     For the stamping with this one, I knew that black wouldn't show up. For fun, I compared Color Club's Cloud Nine and Konad White. I wanted to see what a holographic polish would look like sandwiched between jelly layers. The image is from Bundle Monster plate BM206. Cloud Nine gives a softer subtle stamped effect while the white still looks pretty cool. Can you tell I'm slightly hooked on the stamped sandwich! This look has a total of 3 layers of Obsidian Glass without topcoat.

     And last but not least we have my favorite of the 3, Manganese Glass. A transparent purple jelly. Like Sulphur Glass it's not meant to reach full opacity on its own.

Ellagee-Manganese-Glass

     When I first got my bottle I thought there might have been a mistake. It's so dark purple it almost looks black and I was slightly worried. As you can see I had absolutely nothing to worry about. Here I have 2 coats of Manganese Glass without topcoat.

Ellagee-Manganese-Glass

     Would you look at that shine! And that shade of purple! Dying I love it so much. It's not quite plum, but maybe a watered down version of plum. I know that description doesn't make it sound appealing, but I'm having a hard time describing it. Maybe a smokey purple haze? However you choose to describe it, it's stunning.

Ellagee-Manganese-Glass-with-stamping-stained-glass-collection

     Of course, I had to include another layered stamp. I used Bundle Monster plate BM14 with my Konad Black and White. Even though there isn't as much contrast in images with the black, I like it more than the white. It seems to blend in and stand out at the same time. The white still gives an amazing effect though. This final look is 3 coats of Manganese Glass without top coat.

     Now about that application.... it appears to be streaky at first and you might be tempted to go over your nail multiple times to even things out. Don't. These polishes are self-leveling, and they even out to a flawless, streak-free finish all on their own. Sulphur Glass was a little light for me after 2 coats and ended up needing a third for my personal taste while the other two reached the desired look after 2. All in all, I was extremely happy and as I stated earlier will be getting the rest of the collection.

     If you'd like to pick up your own bottle they can be purchased on Esty where a full sized bottle will run you $8.75. And don't forget to check out Ellagee on Facebook so you can keep up with new releases and all the fun polish news.

     Whew...that was a long post! Thanks for sticking with me till the end and as always, Happy Polishing!

*The products in this post were provided to me at a discounted rate in exchange for my honest review. All photos and opinions are my own and I am not affiliated with Ellagee Polish in any way*





Wednesday, January 29, 2014

10:31 AM

An experiment with gradients


    Today I thought I would take a look back and share with you the reason I decided to start a blog instead of just my facebook page. As some of you may know I started my page in March of 2011. I was just looking for someplace to share my nail art creations. Up until then I was sharing pictures on my personal page and people were starting to make comments about it, and not in a good way. So Lustrous Lacquer was born. At that time I had no intentions of doing a full-blown blog, I just wanted to share my pretty pictures.

    But as time went on I found myself struggling with how to create certain looks. I would watch video after video on YouTube trying to gain some insight or a miracle trick to get my nail art just right. One stroke flowers, dry marbling, needle dragging. you name it I was watching videos on it.

     One of the techniques that I struggled with for quite some time was gradients. I was never happy with the way the polishes blended together. The line was too harsh and looked off. So I started watching videos on how to do them. I discovered there were several ways to get this look. Now I just needed to figure out which way worked best for me. And I thought maybe someone else could benefit from my experimenting so I made my first "tutorial".

     After posting it to my page, I realized that it was an awful lot of information for just one picture. I also liked the thought that maybe I was helping someone else who had struggled with the same thing.
   
     So in November of 2012, I jumped in and started my blog. Ironically I never posted my gradient experiment on my blog. And I've been struggling lately with ideas about fun, creative ideas for a post. I figured going back to the reasons I started this blog was a good way to get myself back on track.  Now please bear with me on this, my '"tutorial" has a lot of growing up to do.


     "There are a few ways to do a gradient nail design. I decided to see which one worked best for me. My pointer finger is done in the manner that I usually try and am never happy with. I start with a base coat. For this, I used CG Sea Spray. Then I add a drop of polish (for this I used CG Man Hunt) to my wax paper and tried to blend the color down the nail starting at the tip. The next step is to add a drop of my base color to the wax paper and work my way up the nail trying to blend the line where the colors meet.
     
     For my middle finger I applied my polish to the sponge, dabbed a little off on my wax paper and then dabbed the sponge onto my nail.
    
     And finally, on my pinkie finger, I painted the polish on the wax paper, leaving a small gap between the colors. I used a toothpick to blend the colors in the middle and, then dipped my sponge into the color. Then I placed the sponge onto my nail. All 3 fingers are finished off with a coat of Seche Vite."
    
     I thought this was genius back then. Looking at it now it makes me cringe a little but the message it still good. Plus it did help me figure out what technique worked best for me. I do a variation of the middle finger technique and my gradients are better than ever. Basically, instead of dabbing the extra polish off on the wax paper I dab it onto my nail several times to blend the colors. So what do my gradients look like now? Take a look!

Photo was taken with my cell phone for IG. Please excuse the less than stellar quality
     I've recently noticed that I like to use blue for my gradients...might have to work on mixing that up a bit. Thanks for taking this walk down memory lane with me. I hope some of you found this little comparison helpful. I want to get back into doing posts like this so if you have a technique you've been struggling with let me know and I'll see if I can break it down and make it easier. Thanks for stopping by and Happy Polishing!

Tuesday, January 28, 2014

10:00 AM

Twinsie Tuesday- Patterns- Anthemion


     For my first ever twin blog post I have the honor of being paired up with the Sparkle Queen. This months theme patterns and we were given Anthemion as our pattern. I don't know about you but I had no idea what that pattern was. Thankfully we were also given a website that lists examples of all sorts of patterns.
   
     So what is an anthemion pattern? According to Artlandia, an anthemion  pattern is
" A classical motif based on a stylized honeysuckle plant or a radiating, fan-shaped palm leaf (palmette) commonly found in Greek, Egyptian, Assyrian, and other ancient art."


Example of Anthemion Photo source Artlandia
     Seeing the examples provides I had a very avant guard feeling and decided I wanted to use a glitzy color for my base. The thought of using one of my stamping plates to recreate this design crossed my mind several times, but I decided to really go for it and try some freehand art. Now let me be the first to say that my free hand skills are severely lacking. But I won't get better if I don't practice right? So here is my version of an anthemion pattern.

Anthemion-Pattern-Gold-Album-Fergie-Wet-n-Wild

     I used Wet-n-Wild Gold Album from the Fergie collection as my base and free handed 2 pieces of the design with a black striper. At the last minute, I threw in the pink dots for a pop of color. I started out really liking the way this was turning out but got rushed halfway through and I feel that it shows in the finished product. But I'm not letting that get me down too much because I think that nail art is about learning as you go and the journey is half the fun. Also, I knew sitting down to do this that I didn't have the right tools in front of me, and you can't get great results with the wrong tools.


     I'm not sure if this is a look that I will try and create again. It is a fun looking pattern though. Now let's see The Sparkle Queens version of an Anthemion pattern.


Monday, January 27, 2014

6:00 AM

What's in a Finish?-Frost and Pearl


     Today in my what's in a finish series I take a closer look at the frost and Pearl finishes. A frost finish is a very fine, shimmery polish often having an icy look to it. Predominantly having a metallic look, a typical color balance is more frost than pigment.

China-Glaze-Exceptionally-Gifted-Frost-Finish
China Glaze Exceptionally Gifted
     The big downfall for this finish is it often shows heavy brush strokes. Even a good top coat can have a hard time covering them up. This can tend to make people want to shy away from using them and they are losing popularity. Which is a shame since they usually are really pretty colors.

     The Pearl finish is very similar to the frost finish except that it has a pearly sheen and a satiny look. This is another finish that seems to have lost popularity because of the brushstrokes and is mainly found in older polishes.

China-Glaze-Camisole-Frost-Finish
China Glaze Camisole


      Overall I think these finishes have some good qualities to them, but the brush stroke factor has limited my purchasing and use of them. How do you feel about them?
Thanks for stopping by and Happy Polishing!

Friday, January 24, 2014

6:00 AM

Cult Nails Iconic


    Today I'd like to share with you a polish that I've had in my collection for quite some time but just got around to using. Cult Nails Iconic is a gorgeous berry red polish with golden shimmer and red glass flecks. Why I waited so long to use this beauty is beyond me. This polish was not only great for the wintry season but gave me a much needed pick me up.

Cult-Nails-Iconic

          Shown here I have 2 coats of Iconic plus top coat. Iconic is still available from Cult Nails if you'd like to purchase it. It can be found in their store and retails for $12.00. I personally think this is one color everyone should have in their collection. Its a great deep red polish with so much character even my boss commented on.

Cult-Nails-Iconic
     
     As I looked at my nails I was reminded of those mulberry candles that you used to be able to find everywhere from the grocery store to the gas station. And it brought me back to my high school days when my best friends and I all worked at the same grocery store and stocked those candles while laughing about whatever situation we had found ourselves in that week. I couldn't help but smile every time I looked down.

     Does this polish need to be added to your collection? Or have you ever worn a polish that brought back great memories from your childhood? Id love to hear about them. Thanks for stopping by and Happy Polishing!


Wednesday, January 22, 2014

12:40 PM

LynBDesigns Mind Palace


    Hello there my fellow lacquer lovers. Today I have an indie polish to share with you from LynBDesigns. This one is called Mind Palace and is from her Baker Street Collection. A jelly finished glitter bomb that I fell in love with when I saw the picture in her shop. Mind Palace is described as a "royal purple base with gobs of white, silver, black, purple, and even blue glitters."

LynBDesigns-Mind-Palace

     Shown here I have 2 coats of Mind Palace layered over Sinful Colors Mesmerise with top coat. Mesmerise was the wrong base color to use since it was too dark.  I ended up losing a lot of the purple glitters when looking at my nails. Thankfully the camera was able to capture them for you to see. I had to do some slight fishing for glitters to get some of the larger white hex glitters but the smaller glitters came out easily. 


LynBDesings-Mind-Palace

     As you can see I was able to get decent glitter coverage on my nails. I didn't have to do the dab method either which was pleasantly surprising. I have to admit my experience with glitters is pretty limited and I have yet to master the dab method.

LynBDesigns-Mind-Palace

     Look at that glitter mix! I really like how the colors are bold on their own but still play nicely together. And the different sized hex glitters add a nice variety.


     Even though I used one layer of top coat I still had a tiny amount of texture from the glitters but they all laid nice and flat on the nail. A second layer of top coat would give you a completely smooth finish. Removal was typical of most glitter bomb polishes and required a little extra time compared to a creme polish. But it wasn't a huge PITA to deal with.

     I'd like to wear this polish alone next time so all the jelly goodness can be highly visible and will add a picture to this post so you can see it both ways.

     I hope you enjoyed this post, feel free to leave me a comment below with your thoughts and as always, Happy Polishing!

***UPDATE***
     As promised I have a picture of Mind Palace all on its own to show you. This is 3 coats without top coat.
LynBDesigns-Mind-Palace


Monday, January 20, 2014

6:00 AM

What's in a finish? - Neon


     Hello everyone. It's time for another installment of my what's in a finish series, which also means it's Monday... Well, what better way to chase away those Monday blues than with Neon! Now while I own several neon polishes I have yet to use them for more than a dotticure which I wasn't happy with the results. So a few fellow bloggers were gracious enough to let me share their pictures with you. Please stop over and check out their blogs or pages. But before we get to the pics lets talk a little about neon polishes.

     While the term Neon describes the color of the polish rather than the finish, neon's do have characteristics that are all their own.  Most neon polishes dry to a semi-matte finish and are typically know for a streaky application. However, they are a fun way to add a pop of color to your manicure. Neon polishes are bright on their own but can be even brighter when layered over white. That's not the case with China Glaze Pink Voltage as shown below by Polished Prescription

Photo credit:  Polished Prescription
     Shown here is 3 coats without top coat. You can follow the link provided to find out more about this specific polish. I'll warn you that there are a lot of photos so you may want your sunglasses handy.

     Not all neon polishes are quite so in your face bright as shown by XO NOELLE in the next photo. So if your looking for something to ease your way into neon's this collection from LCN might be more your speed.

Photo credit: XO NOELLE

   Still considered a neon polish this blue has a sort of muted neon feel to it. Perfect for a pop of color but not too bright at the same time.

      Neon polishes also make for fun nail art as shown here by Amanda Loves Polish.

Photo Credit: Amanda Loves Polish
     This is a manicure that I have wanted to do for a while but am holding off until the weather gets a little warmer. It's just too much of a fun manicure to sport during the gloomy days of winter. Although if we get another really cold spell here like a few weeks ago I might just change my mind about that.

     So what are your thoughts on neon polishes? Are you a wear a full bright manicure kind of person or do you prefer your neon in little bursts? Does the streaky application reputation scare you away or are you up for a challenge? Thanks for stopping by and checking out my post. Id love to get your take on these and as always, Happy Polishing!

Friday, January 17, 2014

6:00 AM

Milani Bijou Bronze


     Happy Friday everyone! I'm sure you're anxious to get your weekend started so I've got another quick post for you today.  My NOTD post is Milani Bijou Bronze. A warm coppery bronze color with micro shimmer.

     I don't know what it is with this shade of polish that draws me to it but, ever since I got my first pedicure with OPI's Down to my last Penny I have been hooked! Bijou Bronze was one of those polishes that I saw a swatch of and knew I just had to have. Unfortunately, it's not available everywhere Milani is sold. After months of searching, I finally found one at a CVS sitting all by itself on a shelf in the make-up section. I did a little happy dance an quickly put it into my cart.

Milani-Bijou-Blitz-Nail-Studs

     For this manicure, I used 2 coats of Bijou Bronze and added some simple square nail studs for extra bling. I then added 2 generous layers of top coat to make sure the studs wouldn't fall off. This was my first time using the studs and I wasn't sure how well they would hold up. Turns out not so well with my line of work. The next day it seemed like every time I looked down at my nails a stud would be missing! I've learned a thing or two since then so I won't be having that problem anytime soon.

Milani-Bijou-Blits-Nail-Studs
    
      The nail studs I ordered from Dollar Nail Art and are available in a variety of shapes and colors. Shipping was pretty fast and everything came wrapped up nice and safe. The only downside to ordering from them is you need a minimum of $35 per order. Which is sometimes hard to get to since everything is so cheap.

     So what do you think of this combination? I really liked the final result and may just wear this again sometime. Thanks for stopping by and Happy Polishing!


Wednesday, January 15, 2014

6:00 AM

Finger Paints She's a Beaut


     Today's NOTD post is Finger Paints She's a Beaut from the Vintage Glam collection fall 2013. A gold metallic polish with a brownish undertone.  To be honest I was drawn to this polish because of the undertones. Most of my golds seem to have more yellow to them giving them a polished brass look whereas this one reminds me of burnished brass. Perfect for that vintage vibe.


Finger-Paints-She's-a-Beaut-Vintage-Glam

    Shown here I have 2 coats of She's a Beaut without top coat. The application was nice and even. Unlike typical metallic polishes, this one dried to a smooth finish with minimal brushstrokes left behind. The few that my camera captured were hardly noticeable with the naked eye.

     There are 6 polishes in the Vintage Glam collection and can be purchased from Sally Beauty Supply. I have my eye on 2 more that hopefully will find a way to my house shortly. Fingers crossed I can still find them at my local store. If not they are still available to order online for $5.29 a bottle. ($4.49 with a beauty club card.)

     So what are your thoughts on She's a Beaut? Just your regular old gold metallic or a twist on an old favorite? As always thanks for stopping by an Happy Polishing!

Monday, January 13, 2014

12:00 AM

What's in a finish? - Foil


     Hello there everyone. It's time to get back to my nail polish finish series now that all the holiday madness and nail art challenge is over. Today I am going to take a look at the foil finish.

     The foil finish nail polish often has a metallic base with very very fine glitters added. It dries to a smooth finish but not quite as smooth as a chrome. This results in a very sparkly finish.

Zoya Bobbi

     Foils are usually compared to metallic finishes but there are significant differences between the two. Metallics typically come in metal colors, copper, gold, silver whereas foils cover the entire spectrum of the rainbow. Giving you a wider variety to choose from.

     I hope you've enjoyed this post, be sure to check out previous posts in this series and as always Happy polishing!

Friday, January 10, 2014

12:00 AM

Zoya Pierre


     Hi there. I just have a quick NOTD post for you today. The other night I posted a picture of 3 bottles of polish and asked my Facebook followers to help me pick which one to use. I left the vote open for 20 minutes and ended up with a tie between Zoya Pierre and Polish Addict Nail Color a.k.a PANC Berry Bewitching. So I decided why not get crazy and use both. Ok, maybe not so much get crazy, but lazy as I didn't want to make the final decision myself.

     These colors ended up going together nicely. In fact, they seem to have the same undertone to them. A muted purple leaning towards mauve. Which in my book lets them fall into the category of Pantone's color for 2014 orchid!

Zoya-Pierre-Polish-Addict-Nail-Color-Berry-Bewitching

     I used 2 coats of Pierre and 3 coats of Berry Bewitching to get full opacity. Then I topped everything off with a coat of Simply Quick top coat. As you can see Berry Bewitching is a slightly darker purple than Pierre and is meant to be a glitter topper but works well on its own too.

     Do you think these colors work for the color of the year? Thanks for stopping by and Happy Polishing!

Wednesday, January 8, 2014

8:11 PM

Laffy Taffy Pink Polish


     Today's blog post is brought to you by someone very special to me. My daughter who everyone calls my mini-me was given her very own set of nail polish from her grandparents for Christmas. Now if you've been following my FB page for a long time you may remember a few pictures I posted about the mani's she's had me do for her. She has her very own style when it comes to polish and knows specifics on what she wants me to paint. So I decided to let her do a guest post on my blog.

     Everything coming up will be in her own words and she even painted her nails all on her own this time. I only had to help with clean up on 2 nails. That was a proud mommy moment for this polish lover since she is only 5 yrs. old.

Laffy Taffy Pink

     This polish looks cute. It's my favorite color. It also looks good with a purple polish like I have on my toes. I applied one coat of polish. My mommy had to help me clean up a little. I like to wear this polish while I drink Chocolate milk. The strawberry scent smelled really good!

    I guess to a 5-year-old having pretty nails while drinking chocolate milk is pretty important. I think she may be paying more attention to me when I blog that I realized because she remembered to tell me how many coats she used. I love that we can spend time together painting our nails and talking about her day. I hope it's something that we can continue to do as she gets older, even into those "my mom embarrasses me no matter what she does" years.

I hope you enjoyed this post. Happy Polishing!
   

Monday, January 6, 2014

5:08 PM

Zoya Dahlia


     Today I have for you pictures of Zoya Dahlia one of the Pixie Dust polishes. When the textured polishes first hit the scene I wasn't too sure how I would feel about them. I'm normally a smooth nail kind of girl. But I picked up Vespa and Nyx to try out before I made up my mind completely. And then I was hooked. Since then I have only added Dahlia to my collection and have yet to branch out to other brands but that's going to change in 2014.

     Dahlia is a dark grey almost black polish loaded with sparkle. Fully opaque in 2 thin coats this beauty can stand on its own or make a fun base for decals or stamping.


Zoya Dahlia Pixie Dust
2 coats without topcoat
     The application was flawless. It was very easy to control where the polish went on the nail to avoid any pooling at the cuticles or overflow onto the sidewalls. Which is normally a huge problem for me since my nails have a dramatic curve at the sides. And now for a macro shot...

Zoya Dahlia Pixie Dust macro

     Even though this shot makes it look like I have a heavy grit sandpaper on my nails it's not that rough to the touch. I don't snag my clothing or bed sheets either. That was my biggest fear about trying textured polish in the beginning, all the things I could get snagged on, but I had nothing to worry about.

     Now back to that part I mentioned about it being a great base for stamping...

Zoya Dahlia Pixie Dust Stamping

     I used my Konad white with Shandy plate SH18 to make this skittled flower look. After all the Christmas nail art I needed something light and different. Plus I just LOVE flower manicures.

     So thoughts on the Pixie Dust polishes? Do you think the textured trend will continue into the new year or will we see them slowly phased out?

     Also, these are the first pictures I've taken with my new lightbox and I was wondering if you could noticed a difference. Thanks for stopping by and Happy Polishing! 


Wednesday, January 1, 2014

8:44 PM

A look back at 2013 and looking forward to 2014

     Hi there everyone. I hope you had a wonderful new year. I spent mine with my kids playing board games, reading book, sledding, and some video games. Today was a day of reflection for me. Ive been thinking a lot lately about setting goals for my blog for the new year and to be honest I'm stumped. Looking back over the last year I can see my little blog has come a long way from it's humble beginnings but I still have a long way to go. I want to say a great big thank you to thse of you who have stuck with me, made helpful suggestions, commented on my posts, and made me feel welcome in the nail polish community.

      
     2013 got off to a slow rocky start for me. I had the intention of this blog being only a hobby with a few post here or there with my main focus being on my facebook page. But was left with the feeling that I was talking to myself. Then I got some followers and a few comments and my spirits were lifted. After about 6 months I realized that in order to be taken as a serious nail blogger I was going to have to put in more work. 

     I still have moments when it feels like I'm talking to myself, especially when I have several posts in a row that have no comments, or hardly any page views. I used to let that get me down but now it motivates me to just want to work harder. Thanks to the recent giveaway I participated in my followers count has tripled, I only hope that some (ok most) of you stick around and find something worth while in my blog to comment on or keep you coming back.

     So what does that mean for me for 2014? For starters I need to really start blogging about my current stash. I have over 800 bottles of polish and Ive used maybe 120 of them. Seems I'm more of a polish collector than a blogger at this point. I also need to start putting more of my personality into my posts. Ive held back a little so far because I have days where I'm all over the board with my sense of humor. Yes I usually have the people around me in tears from laughing so much but it doesn't always translate well when written. Usually because I tell a lot of jokes using an accent. My co-worker and I spent an entire shift talking like Julia Child! (Did I just date myself with that reference?)  


    Of course I have the typical goals of better pictures, higher interaction, and finding a way to make my blog stand out from the hundreds of other nail polish blogs out there. With these goals in mind I look forward to everything that 2014 has in store for me and my little blog and I hope you come along for the ride. Happy Polishing!

Like what you see? Share it with your friends!