Showing posts with label Loreal. Show all posts

Friday, September 23, 2016

10:33 AM

L'Oreal - Charmed, I'm Sure


     Today I'm sharing another polish that I wore a few months back, In fact, I've already blogged a little about Charmed, I'm sure because I used it in a nail art look for spring. And to be honest this is probably a better color for springtime than it is for fall but hey, I don't always follow the rules and am a firm believer in wearing whatever color suits your mood.

     L'Oreal Charmed, I'm Sure is a light camel colored shimmer polish with subtle scattered holographic glitters.  I don't know what it is but I'm drawn to metallic and jeweled toned polishes. I find myself reaching for them in the stores, and from my helmer drawers when trying to pick a polish to wear. 


    The formula was a bit on the thin side, but not so thin that it wanted to pool at my cuticles. Surprisingly it's extremely opaque and was almost a 1 coater for me. Yes, you read that right, this thin formula polish was almost a 1 coater!  The polish was easy to work with and went exactly where I wanted it to on my nails. Shown here is 2 coats plus top coat. To say I was shocked at the coverage would be an understatement. I don't think it works well for stamping but it might be great in a water marble. I'll have to try it out and let you know in a future post. 


     Like all shimmer nail polish, Charmed, I'm sure does suffer from the dreaded brushstrokes but as you can see from my photos they are minimal. As we all know the camera picks up more than the naked eye, so what you see on the nail is even less. 


     Now normally a camel colored shimmer polish might not catch my attention but this reminded me of a lighter version of Essie's Penny Talk so I had to pick it up. And then I saw the subtle holo (which sadly decided to be shy during my photo session) and I knew it would be a color I'd enjoy. If I somehow ended up in a job that only allows neutral nail polish this would be one of my go-to's. Do you have a favorite neutral polish? Thanks for stopping by and Happy Polishing!

Friday, March 25, 2016

6:00 AM

Hobby Polish Bloggers presents Spring


     It's time once again for the monthly link up brought to you by the Facebook group Hobby Polish Bloggers. This month's theme is spring! Now I know there are a lot of options to choose from and I could have done any number of things for this prompt but I just cant pass up an opportunity to do a floral manicure.  Now there isn't a whole lot to say about this manicure so this post is going to be short and sweet. Just what we need on a Friday right? 


    I decided to go with something simple yet classy for this manicure. I really like the clean look this manicure gave me. I started with a base of L'Oreal Charmed, I'm Sure and a generous layer of top coat. A neutral shade with just a hint of shimmer


     The rose is a water slide that I picked up from Born Pretty Store a few years ago and sadly, is no lover available. But I just checked their site and there are quite a few floral options to choose from. I don't know about you but I really like this finished look.  I think there is just enough contrast between the polish and the decal to keep it from being boring, but it's not in your face either.  I was tempted to add the flowers to each nail but I'm glad I kept it to just one. Anything more and I'd have lost the clean, classic look I was going for. 

     Well That's all I have for you today. I told you this post would be short and sweet. If you're looking for more information on Charmed, I'm sure I'll have that for you in a post next week. So be on the look out for that. And if you're going to place an order from Born Pretty Store be sure to use code LAUNX31 to get 10% off your entire order! In the mean time why don't you take a look at the other manicures included in the link up? Thanks for stopping and Happy Polishing!


Wednesday, June 10, 2015

6:00 AM

Silver Nail Polish Stamping Comparison


     Happy Humpday everyone! How's your week going so far? My kids keep telling me that they have run out of things to do and are constantly bored. I guess we are in for a long summer. While I brainstorm ideas to keep them entertained why don't you take a look at today's blog post. I've compared 4 popular silver nail polishes to see how well they work for stamping. The polishes I tested are Sally Hansen Silver Sweep (Insta-dry line), Zoya Trixie, Essie No Place Like Chrome, and Sally Hansen Celeb City (X-treme wear line). Just how well do these silver polish staples work for stamping? Let's take a look.


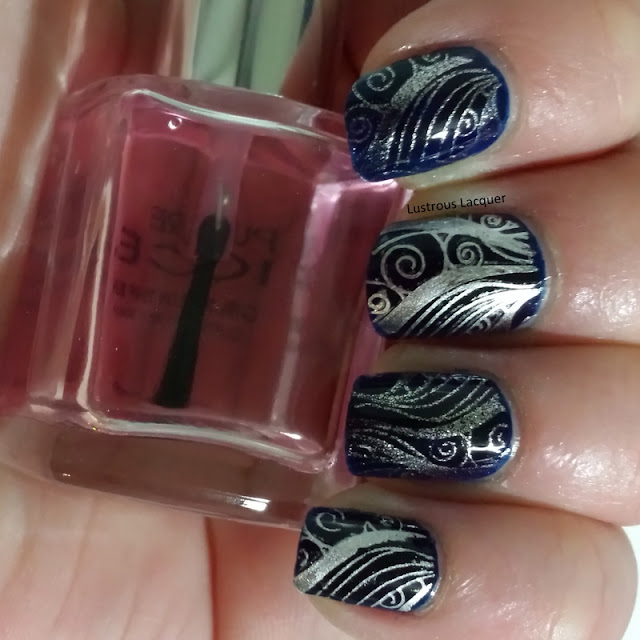
     Using L'Oreal After Hours as my base I set to work, choosing an image that had some larger spaces as well as some intricate designs from Konad plate M51.  As you can see all 4 polishes worked very well, but they have 2 different finishes. No Place Like Chrome and Silver Sweep have more of a chrome look to them, while Celeb City and Trixie have a shimmery finish. For this particular image, I like the delicate sparkly look of Trixie and Celeb City. But there is something to be said about the bolder look of No Place Like Chrome and Silver Sweep.


     While working on this post I think I may have found 2 sets of dupes, but I will get more into that in another post. So make sure you come back! 

     Id say depending on the look you're going for its users choice as far as which one to reach for. Generally, the Sally Hansen polishes are a bit more budget-friendly, and easier to get your hands on. But those seem to be the only real differences when it comes to these 3 brands.  I hope you enjoyed this post and found it helpful. Thanks for stopping by and Happy Polishing!


Wednesday, May 27, 2015

6:00 AM

L'Oreal- After Hours


     I hope everyone had a great weekend. I took full advantage of the long weekend and pretended to be on vacation. I even avoided the internet and tv for the most part and just enjoyed the company of friends and family.I know most of you had to get back to reality yesterday but I had an extra day off and now it's time to get back to the every day and back to blogging for me. Today I'm showing you a polish I picked up on the clearance rack a long time ago. L'Oreal After Hours is one of the first polishes I came across from a mainstream brand that was trying to mimic an indie. This midnight blue jelly is so dark I thought for sure it was black and that's why its taken so long to make an appearance on the blog. 

After-Hours-from-L'Oreal-deep-blue-jelly-nail-polish

     From the first few strokes, I was really impressed with the formula on this one, I tend to apply my polish with a heavier coat than most people, so you may have different results but this was almost a 1 coat polish for me. Have you ever heard of a jelly polish being a 1 coater? I was seriously blown away! Shown here is 2 coats plus top coat. After Hours on its own dries to a semi-matte, rubbery looking finish. 


     A word to the wise, make sure to use a GOOD base coat! As you might notice I have a little staining around my cuticles that just wouldn't go away no matter how much clean up I did. Well, guess what, my nails were slightly stained as well, and I did use a base coat, just not a good one. I should have known better. 


     Isn't that a beautiful deep blue polish! Sadly I think it is no longer available in stores but if you really want it there are a few bottle available from Amazon and eBay. Well, thats all I have for you today, I need to try and get to bed early since the weekend threw my entire schedule off. Thanks for stopping by and Happy Polishing!


Sunday, August 31, 2014

6:00 AM

Let's Go Camping Nail Art Challenge Day 3: Campfires

 
     It's the last day of the Let's Go Camping Nail Art Challenge. I'm sad to see it end. I've had a lot of fun doing these manicure. I am a camping kind of girl at heart after all. But I already know what next months challenge is and now I can get excited about that. On with today's manicure before I get too far ahead of myself. Today's prompt is Campfires. Who doesn't love a campfire? I actually even love the smell! And I know I'm not alone in that, come on don't be shy, who else loves that smell? Something about it just screams summer to me whether it's an actual campfire or just a bonfire in the backyard.


      I've wanted to do a flame manicure for almost 2 years now, but haven't. It's not for lack of time, it was pure intimidation. I wanted to get it just right, like so many of the other fabulous flame manicures I've seen floating around the internet. The most common technique to get this look is the needle drag. Now I don't know about you, but every single time I try this technique something goes horribly wrong and I'm left with big gauges in my polish. I thought, this time, I try a different approach and use a nail art brush instead. Well umm yeah, about that...


     The technique had eluded me again! One of these days I will make it work. But this isn't a total loss. It still looks like fire and I'm pleased about that. I'm just missing the individual flames. It's an abstract campfire. Yeah, that's it, abstract. That's my story and I'm sticking to it. ;)

     My base is L'Oreal After Hours. Going for that early evening feel, when you crack open your first beverage and settle in for a night of good conversation while watching the flames dance. Now that's my kind of summer night right there.


      For my flames, I used 3 polishes from the Cover Girl Capitol Collection: Sulfur Blaze, Flamed Out, and Rogue Red. I dotted each one at the tip of my nail and ran my nail art brush through them. Anyone notice the names of the polishes were fire related? Just a happy coincidence. I really like the coloring on my pointer finger, but the "shape" on my ring finger. And just because I could I decided to throw a matte top coat on to see what it would look like.


     I actually like it this way better, there's more definition between colors. Which way do you like better, glossy or matte? I hope you have enjoyed this challenge and are looking forward to the next one with me. Thanks for stopping by and Happy Polishing!


Thursday, August 28, 2014

11:30 PM

Let's Go Camping Nail Art Challenge Day 1: Under the Stars

   
     It's once again time for another nail art challenge brought to you by the Facebook group Challenge Your Nail Art. This time around the theme is "Let's go Camping!" and today's prompt is "Under the Stars".

    
     For this manicure, I had the vision of a wonderful night sky scene by the lake with the stars twinkling and some waves crashing against the shore. But then I got real and remembered that my nail art skills are severely lacking. I did manage to create at least part of that image on my nails!

blue-and-black-gradient-manicure

    I decided to recreate the night sky from a camping trip I took back when I was about 11. My family sat up almost until dawn watching the Northern Lights dance across the sky. And because we were so far away from any city lights the colors were amazing!

     To get this look, I started out with one coat of Sally Hansen White On so that my gradient colors would really pop. I used Sally Hansen Black Out, L'Oreal After Hours and Maybelline Blue Bombshell for my gradient.  I really wanted to capture the way it looks when the first rays of light start to change the sky from Black to blue.

Gradient-manicure-black-and-blue-nail-polish

     After letting my gradient dry I used a glow in the dark polish from Sinful Colors to make my Northern Lights. By removing almost all of the polish from the brush I was able to create the sort of wispy effect I remembered from my childhood.

     The stars are my absolute least favorite part of this manicure and the reason I don't "love" the finished look. I used my smallest dotting tool and went in with Sally Hansen White On to add them. I think they just look too much like dots instead of stars and that's my issue. Someone will have to give me tips on how to make them look more star-like.

      My favorite part of this manicure is that the Northern lights actually glow! I wanted to get a picture of that for you but realized that it just looks like glowing blobs. I did manage to get a picture where you can see some of the glowing effect and the rest of the manicure at the same time.


     I think it looks really cool this way, and really captures the look I was going for. So what do you think on my "Under the Stars" manicure? Make sure you stop back tomorrow to see what I came up with for "Nature". In the meantime let's check out what the other talented ladies came up with for today. Thanks for stopping by and Happy Polishing!


Monday, March 10, 2014

6:00 AM

What's in a finish? - Sheer


     Today I'd like to take a look at the sheer finish for nail polish. What used to be reserved only for french manicures has quickly been adopted into the world of nail art. In fact, OPI currently has a new collection coming out consisting of only sheer polishes. But what is a sheer finish?

     A sheer finish nail polish has a half transparent finish to it. In other words, you will still have a very visible nail line even after 2 coats. As shown below with China Glaze Heaven.


China Glaze Heaven
   
Sally Hansen Whisper
     Usually, you would find sheer polishes in neutral or soft pink shades, but many companies have expanded into other colors as well.

Loreal Tweet Me
     We are also starting to see some shimmer or sparkle added to the sheer finish as shown in Loreal's Tweet Me. In my opinion, I think this year the sheer finish will be making a come back, and will no longer be reserved for the typical French Manicure.

     How do you feel about a sheer finish nail polish? Do you have any favorites? Thanks for stopping by and Happy Polishing!

Monday, November 25, 2013

7:22 AM

What's in a finish?- Jelly


     Today on the What's in a finish series I take a look at the Jelly finish. So what is a jelly finish? Well, Jellies are like glazes and are basically pigment added to a clear base. They are often described as having a "squishy" texture. You might notice that a lot of glitter polishes have Jelly bases making them great for layering on their own or over a cream polish to give it a little extra Pizazz.

Photo Credit: Hot Pink Aurora
 
Loreal Tweet Me
Loreal Tweet Me

     Because Jellies are usually made in a clear base they tend to be sheer but have an extremely glossy finish. However, if you're looking for full opacity be prepared to apply several coats. One trick to avoid adding 5 layers (or more) of polish to your nails would be to use a similar color creme polish as "undies".

     Many nail Bloggers use Jelly polishes in what's called a "Jelly Sandwich" manicure. You need 2 polishes to make a jelly sandwich. The first one being the jelly polish to be used as the "bread". Normally this is a pigment only jelly. The other polish used is a glitter polish for the "meat".  A chunky glitter typically gives you more dramatic results, but any glitter would work.
  
Photo Credit: Goose's Glitter
     So what do you think of the Jelly finish? I only have a few in my collection and have yet to do a jelly sandwich. I should probably give it a try one of these days. If you missed the previous posts in this series you can catch up by following these links: Creme, Matte, Shimmer, Suede, and Satin. Or if you have questions about a finish I haven't covered yet, feel free to ask about it in the comments and I can make it the next one in the series. Happy Polishing!

Like what you see? Share it with your friends!