Showing posts with label Holo Powder. Show all posts

Thursday, December 28, 2017

6:00 AM

Ugly Christmas Sweater Nails


     Hi Everyone, I know Christmas is over but I have one more look to share with you before moving into the New Year. It's my Ugly Christmas Sweater nails from this year's Ugly Sweater party. You might remember my ugly patchwork nails from last year, this year I decided to go a more traditional route. Afterall nothing was going to top the excitement from last years party. And just in case you were wondering, no we haven't set an official date yet. I will you keep you posted if anything changes. Now let's get to the nails!

Stamped-holographic-Christmas-manicure


     For this manicure, I started off with a base of Stiletto on the Run from the Darlings of Defiance collection by Orly. For my accent nail, I used a base of Sinful Colors Black on Black. Once again I used SuperChic Lacquer G-Force X to help the holographic powder adhere to my regular polish. Once again I used the silver Holographic powder from Born Pretty Store.


     My accent nail is stamped with Hit the Bottle Poison Apple and an image from What's Up Nails plate B022.  For the rest of my stamping, I used images from plate UR Beautiful-18 and stamped with Hit the Bottle As Black as Night and Holo There Beautiful.


     I loved the way this turned out! I wish I would have thought to photograph the sweater I wore because this manicure matched it almost perfectly. What do you think of my ugly sweater nails? Thanks for stopping by and Happy Polishing!

Thursday, December 21, 2017

6:00 AM

Holo Powder Snowflakes


     I hope you're not getting tired of my Holiday nail art looks yet because I have a few more to share with you before the big day. Today's look might be a bit familiar to you since I've recently used the technique. Anyone remember my stamping with holo powder post? Well in that post I mentioned a nail art look that I had in mind and now I'm finally able to share it with you. 

     I have to be honest here and let you know that I didn't think through each step thoroughly before starting this manicure and it's not exactly what I had in mind so you will probably see this technique again as I work the kinks out. On the other hand, I do like the way this turned out and I've got a few more ideas up my sleeve to try out now so I guess you could say it's a win-win! 

     I call this manicure Holo Powder snowflakes because well, that's just what it is. Snowflakes stamped onto my nails and holo powder burnished over them. Yeah I know, I'm not very creative when naming my manicures or blog posts. It's one of the things I'm working on. 
     

     To create this look I started with a base of Sinful Colors Black on Black and waited for it to dry. After that, I applied my G-Force X from Super Chic Lacquer (my secret weapon when it comes to regular polish and holo pigments) to my nails and Simply peel from Bliss Kiss to protect my cuticles.


     I stamped with Hit the Bottle As Black as Night and the snowflakes are from image plate UR Beautiful-16. I've had this plate for awhile but it's only been used recently and frequently, to be honest. I got the opportunity to go to a lock-in for a local girl scout troop and paint nails. At least half of the girls picked this plate to use. It was kinda cute and a lot of fun. But after 4 hours of painting nails, I have a new found admiration for nail techs. 


      I know it's not easy to see in each photo but I used 3 colors of holo powders in this look. I wanted to use 4 but found out I don't have a green in my stash. I'll have to remedy that soon. Each powder is from Born Pretty Store and are item number's 33256 (Silver Holographic), 39224-2 (gold holographic) and, 39324-8 (Red Holographic). I randomly burnished each color onto my nails trying not to create a pattern. I was hoping that the powders would blend just a bit better to create more of a gradient look but the gold wanted to cover up the red so any hope of a gradient was quickly dismissed. I'll have to see if I can find a different way to get a gradient effect with the powders, or if you have any tips or ideas feel free to share. Also if you'd like to pick up any powders for yourself used code LAUNX31 to get 10% off your purchase from Born Pretty Store.


     I hope you enjoyed today's nail art look. Let me know what you think in the comments. As Always thanks for stopping by and Happy Polishing! 

Thursday, November 16, 2017

6:00 AM

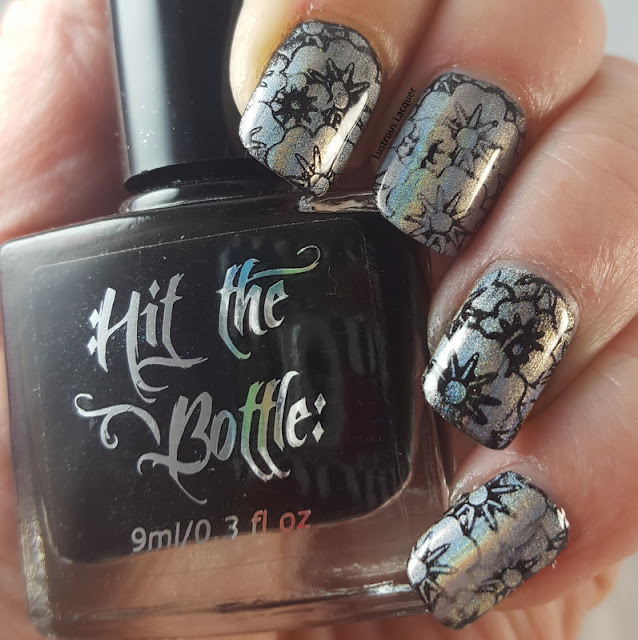
How to easily stamp with holo powders using regular nail polish


     Hello and welcome back to another blog post. I don't know about you but I am excited to share today's look with everyone. For the last year or so I have been watching youtube videos and seeing pictures posted online of all these gorgeous manicures using the holographic pigment powders. But 99% of them were done using gel polish. I have only worn gel polish once in my life and the removal process was the stuff of nightmares. Granted I attempted it myself and probably did it wrong but it was enough to scare me away from using it again. Well, I no longer have to look longingly at these manicures with envy because I was finally able to get the powders to work for me using regular polish! 


     I know there are a ton of tips out there on how to do this and you're probably wondering what took me so long to join the holo powder party. Trust me I was eager to get there long before this, I just struggled with it and took a step back for a bit. I tried using Orly Bonder on my nails with so-so results. I think I let it dry too long before applying the powder so I will be attempting it again. I also tried using my Sally Hansen miracle gel top coat to see if that would work and it failed miserably. However, it did work great with the multi-chrome flakes I received from Beauty Big Bang.  

     So what was the miracle product that helped me finally find success? G-Force X from Super Chic Lacquer.  I was able to get such great result so easily with this product and would recommend it to anyone who wants to use the holo powders with regular polish. Sadly there was no sun the day I did this manicure and I had to take photos in my light box. This resulted in a duller holo flash than what I actually saw on my nails. Thankfully while I was editing photos at my desk I noticed enough natural light coming in the window to get one shot that worked. So I've added it as a bonus shot at the end of the post. 

    Now on to how I created this look. I started out by painting my nails with Hit the Bottle As Black as Night. I know it's a stamping polish but I wanted to make sure that the color I stamped with completely matched my base color.


     Once that dried I added a layer of G-Force X to one nail and let it dry for about  30 seconds. And stamped my design using UR Beautiful plate 11. After this step, you want to make sure you wait long enough for the stamped image to dry before burnishing in your powder. I got a little excited and didn't allow enough time between steps and the faded image on my middle and pinky fingers are the end results.


      The holo powder I used is from Born Pretty Store item #33256. Use code LAUNX31 to get 10% off your order if decide to pick some up. The macro shot above it before adding a top coat. And the next photo is after adding a layer of the Sally Hansen Miracle Gel top coat.


     I still have the holo flash but the power no longer looks smooth. So any recommendations you have for a better top coat to use are greatly appreciated. And now for that bonus shot I mentioned earlier.


     Some of you might be wondering why I did the manicure the way I did. Why didn't I apply the holo powder before stamping? I'm sure that would have been an easier process. But I wanted to see if the powder would stick to my entire nail or only the places without my stamped image. I have an idea in mind that involves stamping and a few colored powders, almost like the lead-light technique. My hope is to test it out this weekend and if it works I'll have it up on the blog soon. Make sure to come back and check it out! Thanks for stopping by and Happy Polishing!

Like what you see? Share it with your friends!