Showing posts with label Dollar Nail Art. Show all posts

Thursday, December 7, 2017

6:00 AM

Finger Paints - Winter Glaze Collection


     During my Thanksgiving break from school I did a little brick and mortar shopping for polish. My coworkers had given me a gift certificate to Sally Beauty supply and it was burning a hole in my pocket so of course I had to spend it. I came across the Winter Glaze Collection from Finger Paints at the firsts Sally's I stopped at. I grabbed 4 polishes from the display and happily made my purchase. It wasn't until I got home that I found out only 2 of the polishes were from the collection. The other 2 were left over from a summer collection. Of course being the polish hoarder I am I just had to get the rest of the collection. I went to 2 more Sally's but came up short. I was only able to find 4 of the 6 polishes in the collection. Not to worry though, I was able to order the missing 2 online and they should be here shortly. Needless to day this is not an easy collection to track down. 

     I'll be sharing the 4 polishes I was able to find with you today, and I have to say I am extremely impressed with this collection.  Mainstream polishes seem to be stepping up their game lately. Just like Orly, Finger Paints has changed their brush. They no longer have the skinny round brush but have switched to the wider flat brush I'm used to seeing the in the Sally Hansen Insta-Dri line. 

     This will be another picture heavy post so I'll get some particulars out of the way right now.All photos are taken in my light box using daylight bulbs. I'll include how many coats I used for each polish as I go since that is different from polish to polish. Now let's get to the polish!

Piece De Resistance

Burgundy-wine-nail-polish-with-red-shimmer

     Color: Deep rich burgundy wine color with red shimmer.

     Application: The application was a dream with smooth even coverage. Piece De Resistance is extremely pigmented and very opaque. Shown here is 1 perfect coat plus top coat.

Burgundy-wine-nail-polish-with-red-shimmer

Burgundy-wine-nail-polish-with-red-shimmer

     I wouldn't recommend adding a matte top coat to this one as it seems to have made all the shimmer disappear. Although it does look pretty dark and vampy that way. And it does remind me of Mentality Tempest so this would be a great and much safer alternative.

Burgundy-wine-nail-polish-with-red-shimmer


     For my nail art look I stamped with Bundle Monster plate Winter Kingdom BM-XL482 and Hit the Bottle A Glint of Gold. 


     I love everything about this polish. The deep rich color, the smooth formula, the 1 coat coverage. I wouldn't be surprised if it worked well for stamping. 

Easily Noticed

Dark-Navy-Blue-Creme-Nail-Polish

     Color: Extremely dark navy blue creme nail polish that almost looks black on the nail.

      Application: Shown here is 1 perfect, effortless coat plus top coat. Easily Noticed is another highly pigmented, extremely opaque polish with a smooth formula and easy application.

Dark-Navy-Blue-Creme-Nail-Polish

Dark-Navy-Blue-Creme-Nail-Polish

     To dress this color up I added a few Ice Chips from Dollar Nail Art in the color White AB. I'm going to have to play around with these again to see if I can get a smoother application.


     Overall I like the formula and opacity of Easily Noticed. I do think the color is just a bit too dark for me to wear alone again. I do want to test to see if it works for stamping.

Cubism Crimson

True-Red-Jelly-nail-polish-with-red-shimmer

     Color: A true crimson red nail polish with subtle red shimmer and a jelly like finish. 

     Application: The formula was the thinnest of the collection but still very easy to work with. I was able to get smooth even coverage with each coat. I do still have a slight VNL after 2 coats which is typical of a jelly polish. I have a feeling if I'd added a 3rd coat full opacity would be reached. Shown here is 2 coats plus top coat.
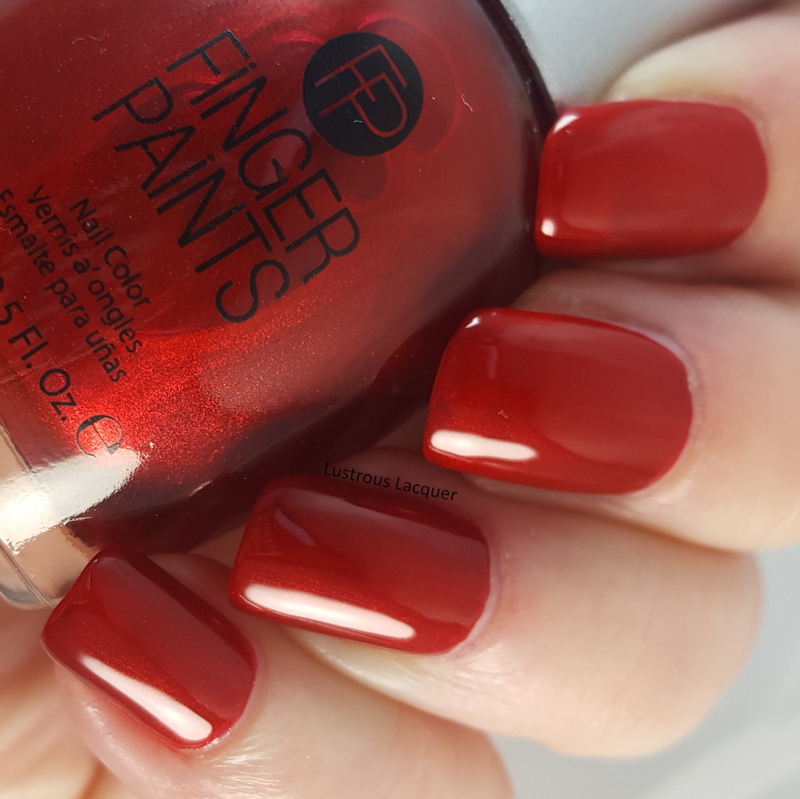
True-Red-Jelly-nail-polish-with-red-shimmer

True-Red-Jelly-nail-polish-with-red-shimmer

     For this nail art look I went with the waterfall technique. I used some striping polishes from China Glaze in Black, white, and Silver. You can find these stripers at Sally Beauty Supply also.


     This is another favorite of mine from the collection. I just love how shiny and squishy it looks! Plus I'm a huge fan of bright red nails.

Oh My Gauche

Gold-micro-glitter-nail-polish

     Color: Clear based polish jam packed with yellow gold micro glitter.

     Application: Great coverage with each coat. Typically I'd apply the 2nd coat of glitter polish with a sponge to get full coverage but not this time. I was about to get full even coverage by applying this one just like any other polish. No sponging required! Shown here is 2 coats plus top coat.

Gold-micro-glitter-nail-polish

Gold-micro-glitter-nail-polish

     For my last nail art look I went the free hand route using my China Glaze striping polishes. My idea was to create the look of argyle wrapping paper. The good news is I'm getting better at my freehand work. The bad news is I'm still having issues with the angles of my strokes. But this just gives me something to work on in 2018 and I'm up for the challenge. 


     I have to say I was very impressed with the coverage I was able to get with Oh My Gauche and I like the bright gold color.  The 2 colors I'm missing are also glitter polishes and this one is giving me high hopes for them.

     I'm very glad I picked this collection up and have to say if this is any indication of how Finger Paints polishes are going to be I'll have to pick up future collections. If you can find this collection I suggest snatching up the colors you want,you wont regret it.  Thanks for stopping by and Happy Polishing!

Wednesday, July 26, 2017

9:10 AM

Laser Lace Nail Art


     Today I have a fun new product to share with you from Dollar Nail Art. It's called Laser Lace and when I saw it on their website I knew I wanted to try it. I thought to myself that I might finally be able to share a completely new product with all of you and ordered a sheet in every color. The pictures they showed looked absolutely stunning and unique to any of the nail art looks I've seen from others. Now I still might be able to share with you a brand new product but it's not an easy product to work with. Let's take a look.


    For my first look, I used the Raspberry Laser lace over a base of Sinful Colors Snow Me White. I wanted to do full coverage on an accent nail and then random pieces on each additional nail. Well, I did it but it didn't turn out how I wanted.


     For starters, the laser lace is extremely delicate and once it was cut into pieces it wanted to separate. So instead of getting nice little strips on my nails, I ended up with random splotches. I do like how my pointer finger turned out, it's almost like the veins in marble. Which if you've been reading my blog for the last year you'd know that's a look I love but haven't mastered yet.


     I wasn't ready to give up just yet so I decided to try the lace over a darker base just to see if it made a big difference.


     This time around I used Cult Nails Black Out as my base and the Sky Blue Laser Lace. Yes, I know it doesn't look blue at all, yet it did before I cut it into smaller pieces. I'm not sure exactly why it has changed. I thought maybe I applied it upside down but that wasn't the case. Either way, I do like the contrast between the lace and the black. But I am disappointed I didn't get the pale blue color.


     As you can see my second attempt was not a success. I think at this point I was getting frustrated, especially since my blue lace didn't look blue at all! 


     So here are some tips I learned while trying the Dollar Nail Art Laser Lace. I hope if you decide to try this product they will help you. Also, I should mention quickly that removal was easy. The lace came right off with regular remover.

 1. Have your pieces cut and ready to apply right after applying your top coat as it is not self-adhesive.
 2. Work on one nail at a time!
 3. Have a soft brush or similar item handy to push the lace onto your nail. That way you can avoid using too much pressure and ruining your base color.
 4. After applying the lace use a good top coat to cover it because there will be a LOT of texture. I recommend one made specifically for chunky glitter. If you don't own one it will take at least 2 thick coats of a regular top coat to smooth it out. And even then you'll still have aome slight texture.

      I definitely need more practice with this product. Maybe I'll have better luck when my nails are longer since I always seem to have trouble with nail art when my nails are nubbins. So what do you think of the laser lace? Do you have any other tips that might make my next attempt more successful? Have I scared you away from trying this product? Let me know in the comments and as always Thanks for stopping by and Happy Polishing!

Friday, December 9, 2016

6:00 AM

Claire's Mood Polish - Flirty and Shy

*Nothing to Disclose*

     There's a famous saying that goes "You get what you pay for." And while that is usually true, every once in a while a product comes along and changes all that. Today I will be sharing with you one of those products. Claire's nail polishes are some of the most wallet friendly polishes you can buy and are available in almost every mall across the country. So Imagine my surprise when the 3-year-old bottle of Mood polish my daughter chose for me to wear still shifted colors. And I don't mean just a slight shift during extreme temperature changes, but a very noticeable shift as I was painting my nails!


The formula of Flirty and Shy sadly was not as friendly as it's price tag. My bottle was thin and runny with a lot of streaking no matter how much I tried to remix my bottle. Now this could be a factor of its age and not the original formula, but I guess I won't know that for sure unless I pick up another bottle.


     Flirty and Shy dries extremely quickly to a matte finish and for me, the color shift was almost instantaneous. Shown here is 2 coats plus top coat. 


     For an accent nail,  my daughter decided I needed to break out my nail foils and picked the Azurit design from Dollar Nail Art. Of course, if you've used nail foils before you know that a regular top coat ruins the foils, and a water based one is needed. The only water based top coat I've tried is Sprout although Id love to hear your suggestion for a different option. Thanks for stopping by and Happy Polishing!

Friday, December 18, 2015

6:00 AM

Hobby Polish Bloggers and 40 Great Nail art Ideas presents - Christmas


     Its that time of year again. Christmas shopping, cookie baking, holiday parties and in my house the plague. The one thing my children share no matter what without fail is their germs, and after being nurse mommy for the last 3 weeks it's my turn so today's post is going to be a quick one. 

     This week both the Hobby Polish Bloggers monthly link up and the 40 Great Nail Art Ideas challenge have lined up perfectly so I can share my Christmas manicure for both with one post. I love it when things work out in my favor. Now most of you know I have been doing the color/pattern prompt for the challenge but this week I'm breaking from my regular schedule to join in on a theme week. Because of the holidays the color prompts were taking quite a long break and I wanted to keep my nail art momentum going. Now for today's nail art look....


    Thanks to my hectic home life right now I opted for something simple and easy to create. And I actually like the results, I feel very festive and fun even as I sit here in my sweats. 


      To create this look I used Fair Maiden Fire Frost as the base for my accent nail and Darling Diva Don't Call me, I'll Call You for the rest.  What you can't see in my photos is my thumb nail (I tried to include it for you but the pictures just looked awkward and not suitable for viewing) which is also painted with Fire Frost and a red rhinestone to help tie the whole thing together. 


    I used some new nail vinyls from KBShimmer to make my peppermint swirl design. The rhinestones I picked up from Dollar Nail Art and add just the right amount of bling for me. If you haven't checkout out Dollar Nail Art and you're a fan of embellishments I highly recommend them. 

     So there you have it. A quick and simple nail art look that's easy to create for the holidays. Let me know what you think of this look before you check out the other talented ladies. Thanks for stopping by and Happy Polishing!


Wednesday, August 12, 2015

12:28 PM

Lime Crime - Parfait Day


     Happy Wednesday folks! Sorry about missing my posts on Monday but life got away from me a bit. With all this back to school stuff going on time just seems to disappear. Not to fear I've got a fun bright polish to show you today and hopefully make up for my short absence. 

     Lime Crime Parfait Day is a Saturated baby pink or some might call it a muted neon pink. Either way, it's a fun color to wear during the summer months. An added bonus is that this color makes your skin look really tan!


     Like a lot of pastel polishes the first coat of Parfait Day goes on a little streaky but evens out on the second. 


     As you can see from my photos it's a little unforgiving with nail imperfections so a good ridge filling base coat is a good idea. 


     Parfait day is one of the few colors in my collection that I have worn numerous times. In fact, it's on my toes as we speak. I just love this color during the summer and have been known to whip it out during those long winter days when I need a pick me up.  

      Plus it looks great with nail art. I used Parfait Day in the stamped gradient I did for a friends wedding last summer. This time around I kept it simple with some purple rhinestones from Dollar Nail Art. 


     What is your favorite way to dress up a pretty creme polish? Let me know in the comments. That's all I have for you today. Back to hunting down deals on school supplies for me. Thanks for stopping by and Happy Polishing!


Monday, June 8, 2015

8:09 AM

Madam Glam - Found the One


     Good Monday Morning to you! I hope everyone had a fantastic weekend. Today I am rounding up my trio of posts featuring Madam Glam polishes. I saved my favorite one for last, Found the One. 

Photo was taken in incandescent lighting

     Found the one is a dark vampy red polish with a jelly finish. The application was good, with the first coat applying a little uneven. Everything smoothed out after 2 and dried to a super glossy finish.

Photo was taken in natural light

     While not a traditional red I still think Found the One gives my nails a classic look. And I love how the red color comes out in the sunshine. 

Photo was taken in incandescent lighting

Photo was taken in natural light
     I tried out a little nail art and am pretty happy with the results. I just wish the studs I used matched the gold polish a little better. 


     For the stamping, I used Messy Mansion plate MM18 and Essie Good as Gold.  The studs I picked up from Dollar Nail Art. Which if you haven't checked that site out I highly recommend that you do. You'll find a ton of nail art supplies, very reasonably priced. The only downfall is that there is a minimum purchase of $25. 

     If you're thinking about picking this polish up for yourself follow this link  http://madamglam.com/?utm_source=yt-lust 
and used code YT30 for 30% off your entire order.  Don't forget to check out my previous posts
featuring Disco Ball, Ibiza, and Paradise Fiesta. Thanks for stopping by and Happy Polishing! 

Friday, October 24, 2014

6:00 AM

Finally a top coat that wont ruin nail foils! Sprout- Raindrop clear

   
     Today I have for you the answer to all your nail foil prayers. Ok well, to be honest, I don't know if that's true, but I did find a top coat that works with nail foils. Finally! You might remember my previous post: My love/hate relationship with nail foils from earlier this year.  Sprout Raindrop clear top coat was the answer to my needs.


      For this test, I used some nail foils that I picked up at Dollar Nail Art. They are not the easiest to apply, but I'm hoping that I'll get a little more practice now that I've found a way to actually wear them. I'll start out with a picture of the nail foils alone.

    
     And here's a macro shot just in case you want a better look. As you can see I still struggled with getting these applied just right, but I was still able to get good results for the top coat testing.


     After applying the foils I added a thin coat of Sprout, making sure to not drag the brush across the surface of the nail. This is not a quick dry top coat and did take about 20 minutes to fully dry for me.


     While I still didn't get absolutely perfect results from Sprout it is leaps and bounds better than my traditional top coat that I attempted to use the last time. There is still some slight wrinkling of the foils but it's minimal. This next macro shot makes it seem much worse than it is to the naked eye.


     On the left is a nail foil with only Sprout Topcoat applied, on the right is the addition of a quick dry top coat. I wanted to see if the quick dry top coat would still ruin the nail foils after Sprout was applied and also which way would hold up better. The additional top cost also seemed to smooth out any wrinkles in the foils. 

    Now the real test. How did everything hold up after a day filled with laundry, dishes, and raking leaves?


     Well, not as good as a traditional manicure that's for sure. But it was a completely different experience for me than the first time wearing foils. The ring finger held up the best as that was the only one with both top coats on it.


      Sprout Raindrop clear didn't turn out to be the miracle product I was hoping it would be, and allow me to wear nail foils for a few days. But it is the only top coat I've used that didn't ruin the foils the minute it touched the nail. And now I can wear nail foils without my nails being a complete disaster after walking out the door.  Thanks for stopping by and Happy Polishing!


Monday, June 23, 2014

6:00 AM

Sinful Colors- Cream Soda

   
     Hi everyone. Today I have a quick post to share with you. If you've been following my facebook page you know that I burned my fingers over the weekend. Typing is not exactly my friend at the moment so I'm going to keep this short and sweet.
 
     A few weeks ago I went on a blogger meet up and these are the nails I wore. Sinful Colors Cream Soda with silver nail studs from Dollar Nail Art.

Sinful-Colors-Cream-Soda-Nail-Studs

     Cream Soda is a pretty coral colored creme polish that dries to a semi-gloss finish. The application was ok. The polish is thinner than most of the ones I own but not so much to be a runny mess. The first coat was a little on the sheer side but reached full opacity after 2. Shown here is 2 coats plus top coat.


Sinful-Colors-Cream-Soda-Silver-Nail-Studs

     Cream Soda is part of the Mod in Bloom collection. I picked mine up at Walgreens back in April but saw a few over the weekend when I was running errands. The studs I used can be purchased from Dollarnailart.com but be warned, you need to have a minimum purchase of $25.


     Overall I like the color, but don't feel the name fits it. The application wasn't so bad that I wouldn't reach for it again, but it's not a go-to polish for me. This color reminds me of Orange Creme from last years collection. I'll be doing a comparison post on those when I'm able to get back to polishing.

     Well, that's about all the typing my fingers can take for today. I appreciate you stopping by and as always, Happy Polishing!
     

Wednesday, February 19, 2014

11:05 AM

My love/hate relationship with Nail Foils


     Good morning my fellow lacquer friends. Happy Hump Day! Today's blog post is about my recent experience with nail foils. Oh, how I looked at picture after picture of manicures done with them, Longing to have them on my fingertips. Finally, after a few months, I bit the bullet and purchased a set of them from Dollar Nail Art. My order arrived and I was all excited about them. And then they sat there daunting me, teasing me, daring me to use them. You know the term "you are your own worst critic"? Well, I am my own biggest naysayer and trying something new, especially when I share my attempts with the world scares me a little. It's something that I'm working on so I watched a YouTube video for some tips and jumped right in. I always feel more prepared and indestructible after watching a few videos on how to do something. Anyone else ever feel that way?

    So after learning that patience is a virtue once again I finally got my first foil applied successfully. It's not perfect but I loved it!

Nail-Foils-Lustrous-Lacquer
    
     At first, I was only going to do an accent nail for my manicure but how could I resist a full manicure of this gorgeousness! So with limited time before work I set out to do just that. The end result is a little bit shady as there is a slight learning curve to nail foils but I was determined!

Nail-Foils-Lustrous-Lacquer

     So this is where the love/hate relationship comes in. I love how this looks. ( Have I said that enough in this post?) But I had a few bald spots on my nails that I couldn't fix. Plus you cant top coat them. When I  tried to top coat them they got ruined. The foil almost crumpled up on my nails. Here's the kicker. Once you have your foils applied don't move, don't apply lotion, stick your hands in your pockets, wash your hands, or just generally touch anything. If you do this is what you'll end up with.

    
     Nail foils are extremely fragile and delicate. This was just 2 hrs into my shift at work. I felt so embarrassed to have my nails looking like this. I put gloves on just to hide them and that removed them even faster. By the end of my 8 hr shift, there was nothing left of the foils at all.

     If anyone has any tips about how to make these last longer I'm all ears. Part of me wonders if a non quick drying top coat would work better but I haven't had time to test this theory yet. I hate to think that I have all these foils that I cant really use. I'd love to hear your thoughts on nail foils or any tips you'd like to share. Thanks for stopping by and Happy Polishing! Also dont forget to check out my 3K giveaway.


*UPDATE*

     A few months ago I found a top coat that actually works with nail foils. You can find my post and review here

Like what you see? Share it with your friends!

