Showing posts with label Rimmel. Show all posts

Friday, May 29, 2015

6:00 AM

Put Up You Dupes - China Glaze For Audrey vs. Rimmel Mintilicious


       After my recent post on Rimmel Mintilicious, I was asked how close it was to China Glaze For Audrey. Well, I happened to own For Audrey so I set out to find the answer. Is Mintilicious a dupe for the famous For Audrey? Let's take a look.

 
     At first glance, you can see that For Audrey is slightly darker in the bottle. It also has a greener undertone to it than Mintilicious. But do these differences carry over once applied to your nails?


     They sure do! As you can see these two are not dupes. While they are both nice colors For Audrey almost looks muddled or dingy next to a brighter Mintilicious. And just for the record, I have never thought For Audrey was a dingy color when I've seen it worn alone. 


     Now let's talk formula. For Audrey had better coverage on the first coat, but both were completely opaque after 2. I used 2 coats plus top coat for this post.  I even tested out how well each of these will stamp using Shandy plate SH20.


     Both polishes worked out really well for stamping. For my base color here I've actually used 2 polishes for another comparison post that will be up on the blog soon. I won't reveal what the polishes are just yet, but they are in fact dupes. Looking at Mintilicious and For Audrey stamped next to each other they look like dupes don't they? 

     I've heard that For Audrey is discontinued but I see it on the shelf every time I go to my local Sally's so you still might be able to get a bottle, Mintilicious is only available online if you're looking to add it to your collection. 

      Over all, I think that these are both really great colors and definitely not dupes. If I had to have only one in my collection I would have to go with Mintilicious, but only because it's the brighter one. I hope you found this post helpful. Thanks for stopping by and Happy Polishing!


Friday, May 22, 2015

6:00 AM

Color4Nails - Crystalline Nail Veil


     Hi everyone and Happy Friday! I've decided that this would be a good post to reveal the nail art I hinted at in my previous post. Which would have been an awful mess to clean up if I hadn't been using the Crystalline Nail Veil from Color4Nails. 

    You might be asking yourself what the heck is Crystalline nail veil? Simply put it's a nail artists best friend!  It's a latex based product meant to aid in clean up from otherwise messy nail art techniques. There are a ton of these products out on the market right now. Including some not originally intended for nail art.  You might remember my previous attempt using Proclaim Hair Glue.... not a pleasant experience for me. While the product worked I had issues with removal and application. I had a much better experience this time around.

     Crystalline Nail Veil comes in a small square bottle with a long skinny brush just like a nail striper. The skinny brush made application around the nail very easy. This part is crucial for me since it seems like no matter how much care I give my cuticles they are forever rough around the nail and polish seems to stick there like a magnet. Clean up for me is sometimes is a real B!*ch. The skinny brush did give me a little trouble when it came to applying the product over a larger area on my finger but I imagine that will get easier with time. 

Crystalline Nail Veil wet

     Nail Veil goes on a bright yellow color and there is a slight odor that I wasn't expecting, It's not particularly strong and disappears as it dries but I wanted to make sure I mentioned it in this post. And it does dry rather quickly which is always nice. 

Crystalline Nail Veil dry

     When dry the nail veil turns into a darker almost dandelion yellow. It's not particularly sticky and I couldn't even really feel it on my skin but,  your fingers will want to stick together if they touch. Yep learned that the hard way, it was easy to get them apart and the product did stay put so I didn't have to start over. Whew! I also did a quick video showing how easy removal is. It's my first real attempt at a video and I'll warn you its a bit rough. 


     My nail was still really wet which made getting my very cheap tweezers to grab anything a bit tricky, but once I got a hold everything peeled off in one nice piece. 

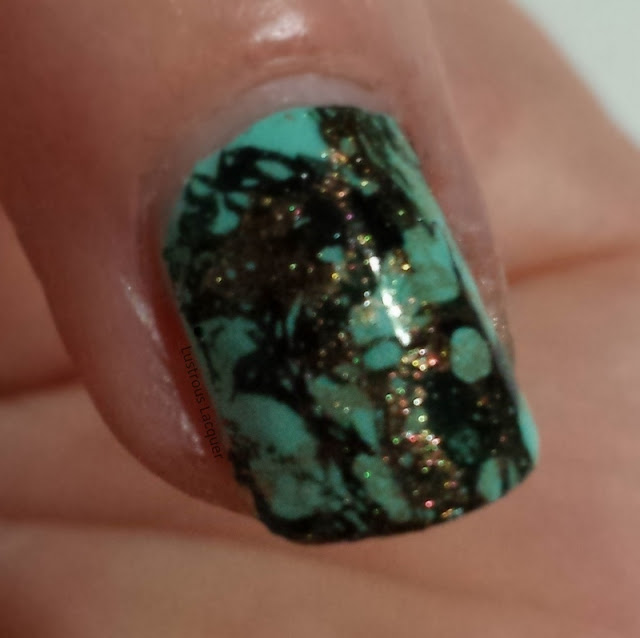
     Now it's time for the big nail art reveal!! I was inspired by the color of Rimmel Mintilicious to do a "turquoise manicure". There might be an official term for it but it reminds me of the pendants people wear so that's what I'm calling it. 


     I used Zoya Black Swan and Penny for the colors of my "veins" in this manicure. To get the splattered effect I dropped a few drops of polish in a bowl of room temp water and spritzed it with rubbing alcohol. I didn't get the polish to spread out quite as much as I wanted it to but I still like this look. The rubbing alcohol I used was only 50%. I'll have to keep my eyes open for something stronger. 


     What do you think, was this nail art worth the hype? Would you use a product like Crystalline Nail Veil? I will warn you this product does contain Latex. If you're allergic or think you may be please avoid using it. There are non-latex versions on the market if you need one. Thanks for stopping by and Happy Polishing!


Wednesday, May 20, 2015

6:00 AM

Rimmel - Mintilicious


     I've got another quick post for you today featuring Mintilicious by Rimmel. It's a quick post because there really isn't a whole lot to say, and I'm not feeling like my usual quirky self at the moment. I'm trying and failing to fight off a migraine and sitting at my computer isn't helping one bit. So to spare my poor head,  let's jump right in.

Mintilicious-Rimmel-mint-green-creme-nail-polish
     
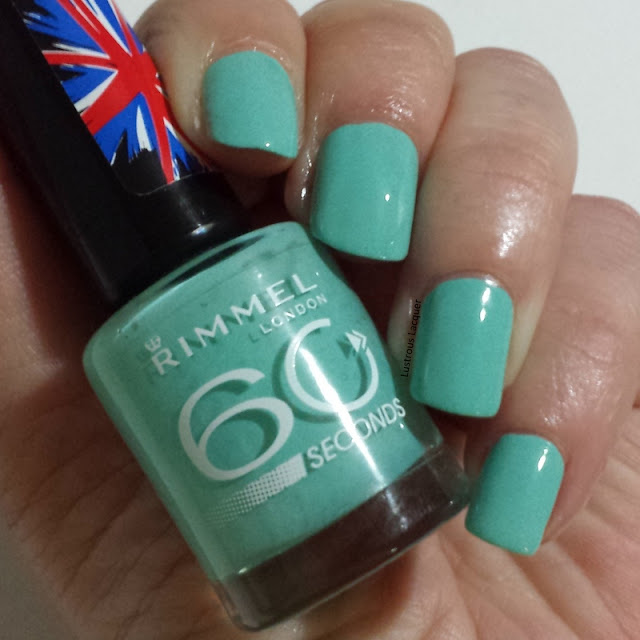
     Rimmel Mintilicious is a green-leaning teal creme released in the summer of 2013. The formula on this one was pretty good. A little uneven on the first coat but the polish flowed off the brush smoothly with nice control. While not completely dry in 60 seconds this polish does dry rather quickly. I found that if I tried to go back over my nail before dipping the brush back into the bottle the polish would streak and drag. But, this polish dries rather quickly which means less time spent waiting to apply that second coat, and you can be out the door faster. See what I did there, quick-drying has its pluses and minuses. Shown here is 2 coats plus top coat.


     I like the color, its fun and bright, perfect for the season. But it's not really one that I see myself wearing on its own often. I did use it as a base for some fun nail art, that I'm not quite ready to reveal yet. hehe.  I did leak a teaser photo on Instagram the other day. Do you want to see it? Well, of course, you do right! 


     Ohhh I wonder what it could be! I see some sparkle in there. Maybe some marbling or is that needle drag? You'll have to wait to find out. 

     Rimmel Mintilicious can still be found on shelves at Wal-mart if you're looking to add it to your collection. Don't forget to stop back again when my nail art is revealed. Thanks to stopping by and Happy Polishing!


Monday, December 1, 2014

6:30 AM

Loki's Nail Vinyls

     
     For my second post today I have the pleasure of reviewing a brand new nail vinyl company, Loki's Nail Vinyls. I'm sure you have heard of Lokis Lacquer around the nail art community. It's actually run by a girl named Tara and she has an amazing blog that I can get lost in for hours.  Well after getting many questions about nail vinyls over the last 12 months she has decided to start her own line. And guess what, her shop opens today with worldwide shipping!

    I decided to create 2 looks with the vinyls that I was sent to share with you today. The first one is a gradient so I could test out the nail aprons. I really wanted to do this one first because I have a feeling the nail aprons will be a big seller. They are available in 2 sizes and what makes them different is that they come in 2 pieces. That means you can get a better fit around your nail. No more gaps where you had to bend or crease the wrap to get a proper fit.


     Another great feature of the wraps is that they are reusable. I used the same set for my entire manicure.


     Because of the proper fit, you get hardly any clean up as you can see here by this poorly done gradient. Just a tip, don't try to do a gradient on a bare nail it's a PITA. I probably would have had even less clean up if I had added a base coat of white first. Then I wouldn't have tried using so much polish on the sponge to get coverage.

     For my finished look, I used these cute vinyls to create the silhouette of a man as an accent to my manicure. I used Sinful Colors Snow Me White and Rimmel Caramel Cupcake as my gradient colors.


     All nail vinyls are made from a plastic product and will melt over time when a solvent-based liquid is put over them. A quick dry top coat is best to apply when leaving them on like stickers. Tara recommends Seche Vite after testing out a few. I actually used Out the Door and had no issues after wearing the vinyls for 24 hours.

     For my next look, I used the French tip guides for a sideways half moon manicure with an art deco feel. The colors I used for this look are Orly Luxe, OPI 4 in the Morning and a white striper.


     The vinyls are quite sticky, if you use them as stencils I recommend sticking them to the back of your hand a few times to remove some of the tackiness. Otherwise, you run the risk of pulling off your base color when trying to remove them. Trust me on this one.  Also, I noticed these vinyls are thicker than others that I have used, making them better quality, and easier to reposition without damaging the shape.

     All of Loki's nail Vinyls are available at http://lokisnailvinyls.storenvy.com and come in your choice of color. (With the exception of the basic chevron and French tip) Eventually, there will be an option of a custom service for designs, but there is already a wide variety to choose from. I hope you like the designs I created. I'll have more in the next coming weeks to share with you. Thanks for stopping by and Happy Polishing!


Wednesday, August 27, 2014

6:00 AM

Rimmel London Limited Edition Festival Color Collection

     
     Today I have for you the Limited Edition Festive Color Collection from Rimmel London. I wanted to get this post up months ago when I first purchased these and well, life and other polishes got in the way. For that, I am truly sorry, and also because I fear these are no longer available in stores. You might find some on blog sales or E-bay though. All polishes are shown with 2 coats without topcoat.

Bright-Neon-Nail-Polish
From L-R: Purple Reign. Funtime Fuchsia, Green Eyed Monster, Instyle Coral and Midnight Skinny Dip


     Funtime Fuchsia is a bright neon fuchsia pink that dries to a  smooth, glossy, crème finish. This one looks like it would be fun for pedicures! A nice rich pink like this deserves to be shown off in your best set of heels.

Festival-Color-Collection-Neon-Pink-Nail-Polish
The photo was taken in a lightbox
     This one for me was almost a 1 coater! I've shown it here as 2 coats no top coat. Just look at that glossy finish! I'm in love <3 The formula has a great as that shine. Nice and smooth.

Neon-Pink-Nail-Polish-Festival-Color-Collection
The photo was taken in a lightbox

       Instyle Coral is a creamy peach leaning coral polish. I originally thought this would be a little bit lighter, but I actually like that it's darker than most coral polishes.  Although it's not quite as dark or as orange as my picture shows. This one was a little fickle when it came time to photograph.

Coral-Nail-Polish-Festive-Color-Collection
The photo was taken in natural lighting

     The formula on this one was a little thinner than Funtime Fuchsia and wanted to streak with thin coats. Everything evened itself out with the second coat and I was left with a smooth glossy finish.

The photo was taken in direct sunlight
    
     Green Eyed Monster is a neon green polish that reminds me of my flowers in springtime. When the stems have just started to sprout out of the ground. It's like my world is awakening after the long cold winter and everything is renewed.  Of course, I say that now knowing that in about 7 or 8 weeks there will be snow on the ground here. Getting a jump on my spring fever this year, no big deal.

Neon-Green-Nail-Polish-Festive-Color-Collection
The photo was taken in a lightbox

     This pretty green polish was not so pretty when it came to application. The first coat was a streaky mess. But I have yet to find a neon green polish that isn't. Also, when wet there were a million little brushstrokes visible. Yes, I said a million! Not to worry, though, once the polish dried those million little brushstrokes were gone. Poof, just like magic!  Oh but make sure you use a good base coat with this one. I have a feeling it will stain. I wasn't going to use myself as a guinea pig to find out.

Neon-Green-Nail-Polish
The photo was taken in a lightbox
     Midnight Skinny Dip is a deep royal blue polish and one of the two with shimmer in this collection. The shimmer is subtle on the nail but can be seen easily in the bottle. It kind of bugs me when polishes are that way. If I see the shimmer in the bottle and buy the polish, isn't is obvious that I want that shimmer on my nails? I mean if I squint really hard and look at it from an angle I can see the shimmer. But who wants to do all that?

Royal-Blue-Nail-Polish-with-Shimmer
The photo was taken in a lightbox
    I expected this polish to be more opaque with the first coat, but it was surprisingly sheer.  I do have to say I was also surprised that full opacity was reached after just 2 coats. With the first being so sheer I thought for sure I would need 3 if not 4.  Let's review; Color-gorgeous, Coverage- surprisingly good, Finish- eh needs more evidence of that shimmer, Base Coat- do I even need to say it? It's a deep blue polish, pretty sure it will leave a stain. Again I decided not to test that theory on myself.

Fetival-Color-Collection
The photo was taken in a lightbox

     And rounding out the collection is the perfectly named Purple Reign. This one reminds me of the purple pouch that a bottle of Crown Royal comes in.  It's not quite are dark as the pouch, but close enough that it invokes that image.  Purple Reign is a deep royal purple with iridescent shimmer.

Festial-Color-Collection-Purple-nail-polish
The photo was taken in direct sunlight

 
Photo credit: unto-the-breach.blogspot.com
     See how close they are. Please tell me they look alike and I don't just have alcohol on the brain. I do have one last BBQ this weekend before summer officially ends and I send my kiddos back to school. ok ok so back to the polish. Just like Midnight Skinny Dip the first coat was sheer but reached full opacity after 2.  The shimmer in this one is a little more evident on the nail. The sunshine really makes it pop!  Just like the other 4 polishes, Purple Reign dries to a super glossy finish. I'd even go so far as to say this one would make a good transition into all those dark fall colors that we will all soon be sporting. 

The photo was taken in direct sunlight

     
     This isn't the first time I've used these polishes, remember way back at the beginning of this post I mentioned purchasing these months ago? Well, they made an appearance on my blog for a nail art challenge, and if you'd like to see some nail art that had good intentions when it started, just click here on my Spring Renewal Nail Art Challenge Post.

     I'd have to say my favorites from this collection are Funtime Fuchsia and Purple Reign but I do like all the colors.  I can really only see myself using Green Eyed Monster in nail art. I'm not one to sport neon green nails on a regular basis.  Do you have any favorites? Thanks for stopping by and Happy Polishing!


Thursday, April 17, 2014

6:00 AM

Spring Renewal Nail Art Challenge Day 1: Easter Egg Nails


    It's time for another nail art challenge hosted by the Challenge Your Nail Art group on Facebook. Anyone and everyone are welcome to join the group, do all or parts of the challenges, and just overall have a good time!

     The theme for this first day is Easter Eggs. I decided to go with another completely freehanded nail art look again. I need to really work on this part of my nail art and I guess challenges are the place to do that for me. Even if that means sharing my less than stellar manicures with you, although I'm starting to see some slight improvement. Now let's get to the manicure, shall we?


Rimmel-Skittles-Manicure-Lustrous-Lacquer

     I started off with a skittles manicure as my base using all Rimmel polishes. Colors are from pointer to pinky: Instyle Coral, Green Eyed Monster, Purple Reign and, Funtime Fuscia. I actually have Funtime Fuscia on my toes right now and I love it. It's such a happy color to help welcome in spring. It makes my toes want to dance every time I look at it.

     Now once I got the base colors for this manicure done that's about where my plan ended too. I knew I wanted to add some stripes and dots but that was about it. The finished product isn't exactly what I had envisioned but it's still not too bad.


     I like how bright my nails ended up being, and the fact that each line isn't perfect reminds me of the eggs I used to dye as a child. I used a few of my kiss striping polishes to make the details on each egg, including the dots or dashes, however, you want to look at them. I finished the entire manicure off with a coat of Seche Vite.

     I hope you stop back tomorrow to see what ideas I came up with for pastel day. In the meantime why not check out what the other participants came up with for their Easter Eggs.


Tuesday, December 3, 2013

12:00 AM

The 12 Mani's of X-mas Day 2: Snow/Winter


      Hello, again my fellow polish lovers!  It's day 2 of the 12 Mani's of X-mas Challenge and today's theme is... snow/winter.


     I had a hard time coming up with an idea for this since I didn't want to do the typical stamped snowflake manicure. While looking at the prompt picture for today inspiration struck. Who doesn't love the look of freshly fallen snow on the tree branches? It really is a magical sight, especially when it's the first one of the season.


     For this manicure, I started with a gradient of China Glaze Sci-Fly-By and Milani White on the Spot. For the trees, I used my black striper and Rimmel Rags to Riches for the pine tree. Then I went in with my white striper to add the fallen snow. Finally, a sponged on some Essie Shine of the Times to the tips for a glistening snow effect.

     This manicure actually turned out pretty close to what I had pictured in my head and I'm pretty proud of that. I don't do a lot of freehand nail art so this was a bit of a challenge for me. How do you think it turned out?

     Make sure to check out the other entries for day 2 of the challenge and stop back in a few days to see what I came up with for day 3. Happy Polishing!


Wednesday, October 23, 2013

8:07 AM

Rimmel- Apple Berry Smoothie


     Well hello, again my lacquer loving friends. Today I have for you a manicure I did using Rimmel Apple Berry Smoothie from their Cocktail Colors collection. Unfortunately, I picked this color up on clearance and the collection has been discontinued.

   Apple Berry Smoothie is an aqua blue polish with blue and purple shimmer. The application took a little getting used to. I found out that less is more for smooth even coverage. And you don't want to "play around" when applying your first coat. Just let it be thin and streaky, trust me you won't be able to tell when you're all done.

Rimmel Apple Berry Smoothie, blue shimmer

     This is 3 thin coats plus top coat. I can now see a slight bald spot on my pinkie that wasn't noticeable to the naked eye. And trust me I was looking at my nails all day today at work trying to decide what I wanted to add to this manicure. 

      
     From this angle, the light was able to bring out more character in the polish and shows traces of the purple shimmer. I really wish it would have been nice out today so I could capture this polish in the sunlight. But winter is on it's way to Minnesota and my days of photographing polish outside are limited until next spring.

      So what did I decide to do with this manicure after thinking about it for 8 hrs today? I went with a quick and easy tape manicure.


     For the white, I used Milani White on the Spot and simply laid my tape at an angle to make the triangles. Originally I was going to use another blue for this but couldn't find just the right shade. That turned out to be a good thing because I'm really digging the high contrast here. Next time I won't be so heavy handed with the white though as it ended up a little thick. Oh well live, learn, and have plenty of acetone on hand right? :)

     I hope you enjoyed this post and thanks for stopping by. Happy Polishing!

Like what you see? Share it with your friends!