Friday, May 29, 2015

6:00 AM

Put Up You Dupes - China Glaze For Audrey vs. Rimmel Mintilicious


       After my recent post on Rimmel Mintilicious, I was asked how close it was to China Glaze For Audrey. Well, I happened to own For Audrey so I set out to find the answer. Is Mintilicious a dupe for the famous For Audrey? Let's take a look.

 
     At first glance, you can see that For Audrey is slightly darker in the bottle. It also has a greener undertone to it than Mintilicious. But do these differences carry over once applied to your nails?


     They sure do! As you can see these two are not dupes. While they are both nice colors For Audrey almost looks muddled or dingy next to a brighter Mintilicious. And just for the record, I have never thought For Audrey was a dingy color when I've seen it worn alone. 


     Now let's talk formula. For Audrey had better coverage on the first coat, but both were completely opaque after 2. I used 2 coats plus top coat for this post.  I even tested out how well each of these will stamp using Shandy plate SH20.


     Both polishes worked out really well for stamping. For my base color here I've actually used 2 polishes for another comparison post that will be up on the blog soon. I won't reveal what the polishes are just yet, but they are in fact dupes. Looking at Mintilicious and For Audrey stamped next to each other they look like dupes don't they? 

     I've heard that For Audrey is discontinued but I see it on the shelf every time I go to my local Sally's so you still might be able to get a bottle, Mintilicious is only available online if you're looking to add it to your collection. 

      Over all, I think that these are both really great colors and definitely not dupes. If I had to have only one in my collection I would have to go with Mintilicious, but only because it's the brighter one. I hope you found this post helpful. Thanks for stopping by and Happy Polishing!


Wednesday, May 27, 2015

6:00 AM

L'Oreal- After Hours


     I hope everyone had a great weekend. I took full advantage of the long weekend and pretended to be on vacation. I even avoided the internet and tv for the most part and just enjoyed the company of friends and family.I know most of you had to get back to reality yesterday but I had an extra day off and now it's time to get back to the every day and back to blogging for me. Today I'm showing you a polish I picked up on the clearance rack a long time ago. L'Oreal After Hours is one of the first polishes I came across from a mainstream brand that was trying to mimic an indie. This midnight blue jelly is so dark I thought for sure it was black and that's why its taken so long to make an appearance on the blog. 

After-Hours-from-L'Oreal-deep-blue-jelly-nail-polish

     From the first few strokes, I was really impressed with the formula on this one, I tend to apply my polish with a heavier coat than most people, so you may have different results but this was almost a 1 coat polish for me. Have you ever heard of a jelly polish being a 1 coater? I was seriously blown away! Shown here is 2 coats plus top coat. After Hours on its own dries to a semi-matte, rubbery looking finish. 


     A word to the wise, make sure to use a GOOD base coat! As you might notice I have a little staining around my cuticles that just wouldn't go away no matter how much clean up I did. Well, guess what, my nails were slightly stained as well, and I did use a base coat, just not a good one. I should have known better. 


     Isn't that a beautiful deep blue polish! Sadly I think it is no longer available in stores but if you really want it there are a few bottle available from Amazon and eBay. Well, thats all I have for you today, I need to try and get to bed early since the weekend threw my entire schedule off. Thanks for stopping by and Happy Polishing!


Friday, May 22, 2015

6:00 AM

Color4Nails - Crystalline Nail Veil


     Hi everyone and Happy Friday! I've decided that this would be a good post to reveal the nail art I hinted at in my previous post. Which would have been an awful mess to clean up if I hadn't been using the Crystalline Nail Veil from Color4Nails. 

    You might be asking yourself what the heck is Crystalline nail veil? Simply put it's a nail artists best friend!  It's a latex based product meant to aid in clean up from otherwise messy nail art techniques. There are a ton of these products out on the market right now. Including some not originally intended for nail art.  You might remember my previous attempt using Proclaim Hair Glue.... not a pleasant experience for me. While the product worked I had issues with removal and application. I had a much better experience this time around.

     Crystalline Nail Veil comes in a small square bottle with a long skinny brush just like a nail striper. The skinny brush made application around the nail very easy. This part is crucial for me since it seems like no matter how much care I give my cuticles they are forever rough around the nail and polish seems to stick there like a magnet. Clean up for me is sometimes is a real B!*ch. The skinny brush did give me a little trouble when it came to applying the product over a larger area on my finger but I imagine that will get easier with time. 

Crystalline Nail Veil wet

     Nail Veil goes on a bright yellow color and there is a slight odor that I wasn't expecting, It's not particularly strong and disappears as it dries but I wanted to make sure I mentioned it in this post. And it does dry rather quickly which is always nice. 

Crystalline Nail Veil dry

     When dry the nail veil turns into a darker almost dandelion yellow. It's not particularly sticky and I couldn't even really feel it on my skin but,  your fingers will want to stick together if they touch. Yep learned that the hard way, it was easy to get them apart and the product did stay put so I didn't have to start over. Whew! I also did a quick video showing how easy removal is. It's my first real attempt at a video and I'll warn you its a bit rough. 


     My nail was still really wet which made getting my very cheap tweezers to grab anything a bit tricky, but once I got a hold everything peeled off in one nice piece. 

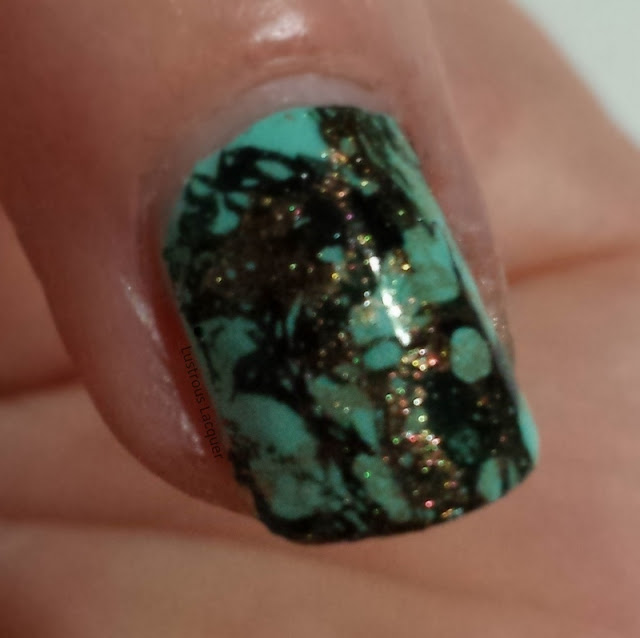
     Now it's time for the big nail art reveal!! I was inspired by the color of Rimmel Mintilicious to do a "turquoise manicure". There might be an official term for it but it reminds me of the pendants people wear so that's what I'm calling it. 


     I used Zoya Black Swan and Penny for the colors of my "veins" in this manicure. To get the splattered effect I dropped a few drops of polish in a bowl of room temp water and spritzed it with rubbing alcohol. I didn't get the polish to spread out quite as much as I wanted it to but I still like this look. The rubbing alcohol I used was only 50%. I'll have to keep my eyes open for something stronger. 


     What do you think, was this nail art worth the hype? Would you use a product like Crystalline Nail Veil? I will warn you this product does contain Latex. If you're allergic or think you may be please avoid using it. There are non-latex versions on the market if you need one. Thanks for stopping by and Happy Polishing!


Thursday, May 21, 2015

6:00 AM

MoYou London - The Holy Shapes Collection Part 3 (Press Release)


     This Friday MoYou London is releasing 4 new plates in their Shapes Collection. These plates range from full nail images to small designs. Get your sneak peek at what's in store right here, right now.

Hi!

OLLY is back!
We adore her exquisitely eclectic style and love for all things geometric. She’s obsessed with peppy prints, bold colour and has a special place in her heart for The Fresh Prince of Bel-Air.

THE HOLY SHAPES COLLECTION

These four plates will be available starting this Friday!

Shape ya later,
The MoYou-London Team 

     MoYou plates can be purchased in their shop. As mentioned above these plates will be available Friday May 22nd.   Plates are £4.99 each or about $8 US. Thanks for stopping by and Happy Polishing!

Wednesday, May 20, 2015

6:00 AM

Rimmel - Mintilicious


     I've got another quick post for you today featuring Mintilicious by Rimmel. It's a quick post because there really isn't a whole lot to say, and I'm not feeling like my usual quirky self at the moment. I'm trying and failing to fight off a migraine and sitting at my computer isn't helping one bit. So to spare my poor head,  let's jump right in.

Mintilicious-Rimmel-mint-green-creme-nail-polish
     
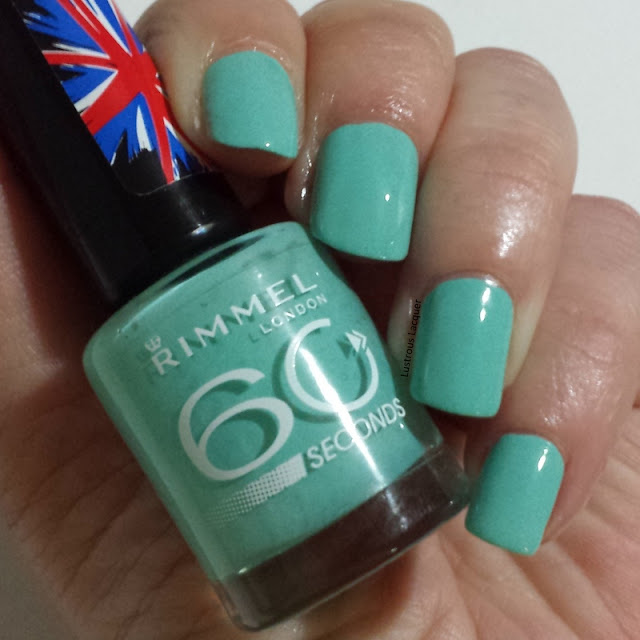
     Rimmel Mintilicious is a green-leaning teal creme released in the summer of 2013. The formula on this one was pretty good. A little uneven on the first coat but the polish flowed off the brush smoothly with nice control. While not completely dry in 60 seconds this polish does dry rather quickly. I found that if I tried to go back over my nail before dipping the brush back into the bottle the polish would streak and drag. But, this polish dries rather quickly which means less time spent waiting to apply that second coat, and you can be out the door faster. See what I did there, quick-drying has its pluses and minuses. Shown here is 2 coats plus top coat.


     I like the color, its fun and bright, perfect for the season. But it's not really one that I see myself wearing on its own often. I did use it as a base for some fun nail art, that I'm not quite ready to reveal yet. hehe.  I did leak a teaser photo on Instagram the other day. Do you want to see it? Well, of course, you do right! 


     Ohhh I wonder what it could be! I see some sparkle in there. Maybe some marbling or is that needle drag? You'll have to wait to find out. 

     Rimmel Mintilicious can still be found on shelves at Wal-mart if you're looking to add it to your collection. Don't forget to stop back again when my nail art is revealed. Thanks to stopping by and Happy Polishing!


Monday, May 18, 2015

3:31 PM

The Indie Coalition for a Cause Spring 2015 Fundraiser


     Good afternoon! I'm posting a little bit later in the day today because I was waiting for some information before I shared this news with you. Do you remember seeing these photos floating around the internet over the last few months? Well it's time to let the cat out of the bag and tell you what they are all about!


      I am a member of the ICC, a group of independent nail polish makers and bloggers dedicated to supporting different charities across the globe. Our goal is to hold 2 fundraiser a year which will support a different cause. We have decided to raise money for the charity  Equality Now for our inaugural fundraiser.

     "Equality Now is an organization that advocates for the human rights of women and girls around the world by raising international visibility of individual cases of abuse, mobilizing public support through global membership, and wielding strategic political pressure to ensure that government enact or enforce laws and policies that uphold the rights of women and girls. Their areas of focus include discrimination in law, sexual violence, female genital mutilation and trafficking. The members of the Indie Coalition for a Cause are in full support of this charity as we both envision a world in which women and men have equal rights under the law and full enjoyment of those rights."

     ICC Equality Now Fundraiser: How YOU Can Help

     The wonderful indie makers that are members of the ICC have contributed custom nail polishes made for this specific event to help entice you to donate to this noble cause. Photographed below are the polish prizes, including a few non-custom extras. Donations are to be made to the ICC fundraiser located here in increments of $5  (With a minimum of $10) and those that wish to be included in the raffle drawing may enter the rafflecopter below at the end of this blog post. There are two prize packs for this raffle: one large prize and a second smaller one. At the time of this post, there are still a few polish prizes trickling in, so there will be even more for our generous donators!

     Please note that this is not like my typical giveaway. In order to be eligible to win, you must visit the Crowdrise page here and donate to the campaign. The rafflecopter is set up such that the larger the donation, the more chances you get to win these beautiful polish prizes.

Alter Ego Nail Enamel
Can't Hide
Swatch courtesy of Adventures in Acetone

Girly Girl

Vintner

She Shines Top Coat

Black Dahlia Lacquer
Stand Up For Equality
Swatch courtesy of Beautee Luvr

Bergamot Cuticle Oil

Bohemian Polish
(formerly Finger Lickin' Lacquer)
At the Head of the River

Ellagee
Make Equality Reality

Firecracker Lacquer
What Do We Want? EQUALITY!

Nail Gems


Girly Bits Cosmetics
50/50

Justice

Time for Change

Literary Lacquers
Secret of Joy

Northern Star Polish
Embrace Yourself

Renaissance Cosmetics
Equality...Now!

Silly Bee's Chickadees
Come Together

Sonoma Nail Art
Equal Work Equal Pay

Strong Women Decals

Prize Pack #1

Prize Pack #2

     Donations can be made to the ICC Equality Now fundraiser on the Crowdrise page linked here. All donations are handled by Crowdrise so you can rest assured that the money is going to this charity. Don't forget to hold on to your confirmation emails for tax purposes too!

     On behalf of the ICC and women everywhere, I would like to thank you for your support! I would also like to personally thank the indie makers that have contributed prizes for this raffle; we couldn't have done it without you! 

Direct link to Rafflecopter:

Mobile friendly link to rafflecopter:


Friday, May 15, 2015

6:00 AM

Hobby Polish Bloggers Presents: May Flowers


     On Monday I showed you my failed attempt at making my own decal and the feedback and suggestions I got was so great that I decided to try it again. I figured the Hobby Polish Bloggers May link up would be the perfect time since the theme is May Flowers.

     Now this is not my original idea but I loved the look and knew I needed to try it myself. The original manicure was done by  Nailartstampingmania. <----( click here for the original post.)  Here is my version.

Holographic-DIY-nail-decals

     I started with a base of Milani White on the Spot and while that dried I started on the decals. This was a long slow process for me as I had to make each decal one at a time. I only have one stamper that I like using at the moment. Good thing I was binge watching episodes of Heros on Netflix to pass the time. I love Netflix by the way, I get to watch all the shows I missed the first time around.

To create my decal I used:
Winstonia plate W-04 
 Zoya Black Swan
Parallox Polish April Holo from the April Subscription box 
 Zoya Penny
Sally Hansen Double Duty base/top coat
Small dotting tool


     As you might remember from my previous post I had a lot of trouble with the decal being stiff and hard to work with. I also had issues with it wanting to stay on the nail. That was because I used Seche Vite on the decal. A quick Dry top coat is what you want in most instances when it comes to nail art but not when making decals. Sally Hansen Double Duty was a dream come true for me. After letting it dry on the stamper for about 10 minutes I was able to easily peel it off, the decal was flexible, but not floppy and, adhered to my nail nicely.


     What a difference the top coat makes! What I once thought was a difficult technique is now so easy! I can see myself doing this over and over again. Of course I'll need to pick up a few more stampers so the process goes a bit quicker. But man o man am I impressed with my results. Now as much as I want you all to sit here and admire my work, it's time to check out what everyone else has come up with. Thanks for stopping by and Happy Polishing!


6:00 AM

Hobby Polish Bloggers Presents: May Flowers


     On Monday I showed you my failed attempt at making my own decal and the feedback and suggestions I got were so great that I decided to try it again. I figured the Hobby Polish Bloggers May link up would be a perfect time since the theme is May Flowers.

     Now, this is not my original idea but I loved the look and knew I needed to try it myself. The original manicure was done by  Nailartstampingmania. <----( click here for the original post.)  Here is my version.

Holographic-DIY-nail-decals

     I started with a base of Milani White on the Spot and while that dried I started on the decals. This was a long slow process for me as I had to make each decal one at a time. I only have one stamper that I like using at the moment. Good thing I was binge watching episodes of Heros on Netflix to pass the time. I love Netflix by the way, I get to watch all the shows I missed the first time around.

To create my decal I used:
Winstonia plate W-04 
 Zoya Black Swan
Parallax Polish April Holo from the April Subscription box 
 Zoya Penny
Sally Hansen Double Duty base/top coat
Small dotting tool


     As you might remember from my previous post I had a lot of trouble with the decal being stiff and hard to work with. I also had issues with it wanting to stay on the nail. That was because I used Seche Vite on the decal. A quick Dry top coat is what you want in most instances when it comes to nail art but not when making decals. Sally Hansen Double Duty was a dream come true for me. After letting it dry on the stamper for about 10 minutes I was able to easily peel it off, the decal was flexible, but not floppy and, adhered to my nail nicely.


     What a difference the top coat makes! What I once thought was a difficult technique is now so easy! I can see myself doing this over and over again. Of course, I'll need to pick up a few more stampers so the process goes a bit quicker. But man o man am I impressed with my results. Now as much as I want you all to sit here and admire my work, it's time to check out what everyone else has come up with. Thanks for stopping by and Happy Polishing!


Like what you see? Share it with your friends!