Showing posts with label Milani. Show all posts

Tuesday, April 17, 2018

6:00 AM

Untried A-Z Challenge Letter H


     We are up to the eighth week of the Untried A-Z challenge and that brings up to the letter H. What is the Untried A-Z challenge? Well, it's simple really, every other week we share a polish that corresponds with the appropriate letter. You can go be the brand name or polish name, share one polish or more. Really it's just a laid-back way to work through your untried polish and have a little fun doing it. I opted to go in alphabetical order as a way to help narrow down which untried polish to use since I often have a hard time picking out which polish I want to wear. This challenge is open to anyone who wants to participate, and you can do as many or as few prompts as you'd like. Now let's get letter H week started. 


     Once again I'm switching things up and sharing more than one polish with you today, in fact, I've got 3 polishes from Milani and two nail art looks for today's post! 
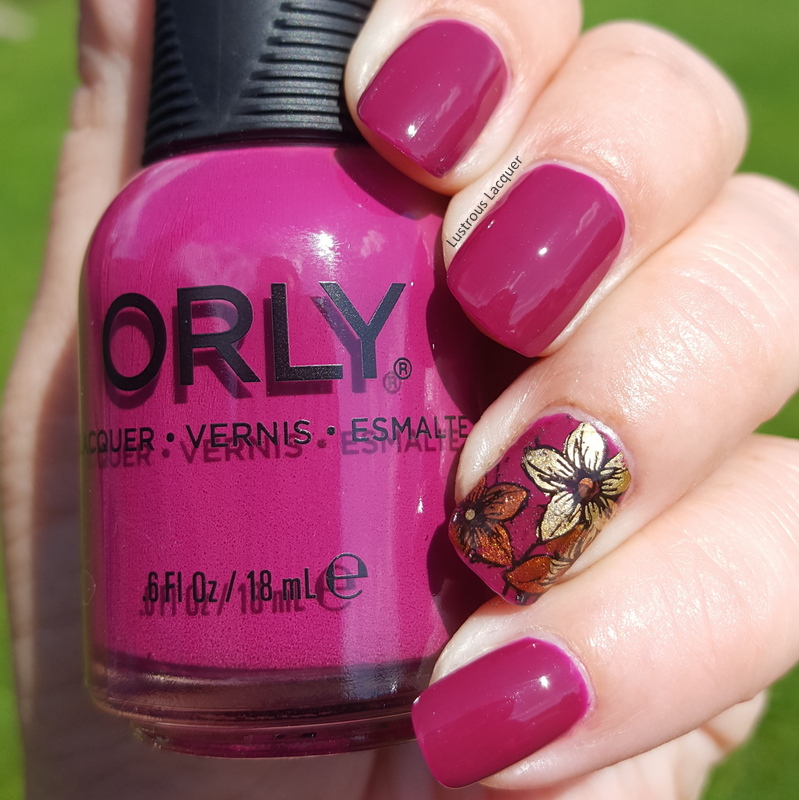
Hot Orchid
     
Medium pink metallic nail polish with subtle silver shimmer

     Hot Orchid is a medium pink metallic polish with a subtle silver shimmery micro glitter. This polish was released in 2012 and I believe was part of the core line. 

Medium pink metallic nail polish with subtle silver shimmer

    The formula for Hot Orchid has a nice consistency, it applied smoothly and evenly with a nice opacity on the first coat. Shown here is 2 coats plus top coat.

Medium pink metallic nail polish with subtle silver shimmer

      Hot Orchid is a highly pigmented polish but like most metallic polishes suffers from brushstrokes. Thankfully they are minimal and don't distract from the pretty color. You can also avoid the brushstrokes by using the tip I shared in my recent review of the Pastel City Collection from Orly

Hi-Tech

Spring green scattered holographic nail polish

     Hi-Tech is a spring green scattered holographic nail polish released in 2012 as part of the 3D Holographic collection. 

Spring green scattered holographic nail polish

     The formula on this is a little thin but applies evenly on the nail. The first coat was a bit on the sheer side but Hi-Tech builds up nicely and full opacity was reached after two coats. Shown here is two coats plus top coat. 

Spring green scattered holographic nail polish

     While this polish doesn't have a strong holographic flash it still packs a pretty punch. While I tend to wear more traditional nail polish colors I actually like this one and can see myself wearing it during the warmer months. 

Hi-Res

lilac purple scattered holographic nail polish

     Hi-Res is a lilac purple scattered holographic nail polish. It was also released in 2012 as part of the 3D Holographic collection. 

lilac purple scattered holographic nail polish

     Just like Hi-Tech, Hi-Res has a thin formula but even coverage. Once again I had a sheer first coat but nice buildability. Full opacity was reached after two coats. Shown here is two coats plus top coat. 

lilac purple scattered holographic nail polish

     This is a bit light for my personal tastes but I still think its a pretty color. I feel like the holographic flash is just a bit stronger in Hi-Res than it is in Hi-tech but still wouldn't consider it a strong flash. 

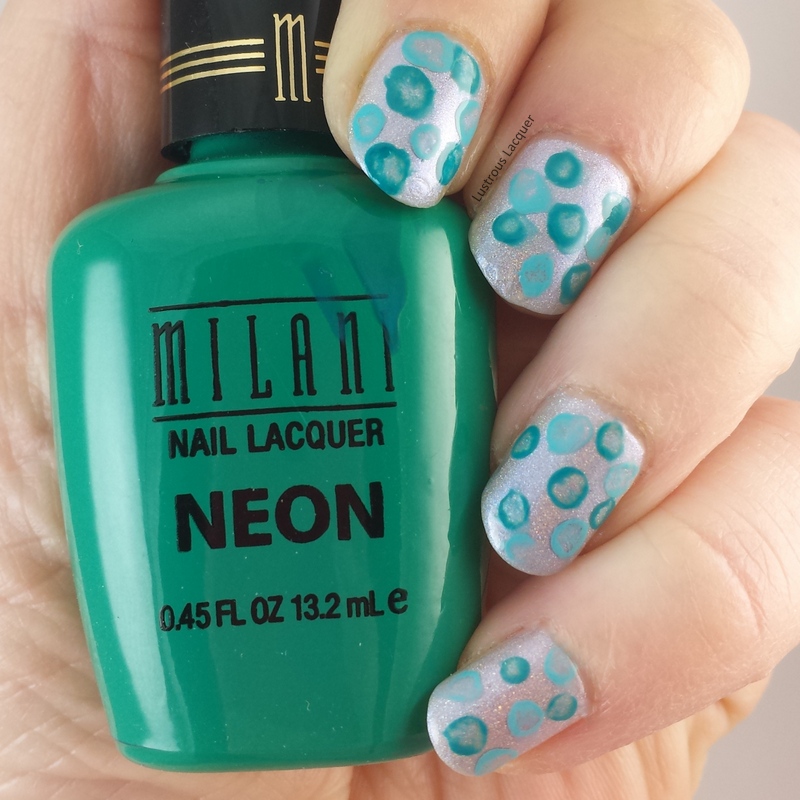
     After swatching these polishes I noticed how nicely they seemed to flow together and wanted to try them out in a gradient. 


      Because of the thinner formula of the holographic polishes the gradient ended up being very subtle. I used Hi-Tech as my base color which caused Hi-Res to look more silver than purple. 


     Of course, I couldn't stop there, so I added some stamping using the marble paradise 01 plate from Pueen and Straight Up Black from Bundle Monster.


     Straight Up Black is an intense stamping polish! It's a bit thicker than my other stamping polishes and I found that I needed to cover more of the image before scraping to get the image fully covered. The messy pointer finger is because I was impatient when taking photos and smudged it rather than a result if the image plate or polish used. 


     What did you think of my letter H polishes, do you have a favorite? Remember this challenge is open to anyone and everyone so please feel free to join in! Did you review a polish from Heather's Hues this week, feel free to add it to the link up! I'd love to get the word about this challenge out more so others can join. Thanks for stopping by and Happy Polishing! 


Friday, February 2, 2018

6:00 AM

Groundhogs Day Prediction 2018 - I'm hoping for spring!


     I'm posting outside of my regular schedule for a special reason today. The members of The Stamping Shop group on Facebook have gotten together for a fun little collab for Groundhogs day and I thought it was a fun idea. Everyone who participated did a manicure with what they thought Punxsutawney Phil’s prediction would be. If they thought he would predict 6 more weeks of winter you did a winter themed manicure, if you thought he would predict an early spring you did a spring themed manicure. I am desperately hoping for an early spring. I've got the urge to go camping already and am over the cold temps of my Minnesota winter. It's been a mild one for snow but the temps have been brutally cold. And I'm cheating a little bit because I did this manicure back in early November but didn't have an appropriate time to share it until now. Hence the lush green grass for my background and beautiful sunlight to capture the shimmer. Oh, spring....hurry up and get here, I miss you!


     For this manicure, I started with a base of Black Cherry from the Orly Velvet Dreams Collection. This deep rich color was the inspiration for my entire manicure and has started a slight obsession of polishes similar to this. You might remember I recently shared with you Con Artist from Nvr Enuff another polish in this color family. Plus I may have ordered a few more recently that will be on the blog soon.


      For my accent nail, I went with the advanced stamping technique using Hit the Bottle As Black as Night and a plate I ordered from Amazon called Flowers 01 by Meidus. Sadly this plate is currently out of stock with no date for when it will return.


     To fill in my flowers I used Maybelline Bold Gold and Milani Bijou Bronze. I just love this color combo! Sadly it was really humid in my house when I did this and it caused my top coat to bubble. I guess I learned my lesson about painting my nails when the dryer has been running all day. For clarification, my office now has to share space with my laundry room. We recently bought new machines, they are bigger than our previous set and no longer fit in the same space. Our solution was to flip the hookups to the other side of the wall and move them into my office. The result is no more swatch fests on laundry day. That's all I've got for you today, Thanks for stopping by and Happy Polishing!


Friday, February 5, 2016

6:00 AM

40 Great Nail Art Ideas- Aqua or Turquoise


     It's time for another look from the 40 Great Nail Art Ideas Challenge! I don't know if you know this but I am actually really enjoying this challenge. Normally I get stressed during a challenge and struggle to get my looks done. But not this time! And you want to know why? This challenge is set up a bit differently than most. For starters there is the option to do weekly manicures with one week dedicated to themes, and one to colors. Or you can do every other week and stick with themes only or colors only. For the color portion of the challenge each person is also assigned a pattern. The end result is 40 different looks all done in the same colors. As most of you know I opted to do the color challenge and you can see my previous looks using TealOrange, Purple and GreenBlack and WhiteGreyGlitter toppersPale Blue and 3 shades of Purple.  This posting every other week is just my speed and helps keep me relaxed and stress free for the challenge. 

     This week the color theme is Aqua or Turquoise  and my pattern prompt is water color. The water color technique is one that I love but have been afraid to attempt until now. And to be completely honest this is one look that I didn't nail, but now I have a little more confidence and look forward to trying again. After I watch a few more YouTube videos on how's it's done of course. 


     For this manicure I started with Parallax Polish Arctic Ice from the newly released Secret of the 7 Seas Collection. You know how I mentioned watching some Youtube videos on how to do the water color manicure, yeah I probably should have watched a few before I attempted this manicure. I had no idea really what I was doing, but I jumped right in! I used the same technique as I did for my black and white swirl manicure from earlier in the challenge. 


    Doing one nail at a time I placed random dots of Milani Fresh Teal and Maybelline Day Glow Teal on the nail. Then I took a nail art brush dipped in acetone and dabbed at the center of the dots. I was going for a more translucent look for the centers rather than removing the color completely but as you can see that didn't work out. And I knew the more I tried the more frustrated I would become and end up ruining the whole thing. We've all had days like that right?

    
     While this manicure didn't turn out exactly as I planned I still like it. Its kinds funky and fun, and very different from any manicure I've done before. Next time I try a water color manicure I'll be sure to use a few more colors and overlap the dots a bit more. See if I can get it to look a bit more like floating bubbles. For those of you who have successfully done this technique, do you have any words of wisdom or tips for the water color novice? Let me know in the comments and then be sure to check out the other looks created for the Aqua or Turquoise challenge. Thanks for stopping by and Happy Polishing!


Friday, September 18, 2015

6:00 AM

Hobby Polish Bloggers Presents - Fall Colors


     It's time once again for the monthly link up presented by the Facebook group Hobby Polish Bloggers. This months theme is fall colors.  I don't know about you but I absolutely love fall colors. The colder temperatures and the fact that winter is approaching I can do without, but the trees look so pretty. I look forward to the changing leaves, especially since we have a tree in our yard that naturally does a gradient of red, orange, yellow and green. Add to that they form an almost perfect ball shape and you can't help but marvel at its beauty.  I knew right away I wanted to incorporate my love for this tree and the changing leaves in my manicure. 

Photo was taken in natural light

    After trying to come up with an abstract manicure idea and coming up empty handed I decided that I literal design would be best. Now I know what you might be thinking. Where are all those colorful leaves I describe earlier, where is the gradient of red, orange, yellow and green?  Well, it was a tough nail art day for me and sometimes it best to just walk away then risk further destruction. It happens to the best of us sometimes. 

     Turns out I didn't have a leaf image that I could have sworn Id used before and the one I did have was a solid image. I wanted one that I could fill in to show the leaves changing. After several failed attempts at decals, and the colors I wanted to use not working well for stamping I had one lonely leaf decal to work with. 

Photo was taken in direct sunlight

     To create this manicure I started out with Sinful Colors Snow me White and a classic french tip look.  Using a striping polish from Jordana called The Stylist I lined the base of the white and let that dry. 

     The decal was created using Red Angle plate RA-121 and Konad Black. I used my best efforts to fill the leaf in with Milani Bijou Bronze


    Overall, I like the finished look. I'm just a wee bit disappointed that my original idea didn't work out.  But fall is nowhere near over so I might try this again. Now let's see what everyone else came up with. Thanks for stopping by and Happy Polishing!


Friday, August 21, 2015

10:38 AM

HPB presents - Neon Tape Manicure


     Every month the members of Hobby Polish Bloggers or HPB for short pick a theme and do a link up. This months theme is Neons and we were allowed complete creativity for these manicures. As soon as I heard the theme I knew I wanted to do a take on the nail art I did over Fickle Fairy Potions Hopelessly Devoted. Unfortunately the longer I had to think about the idea the less confident I became. So I took to my Facebook page to ask for opinions. 

     I originally wanted a black base for this manicure but I knew that the neon would pop better over white. After putting it to a vote on Facebook, a white base had won and I went with it. But I still wanted to know how it would look over black and had to include it on one nail. This is what I came up with. 


   I used 11 polishes and some striping tape to create this manicure. It took almost 4 hours to do because of all the dry time needed. Looking at it now I wish I would have gone with my original idea and just used a black base but the white isn't bad. 

     Ready for the list of polishes used?

  • Finger Paints Black Expressionism and Paper Mache
  • Orly Tropical Pop, Saturated, Ablaze and Hot tropics
  • China Glaze Towel Boy Toy and In the Lime Light
  • Milani Totally 80's,  Pink Rocks! and Dude Blue


      Besides being tedious the tricky part for me was putting a layer of white down under the neon parts of the accent nail. But that also happens to be my favorite part of the manicure. What do you think? Should I have stuck with my original idea and gone with a completely black base or do you like the white? Don't forget to check out what the other members of the group have come up with. Thanks for stopping by and Happy Polishing!


Friday, July 3, 2015

6:00 AM

4th of July Fireworks


       I wanted to end this weekly dedication to 4th if July nail art with a bang. And what better way to do that than with Fireworks! Sadly this ended up as my least favorite manicure of the bunch and that's mainly due to the issues I had while creating it. 

     Let me tell you if something could go wrong it did, right down to me spilling my first bottle of nail polish all over my floor. Of course, it had to be a blue bottle of polish. Thankfully it was hardwood and not carpet so the sugar trick worked for cleaning it up, but I had to race upstairs with wet polish on my hands to get the sugar and that ended up looking like a comedy routine. I'm happy to report that the bottle didn't break and nothing ended up stained. But let's get to the manicure, shall we...


     I started everything off with 2 coats of Milani White on the Spot. I think my bottle must be getting old because it was 2 streaky, gummy coats. Even adding a few drops of thinner showed no real improvement. It might be time to let this bottle go, after one more try with thinner of course. 

     For my fireworks, I used Shandy plates SH04 and SH213 and made decals so I could have complete control over the placement. You would think after my recent Silver nail polish stamping comparison post I would have known which silver polish to use, but that didn't stop me from making 2 decals with Zoya Trixie after the first one was pretty much invisible on my nail. Lucky for me they didn't stick very well and I was able to switch to Sally Hansen Silver Sweep. It's not as sparkly as Trixie but you can see it and that's all that really matters. 


     For my red and blue, I used the same colors as my Patriotic French Tip Manicure with China Glaze Man Hunt and Seeing Red. That post, by the way, got me featured on Blogher's front page on Thursday. You can check out the new badge they gave me to show off over there in the sidebar, located just under the post archive. Getting that e-mail was a huge pick me up! I also notifications that both of my previous 4th of July looks had been recreated by readers. I'm not sure which one was more exciting for me, but the recreations felt more rewarding!


     Overall I don't think the final manicure is bad, just the experience was and I don't like it quite as much as my previous looks. And I still haven't decided what I'm going to wear on my nails this weekend! This is where I'm going to need your help. Should I wear the French Tips, The marbled accent, the Fireworks as is, or the Fireworks on a black base? Let me know what you think in the comments. Have a fabulous holiday weekend, stay safe and Happy Polishing!


Friday, May 15, 2015

6:00 AM

Hobby Polish Bloggers Presents: May Flowers


     On Monday I showed you my failed attempt at making my own decal and the feedback and suggestions I got was so great that I decided to try it again. I figured the Hobby Polish Bloggers May link up would be the perfect time since the theme is May Flowers.

     Now this is not my original idea but I loved the look and knew I needed to try it myself. The original manicure was done by  Nailartstampingmania. <----( click here for the original post.)  Here is my version.

Holographic-DIY-nail-decals

     I started with a base of Milani White on the Spot and while that dried I started on the decals. This was a long slow process for me as I had to make each decal one at a time. I only have one stamper that I like using at the moment. Good thing I was binge watching episodes of Heros on Netflix to pass the time. I love Netflix by the way, I get to watch all the shows I missed the first time around.

To create my decal I used:
Winstonia plate W-04 
 Zoya Black Swan
Parallox Polish April Holo from the April Subscription box 
 Zoya Penny
Sally Hansen Double Duty base/top coat
Small dotting tool


     As you might remember from my previous post I had a lot of trouble with the decal being stiff and hard to work with. I also had issues with it wanting to stay on the nail. That was because I used Seche Vite on the decal. A quick Dry top coat is what you want in most instances when it comes to nail art but not when making decals. Sally Hansen Double Duty was a dream come true for me. After letting it dry on the stamper for about 10 minutes I was able to easily peel it off, the decal was flexible, but not floppy and, adhered to my nail nicely.


     What a difference the top coat makes! What I once thought was a difficult technique is now so easy! I can see myself doing this over and over again. Of course I'll need to pick up a few more stampers so the process goes a bit quicker. But man o man am I impressed with my results. Now as much as I want you all to sit here and admire my work, it's time to check out what everyone else has come up with. Thanks for stopping by and Happy Polishing!


6:00 AM

Hobby Polish Bloggers Presents: May Flowers


     On Monday I showed you my failed attempt at making my own decal and the feedback and suggestions I got were so great that I decided to try it again. I figured the Hobby Polish Bloggers May link up would be a perfect time since the theme is May Flowers.

     Now, this is not my original idea but I loved the look and knew I needed to try it myself. The original manicure was done by  Nailartstampingmania. <----( click here for the original post.)  Here is my version.

Holographic-DIY-nail-decals

     I started with a base of Milani White on the Spot and while that dried I started on the decals. This was a long slow process for me as I had to make each decal one at a time. I only have one stamper that I like using at the moment. Good thing I was binge watching episodes of Heros on Netflix to pass the time. I love Netflix by the way, I get to watch all the shows I missed the first time around.

To create my decal I used:
Winstonia plate W-04 
 Zoya Black Swan
Parallax Polish April Holo from the April Subscription box 
 Zoya Penny
Sally Hansen Double Duty base/top coat
Small dotting tool


     As you might remember from my previous post I had a lot of trouble with the decal being stiff and hard to work with. I also had issues with it wanting to stay on the nail. That was because I used Seche Vite on the decal. A quick Dry top coat is what you want in most instances when it comes to nail art but not when making decals. Sally Hansen Double Duty was a dream come true for me. After letting it dry on the stamper for about 10 minutes I was able to easily peel it off, the decal was flexible, but not floppy and, adhered to my nail nicely.


     What a difference the top coat makes! What I once thought was a difficult technique is now so easy! I can see myself doing this over and over again. Of course, I'll need to pick up a few more stampers so the process goes a bit quicker. But man o man am I impressed with my results. Now as much as I want you all to sit here and admire my work, it's time to check out what everyone else has come up with. Thanks for stopping by and Happy Polishing!


Monday, March 30, 2015

6:00 AM

Orly Color AMP'D - Surfer Girl


     Last week I brought you the press release for the new Color AMP'D collection from Orly. Today I'm sharing my experience with this new 2 part color system with you.  I figured being gone on vacation was the perfect chance to test the wear time and I was not disappointed. I was sent Surfer Girl and the Flexible Sealcoat for this review.

     
     Surfer Girl is a bright neon pink with flashes of purple micro shimmer. Application was a little tricky compared to your typical nail polish but not so much that it was unusable. It just took a little getting used to. The first coat I applied a thin layer, which seemed to end up a little patchy. The second coat I used a bit more polish and it seemed to even out for the most part. But I still had some spots where you could tell the polish was uneven.  A thin 3rd layer evened everything out nicely. I think if I had started with a slightly thicker first coat I would have avoided most of the hassle.

Surfer-Girl-Orly-Color-AMP'd-Collection
Accent nail in Winstonia Plate W-04 with Milani White on the Spot


     I topped everything off with a layer of the flexible seal coat and waited for it to dry. The sealcoat is not a quick dry top coat so I had to wait a bit longer for my nails to dry. After 3 minutes my nails were dry enough to handle a light touch. That wasn't long enough to wait to stamp over the nail however and I ended up with some wrinkles in my polish. But you'd never know that by looking at my pictures. When Orly said this has smudge proof technology they weren't kidding! I added another layer of the flexible sealcoat over my image and everything evened out. Right then and there I was impressed.  But I still needed to test the wear time.

     Over the last week I put my hands through some pretty rough conditions. I was in Northern Minnesota where my kids and I went hiking, collected rocks, skipped rocks into Lake Superior, and spent a lot of time outside in the cold. Not to mention I still had regular things to do like washing dishes, cooking, and giving baths. Oh and before we even left 8 inches of snow fell and I had to shovel my way out on top of scraping the ice off my car. It was the ice scraping that caused my first casualty and I tore the nail on my pointer finger causing a small chip in the polish. 

Day 4 Photo taken with my cell phone inside without direct light.

  
    This is day 4 of my wear test and you can see the small chip on my pointer finger. Other than that I still have a glossy finish on my nails and there is no sign of tip wear. My hands however are starting to show the effects of the cold weather. 

Day 6. Starting to show some tip wear


     After 6 days my manicure was starting to show definite signs on wear. After having to trim down the nail on my pointer finger the polish really started to chip. (I know if I hand't broken that nail this picture would have looked a lot different.) You can just start to see the signs of tip wear on my middle and ring fingers. But I still have a glossy shine. Oh and did I mention that I didn't wrap my tips during application? 6 days before showing tip wear without wrapped tips! I say the problems I had with application are more than worth it for 6 days on wear time. What do you think? 

     Orly Color AMP'D polishes are available exclusively at Target in 36 long lasting shades for $9.99 each. Or you can pick up a launch kit containing 1 flexible color and 1 Sealcoat for $14.99. Have you seen these popping up in your local Target yet?  Thanks for stopping by and Happy Polishing!


Wednesday, March 25, 2015

6:00 AM

Neon Gradient with Stamping


      How is everyone week going so far? I've got a quick post to share with you today. With spring fever hitting me hard this year I wanted something bright and cheery on my tips. I decided to try a neon gradient with a little stamping.  While this didn't turn out exactly like I had hoped I still though it looked pretty cool.


     I started with a white base and sponged on Orly Tropical Pop (yellow) Saturated (purple) Milani Pink Hottie and Fresh Teal. No matter what I did Saturated wanted to photograph blue and after about 100 photos I gave up on getting a color accurate picture. It really is this great intense purple color. While it's a great purple I think it is what went wrong with this manicure. Saturated ended up being too dark for the stamping to show up very well against.


     See what I mean? It shoes up better in pictures than it does in real life and that was a bit disappointing for me. Otherwise I love this manicure. 

     
     For my stamping I used Zoya Black Swan and MoYou Plate 04 from the Kaleidoscope collection. I love this collection from MoYou, and use it the most out of all the image plates that I own. So you will probably see more designs like this in the future.

     And of course I had to share a macro shot with all of you. This is the one nail that turned out pretty much perfect. With even blending on the gradient and a pretty close to centered image. That is a huge accomplishment for me by the way. Image placement is the hardest part about stamping for me. If you have any tips Id love to hear them. 


      What you you think? Are you a fan of wearing neons? Let me know in the comments! That's all I have for you today. Thanks for stopping by and Happy Polishing!


Monday, March 16, 2015

10:14 AM

White Nail Polish Stamping Comparison


     I hope everyone had a great weekend. The weather was so nice here that some friends and I got together for a BBQ and outside games. I might have even gotten a slight tan! I love the warmer weather and everything that it brings. For today's post I'm doing a comparison of white nail polishes and how well they stamp. You might remember my previous post about black nail polishes or you might not it was quite a few months ago. I sort of got sidetracked when it came to making this a series. oops! 

     For this comparison I used Konad stamping white, Sinful Colors Snow me White, Milani White on the Spot and Finger Paints Paper Mache and image plate SH213 from Shandy. Just like last time I wanted a design that had a lot of detail to it to really see just how well the polishes would work.  Let's take a look at my results. For this test I used Sally Girl Curfew as my base color. 


     As you can see there are a few patchy spot in the Konad design. This is due mainly to user error. I scraped a little too hard and removed a lot of polish. I didn't notice it until after the image was already on my nail.  Not the most accurate for testing I know but I think you can still get a good idea of how it works so I decided to not re-do it. 

     All 4 polishes stamp well but they have different opacity to them. Surprisingly the Milani has the most opaque image even though it was the thinnest when applying it on the stamp. Sinful colors did the next best job as far as a crisp clear image goes.  The Konad and Finger Paints seem to be equal in opacity.

    
   Over all based off of this experience Id have to say that Milani White on the Spot is the best nail polish for stamping out of these 4. Even beating out the stamping specific polish from Konad. Impressive considering it's also the oldest of the 4. I've had this bottle for almost 3 years now. What so you think of these results? Are you surprised at which one's stamped the best?  Do you have a favorite white polish to stamp with? Thanks for stopping by and Happy Polishing! 

Monday, March 9, 2015

9:41 AM

Proclaim Hair glue for nail art?


     Good morning everyone. I'm posting a little later than normal today, the whole day light savings thing has really messed with my internal clock and has thrown everything off for me. Anyone else feeling it's effects? 

     Today I have a review of the Proclaim hair glue that people have been using  in nail art lately. Hair glue for nail art? No I'm not crazy, it works as a mask around your nails to help with clean up. The product  was first brought to my attention by Amanda of Amanda Loves Polish when she posted a quick video and I immediately knew I wanted to try it.  After all anything that can make clean up easier is my kind of product!


     I picked this bottle up at Sally's for about $1.37. It's available in 2 colors light and dark and is a much cheaper alternative than liquid palisade. I went with the dark version so I could make sure I would be able to see it on my skin. 

     Application was a bit tricky and I ended up making a bit of a mess. I posted a picture on IG and Facebook with it on my fingers and received a lot of comments about decanting it into an empty polish bottle. Unfortunately I don't have any empty bottles laying around so I had to improvise. I started with a base of Milani White on the Spot and applied the glue once that was dry. 


     The hair glue goes on with a med/dark grey color and turns black when completely dry. It's a bit tacky even when dry and my fingers wanted to stick together on the sides. Which made taking the picture interesting to say the least.  As you can see from the picture above that there was a bit of a learning curve to my application but by the time I reached my pinky things had smoothed out.

     I tried to get as close to the nail bed as I could since my cuticle area is what gives me the most trouble during clean up. For some reason my cuticles always feel rough and dry even 5 minutes after applying cuticle oil. Because of this nail polish sticks to them like a magnet and never fully wants to come off. I suspect this is due to years of having my cuticles clipped at nail salons. They are slowly getting better but still are a major issue for me when it comes to messy nail art like gradients and water marbles. For this test I went with a gradient and I love how the colors look together!


     Wow look at the shimmery mess I've got going on! For my gradient I used Sally Hansen Black and Blue and Loves me Not from the complete Salon manicure line. Both are colors that I typically have a hard time cleaning off my skin. As you can see on my pinky I didn't cover quite enough of my finger and I have a little polish by the knuckle. I mention that because I want to make sure you notice how sheer Black and Blue is. That's important to note for the removal photo coming up and knowing what exactly is left on my tips. 

     Removal was not quite as easy as all those quick little videos of the liquid palisade is but didn't give me too much trouble. For the most part it peeled off in one piece, but not in one tug. I had to use my tweezers to slowly work my way around the nail. This may have been cause by my iffy application of the product though and I was left with little pieces around my nails.


     Those little pieces proved to be challenging to get off with my tweezers but came off easily with a little remover and Q-tip.  I did still have the issue of polish pooling at my cuticles which is what I was hoping to avoid. Next time I'll have to remember to apply the glue around the edge of my nail to avoid that. 

     Overall thoughts? This product does work well for clean up, but the application process is a bit of a pain. Will I use this again? Yes but only because I hate to waste a product. Would I purchase it again? Maybe in a pinch since it's easily available but most likely not.  Since picking this up quite a few other alternative products have come out and I'd like to give one of them a try. Thanks for stopping by and Happy Polishing! 


Monday, December 15, 2014

6:00 AM

The 12 Days of Christmas Nail Art Challenge Day 8: Christmas Ornaments

     
     Monday brings us to the 8th day of the 12 Days of Christmas Nail Art challenge, with the theme being Christmas Ornaments. This year I went a totally different direction than last year's ornament theme with some water decals from Born Pretty Store. I would have loved to try my hand at free hand ornaments but my nails are kind of short right now and I didn't think I would have enough space to paint them.

     For this manicure, I started out with one coat of Milani White on the Spot as a base for my gradient. I then sponged on Sinful Colors Sugar Rush and Sally Hansen Silver Sweep to create my gradient. When that dried I added a quick coat of China Glaze Fairy Dust for added Sparkle. Christmas Ornaments have to sparkle after all!


     The water decals I used were from a variety of sets that I picked up last year. I used set BLE1755 on my pointer and pinky finger, BLE1754 on my ring finger and BLE1753 on my middle finger. I topped everything off with a generous coat of Out the Door.


     Right now Born Pretty store is running a sale where you can get up to 80% off select items. The same runs through Dec 17th, 2014 and you can use code MERRYXMASB10 for an additional 15% off your order. If you've had your eye on a few items I'd say now is the time to stock up!

     And now I think it's time to take a look at the designs everyone else came up with for today. Thanks for stopping by and Happy Polishing!


Like what you see? Share it with your friends!