Friday, September 25, 2015

6:00 AM

Kiss - imPRESS at home manicure


     Thanks to the folks over at Brand Backer I was given the opportunity to review the imPRESS at home manicure kit. Geared towards the busy mom the impress manicure has "everything from soft hues to bold glitter tips and on-trend accent nails all with an ultra-gel shine, imPRESS offerings suit every woman’s every mood at every moment. On-the-go moms no longer need to spend time at a salon to get a salon-quality manicure; no need for DIY skills either! Just press on, and with no dry time you can get right back to life’s demands. Plus, UltraHold technology keeps nails on—until you’re ready to remove—just peel off with no damage to natural nails!"


     The kit I am reviewing today is called Harlem Shake. A blush tones nude with silver glitter accent. The accent nail is optional if *Gasp* glitter isn't your thing. 

     I found that the nail sizes were a little on the small side but was still able to find ones that would work for me. The length of the nail is perfect for a busy mom but are a lot shorter than my natural nails are normally. You might remember my recent pic on Instagram showing my nail tragedy. 


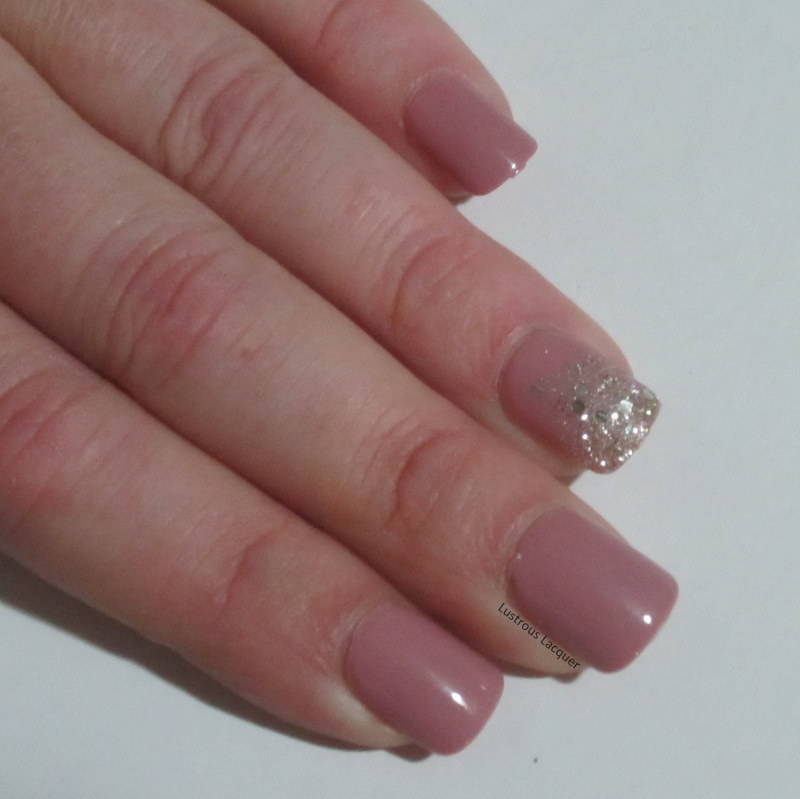
     As far as application goes these were pretty quick and for the most part easy. There is a little plastic tab that you pull off to expose the adhesive that gave me issues. It was hard to remove and I ended up damaging a few of the nails in the process. Not excessively but you can see a few "wrinkles" at the cuticle line in the next photo. 


    Just like the package says they nails are lightweight and flexible. I was able to keep them on for an entire day of housework. And I mean housework, I washed dishes, cleaned bathrooms, picked up toys and did laundry. When I was ready to take them off removal was a snap.I just peeled them off at the side and had no nail damage. There was a tiny amount of adhesive on a few nails but it came off with a swipe of remover. 

    My overall impression is that this kit will, in fact, save time for those who are not able to go to a salon or do their nails at home. As a nail blogger who is gaining experience with nail art and actually enjoys painting her nails Id pass on these most days. To me, they look like fake nails, and I take pride in my natural nails. I put in a lot of work to get my nails in the shape they are today and like showing them off. But let's be honest, this kit isn't marketed towards nail bloggers. It's geared towards busy moms who want pretty nails for a special occasion or just to have pretty tips while doing their mom duty, and this kit will work perfectly for that. 

     These kits can be purchased at numerous stores like Walmart, k-mart or Walgreens. Or online at http://impressmanicure.com

     *The items in this post were provided for my honest review by Brand Backer. All opinions are my own. I am in no way affiliated with Brand Backer or Kiss*


Friday, September 18, 2015

6:00 AM

Hobby Polish Bloggers Presents - Fall Colors


     It's time once again for the monthly link up presented by the Facebook group Hobby Polish Bloggers. This months theme is fall colors.  I don't know about you but I absolutely love fall colors. The colder temperatures and the fact that winter is approaching I can do without, but the trees look so pretty. I look forward to the changing leaves, especially since we have a tree in our yard that naturally does a gradient of red, orange, yellow and green. Add to that they form an almost perfect ball shape and you can't help but marvel at its beauty.  I knew right away I wanted to incorporate my love for this tree and the changing leaves in my manicure. 

Photo was taken in natural light

    After trying to come up with an abstract manicure idea and coming up empty handed I decided that I literal design would be best. Now I know what you might be thinking. Where are all those colorful leaves I describe earlier, where is the gradient of red, orange, yellow and green?  Well, it was a tough nail art day for me and sometimes it best to just walk away then risk further destruction. It happens to the best of us sometimes. 

     Turns out I didn't have a leaf image that I could have sworn Id used before and the one I did have was a solid image. I wanted one that I could fill in to show the leaves changing. After several failed attempts at decals, and the colors I wanted to use not working well for stamping I had one lonely leaf decal to work with. 

Photo was taken in direct sunlight

     To create this manicure I started out with Sinful Colors Snow me White and a classic french tip look.  Using a striping polish from Jordana called The Stylist I lined the base of the white and let that dry. 

     The decal was created using Red Angle plate RA-121 and Konad Black. I used my best efforts to fill the leaf in with Milani Bijou Bronze


    Overall, I like the finished look. I'm just a wee bit disappointed that my original idea didn't work out.  But fall is nowhere near over so I might try this again. Now let's see what everyone else came up with. Thanks for stopping by and Happy Polishing!


Wednesday, September 16, 2015

6:00 AM

Darling Diva - Eleganza and Flazeda (LE Duo)


     Hi Everyone. I've decided to torture you again today with some polishes that are no longer available. #Sorrynotsorry Is it cool to use hashtags in a blog post? I was fortunate to win this duo from a giveaway and they are stunning!!! Eleganze looks like opals on your fingers and Flazeda is packed with sparkly depth.  I had to put them on right away and of course, share them with the world... or the handful of people who read my blog. To those of you reading these words a big hug and many thanks. Now onto the polish!

  **  All photos are shown with 3 thin coats plus topcoat in full sun unless stated otherwise. **


     Eleganza is a clear base packed with mega flakies. It can be layered to give any polish an opal effect or worn on its own.


     The application was a breeze with this beauty. I had no issues with the flakies wanting to move around on my nail and each coat was packed! Plus the polish flowed smoothly and everything laid flat on the nail. There was a slight texture that a single layer of top coat will smooth out. 


     I don't know about you but I think Carrie nail the opal effect with this one! Just look at all those colors reflecting on my nail.  Imagine this layered over an off-white polish, and umm you'll have to imagine it because I'm a bad blogger and have no pictures to share. But wouldn't that be breathtaking! 


     Flazeda is a dark raspberry colored base packed with mega flakies Depending on the lighting it can lean either pink or purple.  It can also be layered over another color or worn on its own. 


     The application was identical to Eleganza with everything flowing smoothly and laying flat on the nail. 


     This one was hard to photograph. All that sparkle made my camera freak out and not want to focus, but I think I did an ok job here. You get to see the base color and the intense sparkle. Its amazing to me how having a colored base changes the flakies so much. They look so much brighter here compared to the softer colors in Eleganza.


     These photos are taken indoors under my daylight bulb. I didn't think they did these polishes justice but I wanted to show them in different lighting. You can see that Flazeda now leans towards purple.   

    I can't really pick a favorite, to be honest. I like them both for different reasons. Could you pick just one? Thanks for stopping by and Happy Polishing!


Monday, September 14, 2015

9:07 AM

Thermal Nail Art


     How was everyone weekend? I feel like I could use an extra day to get caught up on all the everyday things I put off.  Our town festival was once again a great time and I got to catch up with some high school friends that came into town. Now it's back to the every day and I've got a million things to do so today's post is going to be a quick one. 

     Today's I'm revisiting a few items that I've blogged about before but never in the same post. Actually, we can thank my daughter for this nail art look since she is the one who picked everything out for me.

      First up is Pygmy Seahorse from My Sirens Call. This was originally sent to me back in July of 2014 as a Gloss 48 exclusive. And I have to say I love it now just as much as I did back then.

*Edit* It was brought to my attention this morning that since Gloss 48 is no longer in business My Sirens Call now has this polish available for purchase on Etsy. Here is the direct link. https://www.etsy.com/listing/248045030/pygmy-seahorse **


     Actually, I think I might love it more. When I wore it the first time my nails were much shorter and I couldn't fully appreciate the color shift. But Sydney wouldn't let me stop there. She said I needed to dress it up.  At almost 7 she is already turning into quite the polishaholic and has some definite opinions on nail art. 

     After we talked for a bit about why she picked out a thermal polish for me we decided that stamping would be the best nail art to go with. And my Messy Mansions plate MM18 was chosen.  Along with Sinful Colors Enchanted to stamp with. 


     I love how this turned out and will be having Sydney pick a few more of my nail art options in the future. You have to admit the girl's got a pretty good eye!


    I ended up wearing this look for a full week and it held up pretty well. I only had a little tip wear, but it had grown out quite a bit and one nail chipped pretty badly. Now I'm sitting here with naked nails wondering what to do next. Well while I figure that out I better get going. my laundry isn't going to fold itself. Thanks for stopping by and Happy Polishing!


Friday, September 11, 2015

6:00 AM

LynBDesigns - Green Eyed Kitty


     Whew well, we made it to Friday! Another work week in the books, and I'm ready for the weekend. It's our annual town festival this weekend and a friends band is playing at the beer gardens so I will be dancing the night away. Do you have any fun plans? Before I get to dancing though I have to show you Green Eyed Kitty from LynBDesigns. 


     Green Eyed Kitty is a muted sage green metallic with silver shimmer. Unfortunately, this was a limited Edition gift with purchase polish that is no longer available.  Sorry for the polish torture. 


     The application was smooth with a decently sheer first coat but builds up nicely. Shown here is 2 coats plus top coat.  Like most metallic polish you do get a few brush strokes but they are minimal. 


     While this is a color that I never really gave much thought to I actually really like the look of it. It played nicely with my skin tone and felt sort of chic and as sophisticated as a green nail polish can be. 

I really liked this polish on its own but since I can't seem to wear just plain polish anymore I added an accent nail. 


     Once again I broke out my striping tape to create this pattern inspired by Young Wild and Polished and Peace,  Love & OPI by OPI.      Because Peace, Love & OPI is a duochrome the accent nail changed depending on the lighting which of course was really fun to look at and gave me a giggle thinking I was clever without even trying.   But wait, what's that you say? Why of course I'll show you a macro of the nail art! It's a great way to end this post don't you think? 


     I love the finished look of this manicure and I'm sure I will be repeating that tape pattern again. It was a pretty easy one to do. I hope you have a wonderful weekend. Thanks for stopping by and Happy Polishing!


Wednesday, September 9, 2015

6:00 AM

Orly - Hot Tropics


     Happy Wednesday! No, I didn't fall off the face of the earth, I just have had zero time to blog lately with starting a new job, helping the boyfriend finish off his basement and getting the kids back to school. It takes a long time to build 2 rooms and add a bathroom when you only have a few hours a night to work on it! We aren't even 1/4 of the way done but I haven't broken a nail yet! *knock on wood* And to celebrate that fact I decided to throw on the fun bright Hot Tropics from Orly's Summer 2014 Baked Collection.  Plus I'm boycotting the upcoming colder temps of fall and not giving up my neons yet! 


     Hot Tropics is a bright pink toned purple with intense gold glass flecks.  In direct sunlight, it appears to lean heavily towards the pink side as shown above. Also the VNL you see in the pictures is not as noticeable with the naked eye. Shown here is 3 thin coats plus top coat. 


     The application was smooth with the polish going on evenly but quite sheer. Hot Tropics does build up nicely and full opacity can be reached after 3 thin or 2 regular coats.


     I just love how intense the glass flecks are in this polish! They look like they are just floating around in the polish and really add some great depth. But I needed to see how they would look with a matte top coat...


     Babam! You can really see each fleck now. I used 2 coats of Essie Matte About You to get this look. For some reason, if I only use 1 coat I still get a tiny bit of shine. 


     I can't decide if I like it better glossy or matte. Both looks are gorgeous in my opinion. Which one do you like? That's all I've got for you today. Thanks for stopping by and Happy Polishing!


Like what you see? Share it with your friends!