Showing posts with label Winstiona. Show all posts

Wednesday, May 10, 2017

6:00 AM

Pink Roses Nail Art


      Hi Everyone and Happy Wednesday. It feels great to be back blogging, although I'm not sure how consistently I'll be able to get posts up since I am still in the process of moving into my new house. It's an amazing 101-year-old farm house with tall windows, thick baseboards and original intricately carved door hardware. But the best part is there is a room for me to dedicate to a polish room. I can't wait to get it all setup and have everything organized. I'm thinking that I might dedicate a set of posts to it. What do you think, would you like to see how I transform a beige colored office into my own personal polish heaven? Let me know in the comments.

     Before I get to all that, I should probably share a post with all of you. And I thought a double stamped manicure would be the way to go. One that featured roses of course because we all know that I love floral manicures.

     
     It's a simple manicure but one that I really like. It's also a manicure that helped me discover that you can use stamping polish just like regular polish but with fewer coats.  For this look, I used Hit the Bottle Psycho pink as my main color and to stamp the rose image from Winstonia plate W-04 a plate I've used several times over the years.


     The accent nail is painted with Polish My Life Pink Sandals as the base color. I then stamped with Hot the Bottle Drunk Tank Pink and Bundle Monster plate BM-310. Pink Sandals is from the Time to Chill Collection released for spring 2014 and is no longer available for purchase. But it might show up in a destash sale so if you want it, keep your eyes open.


     Like I mentioned above, I'm really happy with how this turned out. I like that it's simple but still feminine and delicate, but not overly so. I think if I'd done the stamping on all my nails it would have been too much. Do you agree?  Do you have a favorite theme to do your nails in, something to go to whenever you're stumped or just want to smile? Well, that's all I've got for today, I better get back to unpacking boxes. Thanks for stopping by and Happy Polishing!


Friday, December 16, 2016

6:00 AM

Frozen Snowflakes


     Well, the temperature has dropped to below zero here on quite a few occasions lately. It was -14 when I woke up yesterday morning. Which means winter is in full effect, my nails and skin are suffering from the extreme cold and Christmas is just around the corner. That means it's time to break out some seasonally inspired manicures! I thought with the severe cold and snow predicted to hit my area over the weekend it was only fitting to share with you the frozen snowflakes manicure I wore this week.

Frozen-manicure-stamped-snowflakes-glitter-nail-polish

     With there still being 10 days left until Christmas I wanted to steer away from the traditional colors, and go with something wintery instead. And I honestly thought this might be an original idea with the blue snowflakes stamped on a blue base but they are all over Pinterest right now. I'm not sure if I saw one and didn't completely remember it, or if I've finally been on trend with my manicure!


     I started with a base of Lollipop Posse Slipping out of time, a Catalina blue nail polish with holographic flakes. Then I mattified it because let's be honest I don't use my matte top coat as often as I should. And maybe because I thought the holographic flakes would look really cool that way.

     For my snowflakes, I pulled out every image plate I own with a snowflake image and went to town! Now I don't remember which plate had which image on it but if you see one you just need to know about let me know in the comments and I can look through my plates and let you know. I can tell you the ones that I used are UR Beautiful 16, Konad M59, Bundle Monster BM-319 and BM-323 and Winstonia Meery X'Mas. (Yes it's spelled meery that's not a type-o on my part)


          For stamping polishes, I used Snowed In and Blue-tiful from Hit the Bottle and really like how it turned out. The blue wasn't quite as easy to see as it looks here which was kind of a bummer at first but as the week went on I really liked the subtleness. Well, that's all I've got for you today. I hope you enjoy your weekend and for those of you in the colder climates, I hope you stay warm. Thanks for stopping by and Happy Polishing!


Monday, December 14, 2015

6:00 AM

Winter Nail Art Looks


     I've had another busy weekend with getting ready for Christmas this last weekend but I did manage to squeeze in a few winter manicures. In fact I've got 3 to share with you today. As I was editing my photos I realized that all 3 looks are very similar and I've got a thing for snowflake manicures. Let's take a look.


     The first look I created I'm calling Winter Wonderland. You  might recognize the base color here from a previous review.  I just knew that I wanted to do a frozen nail art look when I wore Daily Lacquers Narwahl. 


    For the snowflakes I used Sally Hansen Silver Sweep and Bundle Monster plate BM-14. I stamped over that with Konad White and Bundle Monster plate BM-407 to create the trees. Simple but still the look I was going for.


     Keeping with the snowy, winter theme my next manicure was done with a beautiful polish I was gifted during a recent blogger meet up. This is a small batch sample and just perfect for winter. Northern Star Polish Blizzard is a white with grey undertones polish with micro holographic glitters. And with a name like Blizzard I had to add a few snowflakes on top. 


    I used a new plate that I ordered from Winstonia and have been having so much fun with it lately! The plate is called Have a Meery X'mas! (no that's not a typo merry is spelled wrong on the plate.) This plate has so many festive images on it that I know I will be reaching for it often during the holiday season. 

     I again reached for my Konad White and Sally Hansen Silver Sweep to stamp with. Partly because they work so well and partly because I hadn't put them away from the previous manicure. Seriously my nail art station looks like my helmer exploded some days! But I have a feeling I'm not alone in that though. 

Photo taken in natural light
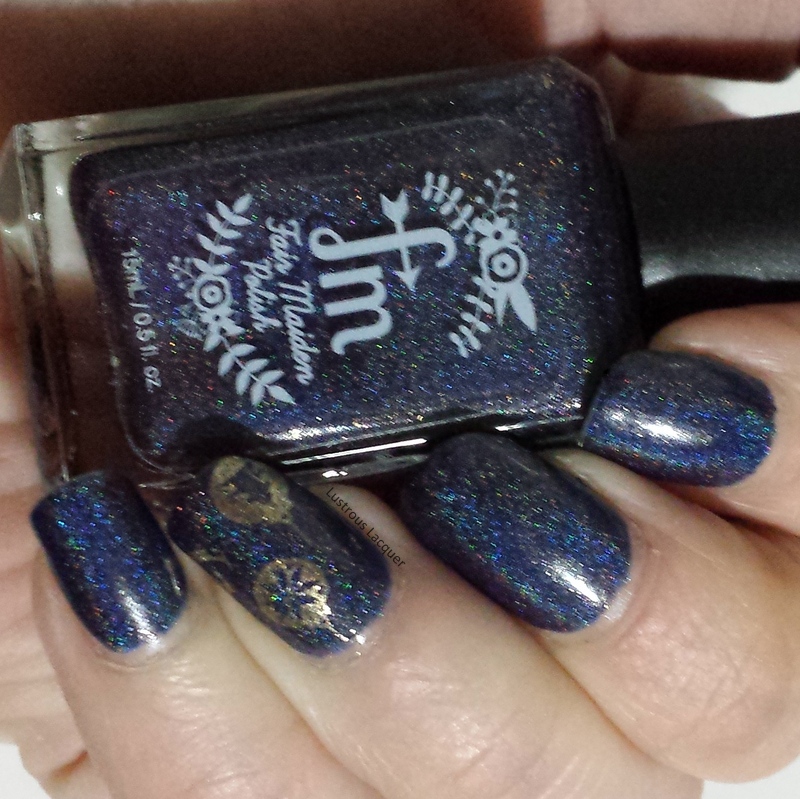
    The last look I have for you features one of my very first Fair Maiden polishes. Starry Night from the newly released Winter at Dusk Collection. Now with a name like Starry Night you'd expect me to stamp a few stars right? Well I went a little outside the box and did more of a Christmas theme with this one. 


    Ta da! Ive got some delicate Christmas bulbs as an accent. I just couldn't cover up all that gorgeous holo in Starry Night. I also realized that I don't own very many gold polishes that work well for stamping. Most of mine are all glitter. 

     Using the same Winstonia plate as my Blizzard manicure and Orly Luxe I created this simplistic holiday look. 


    So those are my 3 quick and easy Winter nail art looks for this year. Id love to hear which one is your favorite. I'll be back later this week with a few Christmas themed looks just in time for the holiday itself. Thanks for stopping by and Happy Polishing!


Friday, May 15, 2015

6:00 AM

Hobby Polish Bloggers Presents: May Flowers


     On Monday I showed you my failed attempt at making my own decal and the feedback and suggestions I got was so great that I decided to try it again. I figured the Hobby Polish Bloggers May link up would be the perfect time since the theme is May Flowers.

     Now this is not my original idea but I loved the look and knew I needed to try it myself. The original manicure was done by  Nailartstampingmania. <----( click here for the original post.)  Here is my version.

Holographic-DIY-nail-decals

     I started with a base of Milani White on the Spot and while that dried I started on the decals. This was a long slow process for me as I had to make each decal one at a time. I only have one stamper that I like using at the moment. Good thing I was binge watching episodes of Heros on Netflix to pass the time. I love Netflix by the way, I get to watch all the shows I missed the first time around.

To create my decal I used:
Winstonia plate W-04 
 Zoya Black Swan
Parallox Polish April Holo from the April Subscription box 
 Zoya Penny
Sally Hansen Double Duty base/top coat
Small dotting tool


     As you might remember from my previous post I had a lot of trouble with the decal being stiff and hard to work with. I also had issues with it wanting to stay on the nail. That was because I used Seche Vite on the decal. A quick Dry top coat is what you want in most instances when it comes to nail art but not when making decals. Sally Hansen Double Duty was a dream come true for me. After letting it dry on the stamper for about 10 minutes I was able to easily peel it off, the decal was flexible, but not floppy and, adhered to my nail nicely.


     What a difference the top coat makes! What I once thought was a difficult technique is now so easy! I can see myself doing this over and over again. Of course I'll need to pick up a few more stampers so the process goes a bit quicker. But man o man am I impressed with my results. Now as much as I want you all to sit here and admire my work, it's time to check out what everyone else has come up with. Thanks for stopping by and Happy Polishing!


6:00 AM

Hobby Polish Bloggers Presents: May Flowers


     On Monday I showed you my failed attempt at making my own decal and the feedback and suggestions I got were so great that I decided to try it again. I figured the Hobby Polish Bloggers May link up would be a perfect time since the theme is May Flowers.

     Now, this is not my original idea but I loved the look and knew I needed to try it myself. The original manicure was done by  Nailartstampingmania. <----( click here for the original post.)  Here is my version.

Holographic-DIY-nail-decals

     I started with a base of Milani White on the Spot and while that dried I started on the decals. This was a long slow process for me as I had to make each decal one at a time. I only have one stamper that I like using at the moment. Good thing I was binge watching episodes of Heros on Netflix to pass the time. I love Netflix by the way, I get to watch all the shows I missed the first time around.

To create my decal I used:
Winstonia plate W-04 
 Zoya Black Swan
Parallax Polish April Holo from the April Subscription box 
 Zoya Penny
Sally Hansen Double Duty base/top coat
Small dotting tool


     As you might remember from my previous post I had a lot of trouble with the decal being stiff and hard to work with. I also had issues with it wanting to stay on the nail. That was because I used Seche Vite on the decal. A quick Dry top coat is what you want in most instances when it comes to nail art but not when making decals. Sally Hansen Double Duty was a dream come true for me. After letting it dry on the stamper for about 10 minutes I was able to easily peel it off, the decal was flexible, but not floppy and, adhered to my nail nicely.


     What a difference the top coat makes! What I once thought was a difficult technique is now so easy! I can see myself doing this over and over again. Of course, I'll need to pick up a few more stampers so the process goes a bit quicker. But man o man am I impressed with my results. Now as much as I want you all to sit here and admire my work, it's time to check out what everyone else has come up with. Thanks for stopping by and Happy Polishing!


Monday, March 30, 2015

6:00 AM

Orly Color AMP'D - Surfer Girl


     Last week I brought you the press release for the new Color AMP'D collection from Orly. Today I'm sharing my experience with this new 2 part color system with you.  I figured being gone on vacation was the perfect chance to test the wear time and I was not disappointed. I was sent Surfer Girl and the Flexible Sealcoat for this review.

     
     Surfer Girl is a bright neon pink with flashes of purple micro shimmer. Application was a little tricky compared to your typical nail polish but not so much that it was unusable. It just took a little getting used to. The first coat I applied a thin layer, which seemed to end up a little patchy. The second coat I used a bit more polish and it seemed to even out for the most part. But I still had some spots where you could tell the polish was uneven.  A thin 3rd layer evened everything out nicely. I think if I had started with a slightly thicker first coat I would have avoided most of the hassle.

Surfer-Girl-Orly-Color-AMP'd-Collection
Accent nail in Winstonia Plate W-04 with Milani White on the Spot


     I topped everything off with a layer of the flexible seal coat and waited for it to dry. The sealcoat is not a quick dry top coat so I had to wait a bit longer for my nails to dry. After 3 minutes my nails were dry enough to handle a light touch. That wasn't long enough to wait to stamp over the nail however and I ended up with some wrinkles in my polish. But you'd never know that by looking at my pictures. When Orly said this has smudge proof technology they weren't kidding! I added another layer of the flexible sealcoat over my image and everything evened out. Right then and there I was impressed.  But I still needed to test the wear time.

     Over the last week I put my hands through some pretty rough conditions. I was in Northern Minnesota where my kids and I went hiking, collected rocks, skipped rocks into Lake Superior, and spent a lot of time outside in the cold. Not to mention I still had regular things to do like washing dishes, cooking, and giving baths. Oh and before we even left 8 inches of snow fell and I had to shovel my way out on top of scraping the ice off my car. It was the ice scraping that caused my first casualty and I tore the nail on my pointer finger causing a small chip in the polish. 

Day 4 Photo taken with my cell phone inside without direct light.

  
    This is day 4 of my wear test and you can see the small chip on my pointer finger. Other than that I still have a glossy finish on my nails and there is no sign of tip wear. My hands however are starting to show the effects of the cold weather. 

Day 6. Starting to show some tip wear


     After 6 days my manicure was starting to show definite signs on wear. After having to trim down the nail on my pointer finger the polish really started to chip. (I know if I hand't broken that nail this picture would have looked a lot different.) You can just start to see the signs of tip wear on my middle and ring fingers. But I still have a glossy shine. Oh and did I mention that I didn't wrap my tips during application? 6 days before showing tip wear without wrapped tips! I say the problems I had with application are more than worth it for 6 days on wear time. What do you think? 

     Orly Color AMP'D polishes are available exclusively at Target in 36 long lasting shades for $9.99 each. Or you can pick up a launch kit containing 1 flexible color and 1 Sealcoat for $14.99. Have you seen these popping up in your local Target yet?  Thanks for stopping by and Happy Polishing!


Friday, August 15, 2014

6:00 AM

Lumina Lacquers- Soleil

   
     It's Friday! I think that calls for a fun, sparkly nail polish. So today I have just that for you. Ladies and Gentlemen feast your eyes upon Lumina Lacquers Soleil.

Gold-Glitter-Indie-Nail-Polish

      A golden micro glitter polish that is extremely holographic. Soleil is the sister polish to Maleficent and Silver Springs! While all 3 polishes are beautiful, Soleil is my favorite and the only one I own from the trio.  In fact, I fell in love with this polish and found myself hitting the purchase button before I was halfway through reading the review from Imperfectly Painted.


Micro-Glitter-Holographic-Gold-Nail-Polish
     
     The application was pretty good for a glitter polish. I was able to get lots of glitter on the brush and it flowed smoothly. If you're one to apply thin coats you will need 3 or 4 to reach full opacity. The glitter likes to move around on the nail with thinner coats. But if you're like me and tend to do thicker layers you can get away with 2. 

Gold-Hologrpahic-indie-nail-polish

     Soleil does dry to a rougher texture and is top coat hungry. I used 2 layers of top coat to get a nice smooth finish.

     Even though I absolutely love this polish wearing it alone as a full manicure can be a bit much so I decided to add some stamping on top. I used my new Winstonia plate W-04 and Finger Paints Black Expressionism for this design.

Black-Stamping-Over-Gold-Micro-Glitter-Nail-Polish

     Please forgive the picture quality, I took it with my cell phone after being at a BBQ all day. And my flash may have gone off, but you get to see just how sparkly Soleil is this way. I get bonus points for that right.

     What do you think of Soleil? This might just be the first polish I've purchased that I want to get a backup for. I can see myself using this all the time as an accent nail, or for nail art. Also, did you notice I use bigger pictures in this post? I'd love to hear your thoughts on that too. Should I stick with this size or go back to my original size?

     Thanks for stopping by and Happy Polishing!


Like what you see? Share it with your friends!