Showing posts with label Leadlight. Show all posts

Tuesday, November 21, 2017

6:00 AM

Leadlight Floral Accent Manicure


     It's been a rough few years for my blog. I started out with the intention of focusing solely on nail art, then got caught up in the swatching game trying to gain some popularity with readers and hoping it would lead to opportunities to work with different brands. I've lost my focus and motivation on more occasions than I'd like to admit while attempting every new trick I read about making money from blogging. And after 5 years of the ups and downs, I've realized that I just want to do this for me. It's my escape from the everyday stresses of life and I need to keep it that way. So as I mentioned in my Gold polish stamping comparison post I'm taking a step back from the heavy posting schedule that I can no longer maintain. But what I didn't mention is that I'm going to focus more on what I started out trying to do and that's to post more nail art. I'll still have nail polish swatches and reviews for those of you who enjoy reading them because I like doing them. They just won't be the main focus of my blog anymore. So with that in mind let's jump right into today's nail art look. 


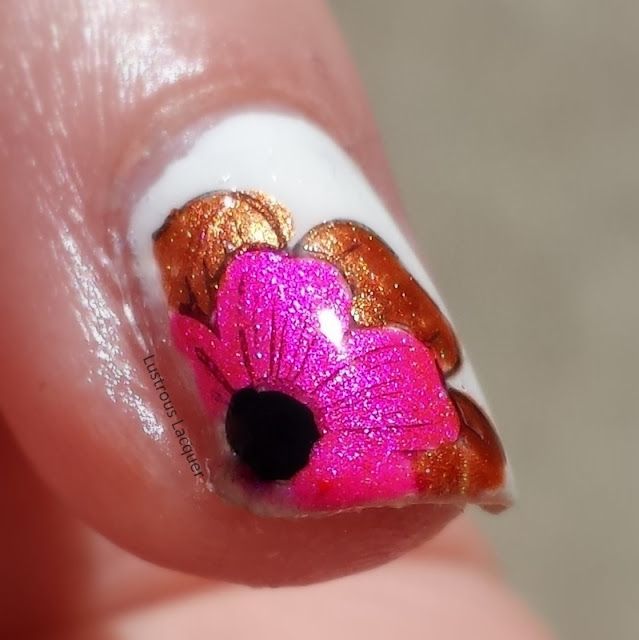
      It's been awhile since I've done a leadlight manicure and while this isn't exactly a seasonally appropriate look I knew it's what I wanted the minute I put on Native War Paint's I'm a VIP!. Plus I've never really been one to let the seasons dictate what I wear on my nails. 

     I'm a VIP! was one of the polishes I received in my VIP bag from Polishcon Chicago this year. It's a gorgeous aqua blue with iridescent shimmer. Looking at it on my nails it brought to mind the image of a beautiful sunset reflecting off of tropical waters in some exotic location. Especially when I'd get flashes of pink and purple mixed with gold. Oh, what I'd give to be at the tropical location right now since the temps here have been just above freezing lately and the snow could start falling at any time.


     For my accent nail, I stamped an image from plate UR Beautiful 10 using Hit the Bottle Snowed In. I guess maybe my manicure is seasonally appropriate after all considering they are predicting a ton of snowfall in my area this year. Let's hope I'm not foreshadowing my future here and won't end up actually snowed in! It has happened to me in the past. 


      I filled my floral image in with some homemade jelly polishes that I purchased from Heidi Halpern Kay who is an admin of the Leadlighting/reverse Stamping group I'm in on Facebook. Here are her words on how to get your own if interested. 
I do not have a website or store front. I can be reached through Facebook (Heidi Susan Halpern Kay) or by email heidi@kayconcepts.com. I admin the Leadlighting and Reverse/Advanced Stamping Nail Art Group. Prices are $2.50 each plus exact shipping. Minimum order is 12 -- you can hand pick any of 40 plus colors and I make them to order in under a week.

     I do know that she's had some things come up lately in her personal life and the holidays are approaching so the lead time is probably extended right now. The colors have no names but she has a picture of what is available if you're interested. A set of 12 polishes should cost you approximately $36.10 shipped.

    And just like my previous post, I'm including a bonus shot to help show off the entire look. This one has less reflection on it so the details aren't hidden. And was also taken outside so you can see what I'm a VIP! looks like in natural sunlight.


      Thanks for stopping by and Happy Polishing! 

Wednesday, September 28, 2016

6:00 AM

Leadlighting, Reverse and Advanced stamping. What are they and what's the difference?


     You hear a lot of terms in the nail art community. Cindy hand, glitter bomb, ruffian, smoosh manicure to name a few. If you're just starting out it can be a bit overwhelming. Heck even if you aren't a newbie some of these terms may still confuse you. For me, my biggest issue is remembering the difference between leadlighting and reverse stamping. And that got me thinking that maybe I'm not alone and a blog post might be helpful. So I sat down, did a bit of research, watched some youtube videos and asked questions. This  is what I found.


Leadlighting - is the technique of using transparent jellies, alcohol inks, or watercolors to color in open images stamped in a darker opaque polish. This can be done directly on the nail, onto a mat (Like making your own decal) or directly on the stamper head itself.  The effect is a stained glass look allowing you to "see through" to the base color. Below is an image of a leadlight manicure I created to wear to a wedding. 


     For this look, I opted to stamp directly onto my nails and then color in the flowers with a sheer yellow polish. (full details can be found in my Leadlight post

     Reverse Stamping- is a lot like leadlighting in the sense that you are stamping an image and filling in the open space. The big difference is that you are using opaque colors to fill in effectively covering up your base color. This technique can be done on a mat or a stamper and sealed with top coat. Once dry the image is peeled off, flipped over and placed on the nail. The easiest way for me to remember this is to think in terms of coloring in the opposite side of the image than what you will see in the finished manicure. I recently shared a reverse stamped look in my Queen of Hearts manicure. But my favorite reverse stamped look was a floral manicure I created for a Hobby Polish Bloggers link up. 


You can find all the details for the polishes, and image plate I used by following this link. Because you are filling in the back side of the image for this technique it can not be done directly on the nail. 

     Advanced Stamping - is a lot like reversed stamping but you do this one entirely on the stamper head. You start out by painting your nails the desired color, but do not apply top coat. Then stamp the image onto the stamper and color it in. Let the image dry for about 30 seconds. While the image is drying apply your top coat. Once your top coat is tacky to the touch,  firmly press your stamper onto the nail. 

     This is one technique that I have yet to try myself but I found a detailed blog post and a video for you to check out. Maybe it will help you decide if you want to try this technique out for yourself.

Blog Post: Advanced stamping by Didolines Nail & Co. There is a video linked within this post 

or check out the video

Video : Advanced stamping by Opal Hazlett I just love the butterfly she created. 

     I hope you found this post to be helpful and that I answered some of the questions you may have had. Have you tried any of these techniques? Which one is your favorite, or which one intimidates you? Let me know in the comments if there are any other terms or techniques you're unsure about and I'll do my best to answer your questions. Thanks for stopping by and Happy Polishing!


Monday, January 5, 2015

10:51 AM

My top 10 nail art looks from 2014


     I thought I'd start 2015 off with a look back at some of my favorite nail art looks from the last year. Originally I was going to share my top 5 looks but I had a hard time narrowing it down so I went with 10.  It was fun to see how things progressed from an ok manicure to start out with to my all ti,e favorite nail art look. I hope you enjoy this stroll down memory lane and I'd love to hear which look you like the best.

     March brings us the first look of the year with some tiger stripes. This was part of a twin manicure that actually ended up being a triple manicure. 


     All the details for this look can be found at http://lustrouslacquer.blogspot.com/2014/03/twin-blog-post-tiger-print.html

     I finally attempted a Sugar Spun manicure as part of the Spring Renewal Nail Art Challenge in April. This was the look I put together for the Pastel Prompt.


     May was a slow month for nail art for me but I created 2 looks that I absolutely loved in June. Ironically both manicures were for weddings or wedding-related. The first look is a stamped gradient for one of my closest and longest friends in the world. 

    
     I wish I had a picture of the finished manicure. I ended up adding a layer of Fairy Dust after I had taken all my pictures. But there is a quick cell phone pic in the original post. You can find it here http://lustrouslacquer.blogspot.com/2014/06/stamped-gradient-for-alissa.html

     For the second wedding in June, I did the leadlight technique and matched my manicure to my dress. It was a big hit with my friends and I was pretty darn proud of my efforts.


     More pictures including one of the dress I wore can be found in the original post.  http://lustrouslacquer.blogspot.com/2014/06/leadlight-manicure.html

     July brought out some simple nail art from me. I did a few simple dotticures and this simple tape manicure. It just goes to show that not all nail art has to be extravagant. 


     This is also about the time that I started cropping all of my images to the same size and making them square. I like the more uniform look. Check out the full post to see if you agree.  http://lustrouslacquer.blogspot.com/2014/07/nail-art-tape-manicure.html

     August brought another nail art challenge to my blog. This was my Under the Stars look I created for the Let's go Camping nail art challenge. 


     This entire look doesn't thrill me as much as some of the other looks I created. But it's one of my favorites because of the way I was able to get the sky to look like it had Northern Lights in it. And it even glowed in the dark. http://lustrouslacquer.blogspot.com/2014/08/lets-go-camping-nail-art-challenge-day.html

     In September I was given the opportunity to do a guest post over at The Fancy Side. The theme was bridal since Amy was getting married and that's why she needed guest posts. 


     I was really in love with this look and ended up wearing it for almost a week. Find my original post and a link to the guest post here. http://lustrouslacquer.blogspot.com/2014/09/guest-post-at-fancy-side-bridal-manicure.html

     October was another busy month for nail art for me. And while I did like my Halloween manicure 2 others won out for the top 10 list. I did my first Chevron manicure at the beginning of the month. 


     The full post can be found by following this link. http://lustrouslacquer.blogspot.com/2014/10/my-first-chevron-manicure-fraturing.html

     Towards the end of October, I did another first on my blog. Well, 2 actually. I attempted Newspaper nails and Water decals for the first time in this vintage-vibed manicure.


     All the details including a funny story about the water decals can be found at http://lustrouslacquer.blogspot.com/2014/10/newspaper-nails-with-born-pretty-store.html

     Rounding out the year is my absolute favorite manicure. My Ugly Sweater nails for the 12 Days of Christmas nail art challenge. 


     This is also the manicure where I discovered how easy it was to create these looks using acrylic paint instead of just polish. I have a feeling my nail art is going to look a whole lot better in 2015 with this bit of knowledge. Find the full post here http://lustrouslacquer.blogspot.com/2014/12/the-12-days-of-christmas-nail-art_19.html

     I hope you enjoyed this little look back at my year in nail art. It's been a fun journey and I've learned a few things along the way. I have big hopes for 2015 and I'd love it if you'd come along for the ride. Thanks for stopping by and Happy Polishing!


Wednesday, June 25, 2014

6:00 AM

Leadlight Manicure

  
     Today I'm sharing with you a manicure I wore to a wedding last weekend. No not the wedding of my good friend Alissa who you might remember from my recent gradient post, but another friend who got married. I knew I wanted to do a fun, special manicure that went with my dress.

My inspiration
     I knew I had to do something special for this night. The girls that I was going with take a very active interest in my manicures and I wanted to impress them. Well the most impressive nail art technique currently for me is the leadlight technique.
     For those of you unfamiliar with leadlight it's really quite simple. It's just like coloring pictures in a coloring book but with a stamped image and sheer nail polish.

leadlight-manicure
   
     I started off with a base of Finger Paints Paper Mache, then stamped with Konad special black using Bundle Monster plate BM-318. The flowers reminded me of the flowers on my dress without matching them exactly. I then took my smallest dotting tool and filled in the centers of the flowers with OPI I'm Never Amberrassed from the sheer tints collection.

leadlight-manicure

     While my stamping still isn't perfect I really love how this turned out. And what did the girls think? Well, they were impressed, which made me feel really, really good. I don't tend to do a lot of nail art so when it comes together, I'm overly giddy about it and want people to notice it.

     I got especially giddy about this manicure. It turned out just like I wanted it to and I matched the dress pretty darn well if I don't say so myself.  What do you think?


     I hope you give the leadlight technique a try. I think it's an easy way to get a great outcome. If you do try it out, please share your manicures with me either on my facebook page or in the comments here. Thanks for stopping by and Happy Polishing!


Like what you see? Share it with your friends!

