Showing posts with label Christmas manicure. Show all posts

Thursday, December 28, 2017

6:00 AM

Ugly Christmas Sweater Nails


     Hi Everyone, I know Christmas is over but I have one more look to share with you before moving into the New Year. It's my Ugly Christmas Sweater nails from this year's Ugly Sweater party. You might remember my ugly patchwork nails from last year, this year I decided to go a more traditional route. Afterall nothing was going to top the excitement from last years party. And just in case you were wondering, no we haven't set an official date yet. I will you keep you posted if anything changes. Now let's get to the nails!

Stamped-holographic-Christmas-manicure


     For this manicure, I started off with a base of Stiletto on the Run from the Darlings of Defiance collection by Orly. For my accent nail, I used a base of Sinful Colors Black on Black. Once again I used SuperChic Lacquer G-Force X to help the holographic powder adhere to my regular polish. Once again I used the silver Holographic powder from Born Pretty Store.


     My accent nail is stamped with Hit the Bottle Poison Apple and an image from What's Up Nails plate B022.  For the rest of my stamping, I used images from plate UR Beautiful-18 and stamped with Hit the Bottle As Black as Night and Holo There Beautiful.


     I loved the way this turned out! I wish I would have thought to photograph the sweater I wore because this manicure matched it almost perfectly. What do you think of my ugly sweater nails? Thanks for stopping by and Happy Polishing!

Thursday, December 21, 2017

6:00 AM

Holo Powder Snowflakes


     I hope you're not getting tired of my Holiday nail art looks yet because I have a few more to share with you before the big day. Today's look might be a bit familiar to you since I've recently used the technique. Anyone remember my stamping with holo powder post? Well in that post I mentioned a nail art look that I had in mind and now I'm finally able to share it with you. 

     I have to be honest here and let you know that I didn't think through each step thoroughly before starting this manicure and it's not exactly what I had in mind so you will probably see this technique again as I work the kinks out. On the other hand, I do like the way this turned out and I've got a few more ideas up my sleeve to try out now so I guess you could say it's a win-win! 

     I call this manicure Holo Powder snowflakes because well, that's just what it is. Snowflakes stamped onto my nails and holo powder burnished over them. Yeah I know, I'm not very creative when naming my manicures or blog posts. It's one of the things I'm working on. 
     

     To create this look I started with a base of Sinful Colors Black on Black and waited for it to dry. After that, I applied my G-Force X from Super Chic Lacquer (my secret weapon when it comes to regular polish and holo pigments) to my nails and Simply peel from Bliss Kiss to protect my cuticles.


     I stamped with Hit the Bottle As Black as Night and the snowflakes are from image plate UR Beautiful-16. I've had this plate for awhile but it's only been used recently and frequently, to be honest. I got the opportunity to go to a lock-in for a local girl scout troop and paint nails. At least half of the girls picked this plate to use. It was kinda cute and a lot of fun. But after 4 hours of painting nails, I have a new found admiration for nail techs. 


      I know it's not easy to see in each photo but I used 3 colors of holo powders in this look. I wanted to use 4 but found out I don't have a green in my stash. I'll have to remedy that soon. Each powder is from Born Pretty Store and are item number's 33256 (Silver Holographic), 39224-2 (gold holographic) and, 39324-8 (Red Holographic). I randomly burnished each color onto my nails trying not to create a pattern. I was hoping that the powders would blend just a bit better to create more of a gradient look but the gold wanted to cover up the red so any hope of a gradient was quickly dismissed. I'll have to see if I can find a different way to get a gradient effect with the powders, or if you have any tips or ideas feel free to share. Also if you'd like to pick up any powders for yourself used code LAUNX31 to get 10% off your purchase from Born Pretty Store.


     I hope you enjoyed today's nail art look. Let me know what you think in the comments. As Always thanks for stopping by and Happy Polishing! 

Tuesday, December 19, 2017

6:00 AM

Holiday Fluid Nail Art


     The Holiday manicures continue today on the blog. This time I'm bringing you a look that takes minimal effort but a bit of patience. Sound familiar? It's almost the exact opening line I used for my last fluid nail art look. The difference is, this time it's even easier to create the look! And all it takes is a few colors of nail polish, a nail art mat and time.


     Doesn't it look neat? I just love how this turned out and it was so so simple to do! I used 4 different polishes from Sinful Colors It's a Wrap (gold) Under 18 (red) Whipped Frosting (white) and HD Nails (green) to create this look. 


    Now for the easy part of the manicure. All I did was place random drops of each polish on my mat. I'd recommend using one of the mini mats for this technique simply because it's easier to work with than the full sized ones. Make sure the drop are close enough to run together, making sure to cover approximately a 2-inch by2-inch area. You may need to cover more area if your nails are really long. If you don't get the entire area covered with polish don't worry, a few bare spots can be fixed in the next step. 

     After you're satisfied with the polish drops, all that's left is to pick up your mat and fold it in half twice. Once horizontally and once vertically. This step helps fill in any blank spots you might have and, smooshes the polish together to create a really cool marble effect. Plus it's much easier than tilting the mat back and forth. Now comes the tough part, waiting for the design to dry so you can move on to the next step. 

     I allowed the polish to dry for about 2 hours, this time around I skipped the step of applying topcoat before peeling the polish off my mat. This helped cut down on dry time and made it easier to cut out nail sized pieces.  


     After you've cut your decals down to the right sizes all that's left is to apply them to the nail. I used a base of Orly Bonder and let it dry to a tacky state but not fully dry before placing my decal on the nail. After that, all I had left to do was a little cleanup and to add a layer of top coat. My go-to is Girl on the Run by Pure Ice but any top coat will work. 

      Have you tried the fluid nail art look yet? What do you think about this technique vs the other technique I used to get the same effect? I hope you've enjoyed this post, thanks for stopping by and Happy Polishing! 


Tuesday, December 12, 2017

6:00 AM

Christmas Ivy Nails


     Hello Everyone, how has December treated you so far? Are you done with your Christmas shopping or still on the hunt for that perfect gift? Perhaps you need a little push to get you into that Christmas spirit? If that's the case have I got the perfect manicure to share with you today! This Christmas Ivy manicure recently popped up in my news feed from Robin Moses and I knew right away that I wanted to try it.  

     I've been wanting to work on my free hand nail art skills for some time and this manicure looked simple enough that I felt it was a good way to practice. Of course, all the great nail artists out there make these manicures look so easy and effortless but to be honest this one was actually pretty easy to do. Now by no means is mine anywhere in the ballpark of being as good as the original but I'm very happy with how it turned out.I even have a new found enthusiasm to keep working on my free hand skills.


      I started out with Sally Hansen Satin from the Smooth and Perfect line. Typically I would use China Glaze Heaven as my naked nail color but I wanted to see if I had other option in my collection already. Turnes out Satin is the better option of the two and has become my go-to polish when I want this effect. 

     I hand painted my french tips with Sally Hansen Wild Strawberry from the Crayola collab earlier this year. I don't know why but I have always been able to do a decent freehand french tip. I wish I could take that skill and transfer it to other aspects of my nail art. Especially when it comes to brush control when hand painting designs. 


     For my Ivy, I used acrylic paint in various shades of copper and gold. I picked a true gold for the vine and a darker bronze for the leaves. Then I went in with a light gold to add some highlighting and try to add depth. Painting curving lines is a huge hurdle for me that I can't quite seem to get over but my hand painted leaves have improved. 


     The glitter on my tips is Fantasy Makers Once Upon a Time. I started off by just brushing it on but noticed that I was getting more of the blackened base than I wanted. To fix that I applied the polish to a sponge and that dabbed it on my nail. I like the sponged option much better, don't you?  I topped everything off with Darling Diva's Preformance Enhancing top coat to give it a super glossy finish.

     Anyone remember the very first mani I tried to recreate from Robin Moses? I had an awful time getting the angles right and things just looked off. I haven't mastered the angles yet but see improvement in those tiny little leaves. It's those little victories that I want to share with others, especially those just starting out with nail art, in hopes that it inspires them to not give up, or try something new.  It's the very reason I started this blog in the first place and I'm glad I'm getting back to that after losing my focus for awhile.

     I hope you enjoyed today's post and maybe were inspired to tackle a nail art technique or look you haven't quite mastered yet. Thanks for stopping by and Happy Polishing!


Friday, December 16, 2016

6:00 AM

Frozen Snowflakes


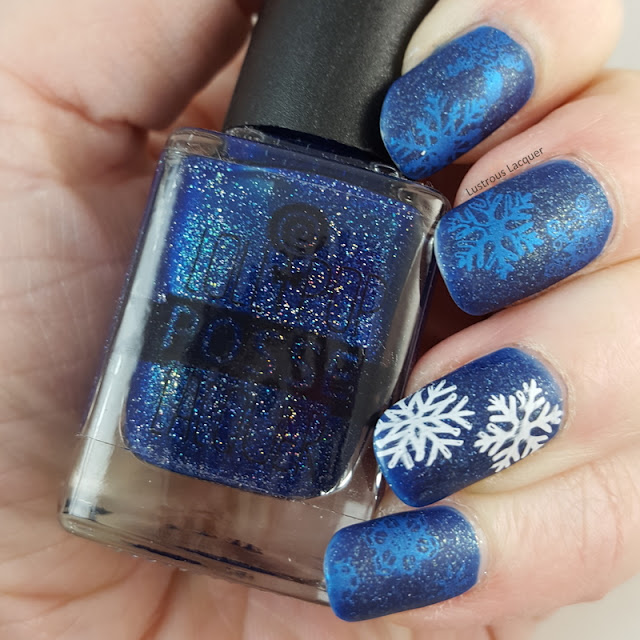
     Well, the temperature has dropped to below zero here on quite a few occasions lately. It was -14 when I woke up yesterday morning. Which means winter is in full effect, my nails and skin are suffering from the extreme cold and Christmas is just around the corner. That means it's time to break out some seasonally inspired manicures! I thought with the severe cold and snow predicted to hit my area over the weekend it was only fitting to share with you the frozen snowflakes manicure I wore this week.

Frozen-manicure-stamped-snowflakes-glitter-nail-polish

     With there still being 10 days left until Christmas I wanted to steer away from the traditional colors, and go with something wintery instead. And I honestly thought this might be an original idea with the blue snowflakes stamped on a blue base but they are all over Pinterest right now. I'm not sure if I saw one and didn't completely remember it, or if I've finally been on trend with my manicure!


     I started with a base of Lollipop Posse Slipping out of time, a Catalina blue nail polish with holographic flakes. Then I mattified it because let's be honest I don't use my matte top coat as often as I should. And maybe because I thought the holographic flakes would look really cool that way.

     For my snowflakes, I pulled out every image plate I own with a snowflake image and went to town! Now I don't remember which plate had which image on it but if you see one you just need to know about let me know in the comments and I can look through my plates and let you know. I can tell you the ones that I used are UR Beautiful 16, Konad M59, Bundle Monster BM-319 and BM-323 and Winstonia Meery X'Mas. (Yes it's spelled meery that's not a type-o on my part)


          For stamping polishes, I used Snowed In and Blue-tiful from Hit the Bottle and really like how it turned out. The blue wasn't quite as easy to see as it looks here which was kind of a bummer at first but as the week went on I really liked the subtleness. Well, that's all I've got for you today. I hope you enjoy your weekend and for those of you in the colder climates, I hope you stay warm. Thanks for stopping by and Happy Polishing!


Friday, December 18, 2015

6:00 AM

Hobby Polish Bloggers and 40 Great Nail art Ideas presents - Christmas


     Its that time of year again. Christmas shopping, cookie baking, holiday parties and in my house the plague. The one thing my children share no matter what without fail is their germs, and after being nurse mommy for the last 3 weeks it's my turn so today's post is going to be a quick one. 

     This week both the Hobby Polish Bloggers monthly link up and the 40 Great Nail Art Ideas challenge have lined up perfectly so I can share my Christmas manicure for both with one post. I love it when things work out in my favor. Now most of you know I have been doing the color/pattern prompt for the challenge but this week I'm breaking from my regular schedule to join in on a theme week. Because of the holidays the color prompts were taking quite a long break and I wanted to keep my nail art momentum going. Now for today's nail art look....


    Thanks to my hectic home life right now I opted for something simple and easy to create. And I actually like the results, I feel very festive and fun even as I sit here in my sweats. 


      To create this look I used Fair Maiden Fire Frost as the base for my accent nail and Darling Diva Don't Call me, I'll Call You for the rest.  What you can't see in my photos is my thumb nail (I tried to include it for you but the pictures just looked awkward and not suitable for viewing) which is also painted with Fire Frost and a red rhinestone to help tie the whole thing together. 


    I used some new nail vinyls from KBShimmer to make my peppermint swirl design. The rhinestones I picked up from Dollar Nail Art and add just the right amount of bling for me. If you haven't checkout out Dollar Nail Art and you're a fan of embellishments I highly recommend them. 

     So there you have it. A quick and simple nail art look that's easy to create for the holidays. Let me know what you think of this look before you check out the other talented ladies. Thanks for stopping by and Happy Polishing!


Monday, December 14, 2015

6:00 AM

Winter Nail Art Looks


     I've had another busy weekend with getting ready for Christmas this last weekend but I did manage to squeeze in a few winter manicures. In fact I've got 3 to share with you today. As I was editing my photos I realized that all 3 looks are very similar and I've got a thing for snowflake manicures. Let's take a look.


     The first look I created I'm calling Winter Wonderland. You  might recognize the base color here from a previous review.  I just knew that I wanted to do a frozen nail art look when I wore Daily Lacquers Narwahl. 


    For the snowflakes I used Sally Hansen Silver Sweep and Bundle Monster plate BM-14. I stamped over that with Konad White and Bundle Monster plate BM-407 to create the trees. Simple but still the look I was going for.


     Keeping with the snowy, winter theme my next manicure was done with a beautiful polish I was gifted during a recent blogger meet up. This is a small batch sample and just perfect for winter. Northern Star Polish Blizzard is a white with grey undertones polish with micro holographic glitters. And with a name like Blizzard I had to add a few snowflakes on top. 


    I used a new plate that I ordered from Winstonia and have been having so much fun with it lately! The plate is called Have a Meery X'mas! (no that's not a typo merry is spelled wrong on the plate.) This plate has so many festive images on it that I know I will be reaching for it often during the holiday season. 

     I again reached for my Konad White and Sally Hansen Silver Sweep to stamp with. Partly because they work so well and partly because I hadn't put them away from the previous manicure. Seriously my nail art station looks like my helmer exploded some days! But I have a feeling I'm not alone in that though. 

Photo taken in natural light
    The last look I have for you features one of my very first Fair Maiden polishes. Starry Night from the newly released Winter at Dusk Collection. Now with a name like Starry Night you'd expect me to stamp a few stars right? Well I went a little outside the box and did more of a Christmas theme with this one. 


    Ta da! Ive got some delicate Christmas bulbs as an accent. I just couldn't cover up all that gorgeous holo in Starry Night. I also realized that I don't own very many gold polishes that work well for stamping. Most of mine are all glitter. 

     Using the same Winstonia plate as my Blizzard manicure and Orly Luxe I created this simplistic holiday look. 


    So those are my 3 quick and easy Winter nail art looks for this year. Id love to hear which one is your favorite. I'll be back later this week with a few Christmas themed looks just in time for the holiday itself. Thanks for stopping by and Happy Polishing!


Tuesday, December 23, 2014

6:00 AM

The 12 Days of Christmas Nail Art Challenge Day 12: Freestyle

     
     It's the last day of the 12 Days of Christmas Nail Art Challenge. I hope you have enjoyed some of my designs as much as I've enjoyed creating them. Today's theme is Freestyle. That means that I could do anything I wanted, recreate a design someone else did, do over a design I wasn't happy with, or create something new.  I opted to create a completely new look for today and try out my hand at leopard spots.
  
     I know what you're probably thinking, what does leopard have to do with Christmas? Well nothing really, but if you use festive colors you end up with a Christmas look. Check it out and see if you feel the same.


    To get this look I started out with a base of Finger Paints Paper Mache and then layered 2 coats of  China Glaze Seeing Red over the top. I wanted a simple manicure, so I left only half of my ring finger white and ready for my spots.

     Once everything dried I took my smallest dotting tool and began adding random splotches of Orly Luxe. Currently, my favorite gold nail polish to use, even though it leaves brush strokes on the nail. To make sure I had control over the outlining I used green acrylic paint as my finishing touch.


     At this point, I debated adding a few leopard spots to another nail to try and tie the whole thing together. But less is more they say so a coat of Seche Vite was the only thing I added. I might go in and add some spots before I take it off just to see how it would look, I haven't decided yet. I don't want to be disappointed that I didn't add them earlier if it turns out to look great. lol

     So now that you have seen my final look, why not check out the other manicure people came up with for today. Thanks for stopping by and Happy Polishing!


Sunday, December 21, 2014

6:00 AM

The 12 Days of Christmas Nail Art Challenge Day 11: Presents

     
    Today's theme for the 12 Days of Christmas Nail Art Challenge is Presents. Hooray, we all love presents! Are you the kind to rip into those brightly wrapped gifts, or do you like to take your time and save the wrapping paper? I myself tend to do whatever the moment calls for.
  
     My manicure today is about the gift when it's wrapped, even though I have opened gifts on the brain these days. Who can blame me with Christmas only 4 days away?


     I started with 2 coats of Lost Without my Blogger. A glitter packed clear based polish with flashes of white, green and, gold. Then I matted it. After that dried, I doodled some ribbons and bows with a gold and white stripers and matted it again.


     There are things I like about this manicure and a few things that I don't. The nails with bows on them turned out how I had wanted. The ones with just the ribbons not so much. I think I should have added a bow or maybe used fewer lines. But I'm ok with the finished results. And now here are a few more present manicures. Thanks for stopping by and Happy Polishing!


Friday, December 19, 2014

6:42 PM

The 12 Days of Christmas Nail Art Challenge Day 10 : Ugly Christmas Sweater

     I was really excited about today's theme when I first saw all the challenge prompts. I've always wanted to do an ugly Christmas sweater manicure. I thought about doing something pretty traditional but then decided to try and get creative.

      I'm posting really late today because the manicure I did late last night for today's prompt turned out to be a huge disaster. Without time to fix it, I had to wait until after work today to try out a different idea. Seriously there was nothing good about my first attempt, instead of ugly sweater it was just ugly. It was supposed to be a textured background with white snowflakes stamped all over and then presents in the middle.


     See what I mean. There was nothing good about this manicure. Except for the base color. I really liked the idea of using a textured polish as my base, since most sweaters have a bit of texture to them. Instead of stamping for my second attempt I tried my hand at a little freehand art and this is what I came up with.

Christmas-Holly-manicure


     Big difference right! Keeping Zoya London as my base color I used acrylic paint and a new nail art brush I just picked up I painted my holly leaves. Why have I been trying to do nail art with only polish for the last 2 years? Seriously Acrylic paint is so much easier to use. Red rhinestones and a few dots of top coat completed my look.


     I'm so sad that because I'm behind in my posting that I have to take this off as soon as I'm done writing this post to work on another manicure. Hopefully, I like it as much as this one. In the meantime why not check out some more ugly sweaters. Thanks for stopping by and Happy Polishing!


Wednesday, December 17, 2014

11:09 AM

The 12 Days of Christmas Nail Art Challenge Day 9: Glitter

    
      It's one of my favorite days of the Christmas Nail Art Challenge so far, Glitter!! Who doesn't love glitter right? It sparkles, it shines, and it makes you feel pretty. Well, it makes me feel like my nails are pretty.


     My original intention was to do a color block manicure for today using traditional colors. But that turned into a train wreck when I realized that I started out in the wrong direction and was impatient applying my tape.  I've put that design idea on the back burner for now.

     So what did I do for my glitter manicure? In the end, I went with a festive, sparkly chevron manicure. And now I'm wishing I had done both hands because I love the finished look!

Christmas-cevron-nail-art
  
     I started off with a base of Cult Nail Blaze. 2 coats over a thin coat of Orly Luxe gave me a perfect gold base.  Once that dried I carefully applied my chevron decals from KBShimmer. There are actually 2 sizes of chevrons here but they are so close it's hard to tell. So I didn't quite get the complete look I was going for but I still love it.

Holiday-Chevron-maniure
  
     For my accent nail, I used Color Club Perfect Molten, a soft green with silver shimmer. My red is the gorgeous Marilyn from Shimmer Polish. This glitter packed jelly is a great red color for any Christmas nail art, or if you just want to rock some sexy red nails. I topped everything off with 2 generous coats of Out the Door.

     I think this is my favorite manicure of the challenge so far, but I do have a fun idea in mind for the next prompt, ugly Christmas sweater. Fingers crossed I can pull it off. While I go work on that, why don't you check out the other glitter manicures from today and I'll see you back here on Friday. Thanks for stopping by and Happy Polishing!
 

Monday, December 15, 2014

6:00 AM

The 12 Days of Christmas Nail Art Challenge Day 8: Christmas Ornaments

     
     Monday brings us to the 8th day of the 12 Days of Christmas Nail Art challenge, with the theme being Christmas Ornaments. This year I went a totally different direction than last year's ornament theme with some water decals from Born Pretty Store. I would have loved to try my hand at free hand ornaments but my nails are kind of short right now and I didn't think I would have enough space to paint them.

     For this manicure, I started out with one coat of Milani White on the Spot as a base for my gradient. I then sponged on Sinful Colors Sugar Rush and Sally Hansen Silver Sweep to create my gradient. When that dried I added a quick coat of China Glaze Fairy Dust for added Sparkle. Christmas Ornaments have to sparkle after all!


     The water decals I used were from a variety of sets that I picked up last year. I used set BLE1755 on my pointer and pinky finger, BLE1754 on my ring finger and BLE1753 on my middle finger. I topped everything off with a generous coat of Out the Door.


     Right now Born Pretty store is running a sale where you can get up to 80% off select items. The same runs through Dec 17th, 2014 and you can use code MERRYXMASB10 for an additional 15% off your order. If you've had your eye on a few items I'd say now is the time to stock up!

     And now I think it's time to take a look at the designs everyone else came up with for today. Thanks for stopping by and Happy Polishing!


Saturday, December 13, 2014

6:00 AM

The 12 Days of Christmas Nail Art Challenge Day 7: Red and Green Colors

          
     Today's prompt in the 12 Days of Christmas Nail Art challenge is Red and Green colors. This is another one where there are endless options. In fact, there were so many options that it wasn't until I had a nail art brush loaded up with green polish that I knew what I was going to do.

     In an effort to work on my brush control I decided to take on the task of making swirls of red and green look like candy. This ended up being a little harder than I thought but by the end, I had 1 really good nail and a better understanding of brush control.


     I started with a base of Sinful Colors Snow Me White.  Then I hand painted the swirls with Zoya Rekha and Wet~n~Wild Poison Ivy. My middle finger was the last one I painted and I think it turned out the best. It's a bit busy for an entire manicure, but I still like it. Not because it looks great, but because it shows a sort of progression with my brush strokes.


     Poison Ivy turned out to be darker than I remembered and looks almost black in some lighting. Which is kind of a bummer, but when the light hits it just right there's a flash of green shimmer. I almost added a lighter shade of green over the top to lighten it up a bit but didn't want to risk not being able to follow the original lines. I still might try it before I remove this manicure just to see how it looks.

     Now let's check out the looks everyone else came up with. Thanks for stopping by and Happy Polishing!


Thursday, December 11, 2014

6:30 AM

The 12 Days of Christmas Nail Art Challenge Day 6: Any line from the "12 Days" Song

     
     We are halfway through the Christmas Nail Art Challenge. I can't believe I've kept up so far. It's been kind of touch and go there for a few days with today being no exception. Today's theme is any line from the 12 Days of Christmas song.

      I knew I could do a pretty decent job at the 5 golden rings but I wanted to challenge myself a bit more. I decided to try the 7 swans a swimming. Let's just say that my time ran out, I put this manicure together in about 7 minutes and I don't like it at all. Because of that, this is going to be a short post.


     I started out with Frost Bite from Cuttin Edge as my base color. Then I went in with a white striper and painted my swan bodies. They actually looked semi-decent until I added the black to their heads. It all went downhill from there. The beaks are droopy and just yuck. I tried to save it with a little silver glitter to add some dimension or detail to the swan bodies but I don't think it really helped.

     On the other 2 fingers, I have some very very subtle stamping with Mentality Touch and image plate BM06 from Bundle Monster. I'm sure if I could have taken a bit more time this would have turned out much better. As it is I'm calling for a mani re-do and calling it a night for now.


     The only reason this is being shared is that I want to do every day in the challenge and I promised myself when I started this blog I would share my fails too.  But enough of this sad manicure attempt, let's take a look at what the other talented ladies came up with. Thanks for stopping by and Happy Polishing!


Tuesday, December 9, 2014

6:00 AM

The 12 Days of Christmas Nail Art Challenge Day 5: Ice Blue and White Colors

     
     I'm back with the 5th day of the 12 Days of Christmas Nail Art Challenge. Today's theme is Ice Blue and White colors. There's a lot of freedom with a prompt like this, but I knew exactly what I wanted to do as soon as I saw it.

     As many of you know Frozen was the big winter movie last year. Let's be honest it was more than a big hit, it went viral times 3. My daughter still sings the songs on a daily basis, some days my boys even join in. What you might not know is that Cuttin' Edge polish released a polish trio based on the movie. I snatched them up and then never used them... That got me thinking, what better polish to use for this theme than one inspired by the ice princess herself! And with a little stretch of the imagination, my waterfall technique turns into icicles.

 
      My base color is called Let it Go and is a beautiful medium blue linear holographic polish that has sat unloved for too long in my collection. 2 easy coats was all I needed for full coverage. True color is slightly lighter than shown here. With a much appreciated steady hand, I painted the icicles with 2 KISS stripers in White and Silver Glitter. Let's hope that steady hand sticks around for the rest of the challenge.

 
      I really like the way this turned out. Especially on the ring finger. The waterfall technique is one I've wanted to try for a while, and now I can scratch it off my manicure to-do list! What would you have done with this prompt? Let's see what the other ladies have come up with below. Thanks for stopping by and Happy Polishing!


Sunday, December 7, 2014

6:00 AM

The 12 Days of Christmas Nail Art Challenge Day 4: Santa/Elves

   
      I'm breaking my regular posting schedule to bring you my manicure for the 4th day of the Christmas Nail Art Challenge. Today's theme is Santa and or his Elves.

     After discovering that many of my striping polishes have dried up beyond repair I decided to throw my original idea out the window and focus on Santa. I also decided that I need to go shopping for new striping polishes. ;)

    
     I used Zoya Rekha as my base color for 4 of my nails. On my ring finger, I used a variety of striping polishes and regular polishes to make my Santa. The entire face was done with dotting tools, except for the hat. That I was able to actually use a striping polish for and paint it on. I even tried to give him rosy cheeks with a sheet tint pink polish. As you can see I didn't wait long enough before adding my top coat and the red streaked a little bit. Well ok, I'll be honest, it streaked a lot!


     The streaking really made me sad because up until then my Santa looked pretty cute and jolly.  So lesson learned, wait more than 20 minutes to apply top coat when working with red and white polish.  Although I still think he looks kind of cute.

     Now let's see what the others have come up with for today. As always thanks for stopping by and Happy Polishing!


Wednesday, December 3, 2014

6:00 AM

The 12 Days of Christmas Nail Art Challenge Day 2 : Christmas Trees

     
     It's the Second day of the Christmas Nail Art Challenge and today's theme is Christmas trees. I had a heck of a time trying to come up with an idea for today's theme.  I wanted to go for something different again and attempted a few different ideas. But fancy nail art was just not in the cards for me today. After 4 failed manicures I finally settled on a French twist with stamping.


     I'm actually pretty proud of how this turned out considering how frustrated I was when I started it. And for some reason, I can freehand a French tip in my sleep, but I can't paint lines to make a tree to save my life. Funny how that works.

     Enough of my nail art skill ponderings, back to the manicure. I started off with a layer of Simply Smooth. I wanted even color for the "nude" part of the nail along with a smooth surface to work with. The French tips are Ho Ho Holly from Color Club and a sparkly red striping polish I picked up at Sally's. I stamped with Finger Paints Paper Mache and Konad plate M12. Add in some gold accents with Orly Luxe and viola my manicure is completed!


     I wish the Merry Christmas was a little easier to read, but I still think it looks cute. Festive but not over the top  I guess. The next prompt is snowmen and I hope I don't have as many issues coming up with a manicure for that one. While I'm off thinking up ideas why don't you check out the other manicures in the challenge.  Or check out what I did for last years Christmas Tree prompt. Thanks for stopping by and Happy Polishing!


Monday, December 1, 2014

6:00 AM

The 12 Days of Christmas Nail Art Challenge Day 1: Snowflakes

      
     Welcome to December! It's that time of year again, the time for Christmas Manicures. I am participating in the 12 Days of Christmas Nail Art challenge again, hosted by the group Challenge Your Nail Art on Facebook.


     Today's theme is Snowflakes. I knew I didn't want to use traditional colors but still wanted something with a winter/Christmas feeling to it. Last year I used a lot of traditional colors and my manicures looked a lot like everyone else's. A great example would be last years snow theme.
    
     While trying to come up with ideas I came across a manicure in my newsfeed from Beginnails that was perfect. So this manicure is dedicated to her and the inspiration she gave me.

Snow-Flake-Manicure-with-glitter

     I started with 2 coats of KBShimmer Hexy Bikini for my base. After it was dry I dabbed on the OPI sheer tints to random spots on my nails and added a layer of top coat. I really liked how it looked and really didn't want to mess it up so I waited a full hour before moving on to the next step.

Snowflake-nail-art-with-Glitter

     For my snowflakes, I used Finger Paints Black Expressionism and image plates from Bundle Monster and Shandy. ( BM-319, BM-323, and SH-202.) I have realized that in addition to needing better image plates for Halloween I also need ones for Christmas. Although I did like the variety I had with snowflake images to choose from.

     I liked the look of this glossy but it was hard to photograph. I kept getting glare and losing the detail in the snowflakes. So I did what every polish loving person would do, I mattified it!

Matte-Snowflake-Nail-Art

     I'm having a hard time deciding if I like it glossy or matte better. The Glossy version had much more sparkle, but the matte version shows much more detail. Which way do you like better?

    Before you go, make sure you check out the other participant's manicures. Thanks for stopping by and Happy Polishing!


Like what you see? Share it with your friends!