Thursday, June 28, 2018

6:00 AM

Lustrous Lacquer's Quarterly Favorites Round-up Vol. 2


      It's the end of June and that means it's time once again for a round-up of my favorite nail art looks from the last three months.  Becuase I took a bit of a hiatus for the month of May this post will be less extensive as the previous version. But that's no excuse to not sit back, relax and revisit a few of my favorite post, enjoy!


     April was a busy month for me when it came to marbled looks. I shared a drip marble and a watermarble. You'd think either one of those would have made it into my top 3 looks but I actually liked my Neutral nail art look the best. 


    This simple look had two different accent nails which is something that I don't often do, in fact, I'm not sure I've ever done it before. It was a pleasant surprise when I fell in love with it and that's why it is my favorite look from April.  

     May was the month where I lost my blogging mojo, the weather finally warmed up and so did my personal life. There are only a few posts to pick from but the one that truly stands out is my Parchment Manicure


    I am very proud of how this turned out and even more proud of the fact that I was able to film a tutorial video for my Youtube channel. I have to admit that this is my favorite manicure of the last three months, and let you know that I have a few more that I'm proud to share this summer.

     June was a stressful month for blogging because I fell behind on the Untried A-Z Challenge. Not only did I need to catch up on that but I needed to write posts to cover while I was gone on vacation. That left little time for nail art. I ended up only sharing one nail art look this month unless you count that look I created for my Letter L post. Which wasn't a nail art post specifically, but maybe I'll still count it just to make me feel better. My one and only nail art specific post for the month of June was my 80's Funky French mani


     Now I know this isn't some of my best work, and it might be considered a fail depending on my mood but it made my list of favorites for what it represents. For me, this manicure humbles and encourages me. It humbles me because even though I've been blogging about nail art for years I still make mistakes and it encourages me to keep trying those techniques I'm not comfortable with. 

    I hope you enjoyed this look back at my last three months of blogging. I'd love to know which look is your favorite. Stop back next Tuesday to see my 4th of July nail art, which I'm hosting a link up for and everyone is welcome to join if they want. The inlinkz code can be found on my Facebook page or feel free to send me an e-mail at lustrouslacquer@live.com or send me a dm asking for it. Thanks for stopping by and Happy Polishing! 


Tuesday, June 26, 2018

6:00 AM

Untried A-Z Challenge Letter M


     Hey Everyone, it's time once again for the Untried A-Z Challenge and this week we are at the halfway point with the letter M! I can't believe we are at the halfway point already, this challenge seems to be flying by. Don't worry there is still time to join in whenever you want. Even if you didn't plan on joining the challenge but happened to blog about a polish with the corresponding letter, add it to the link up. It's the more the merrier for this challenge and all are welcome. 😊


     This week I am not only sharing an untried polish with all of you but it's also an untried brand for me as well. It's a double whammy! I'd only heard of Love, Angeline a few times and sadly the name never really stuck in my head long enough for me to make a purchase and in 2017 the shop closed. I recently pick up a few bottles to try from a destash. One of those bottles was Metamorphosis.


     Metamorphosis was released in 2013 as part of the Smoke & Mirrors collection. It's an elephant grey crelly with various sized hex glitters in purple, grey, orange, and gold that dries to a glossy finish. I am so late to the crelly party, I recently discovered my love for them within the last year. I have no idea if they are still a trend or not but that's the story of my life, I decide I like something a year or two too late.


     The first coat went on surprisingly sheer considering how dark of a grey this polish is, and the glitters were a bit sparse and wanted to slide to the tips of my nails. After the first coat, I added 3 drops of thinner to my bottle in order to get the glitters out easier.  Like I mentioned above I purchased this bottle in a destash and have no idea how old it is but the 3 drops of thinner seemed to do the trick.
 
     The second coat built up to a nice opacity with a decent clustering of glitters. I probably could have stopped there but I wanted more of the glitter to be visible since it seemed to be getting lost in the base color. I sponged on a third coat and that really helped get better glitter coverage as well as help them stand out against the grey.


     I would definitely wear this polish again but would try the sponging technique on the second coat and hope that the opacity is there as well as a nice glitter coverage.

     While I like this polish and have a new found love for crellies I never know what kind of nail art to do over them. Stamping seems like the obvious choice but I don't want to cover up all the glitters so it would have to be a subtle design and then that seems almost pointless. What kind of nail art do you add to your crelly polishes?

     I'm currently driving home from vacation and will be stuck in my vehicle for 8 long hours which means I'll need something to do to pass the time. (Don't worry I'm not the one driving)  I'd love to spend it reading your thoughts on this fun crelly and see posts from people participating in the challenge. It's ok if you haven't joined in yet, there is room for everyone at any time! You can find all the details in the event on my Facebook page. Thanks for stopping by and Happy Polishing!


Thursday, June 21, 2018

6:00 AM

Contrary Polish - Discordant Melody


     Today I've got a polish from Contrary Polish to share with you. Released in 2016 as part of the Gothic Winter Collection, Discordant Melody is one of those polishes that has stunning depth in the bottle and on the nail. 


      The mix of holographic particles and holographic micro glitters swimming in a jelly base make Discordant Melody one of those polishes that have many looks to it depending on the lighting. Almost as if each look shows one of its secrets. In the shadowed light it looks like little stars floating in a vampy red base, and in direct light, you get these fabulous flashes of sparkle that reminds me of a sparkling red wine.


      The application process was just what you'd expect from a jelly polish with the first coat applying smoothly but quite sheer. The second coat built up with a nice opacity leaving a beautiful squishy finish. Shown here is two coats plus top coat.


    I absolutely love this polish. There's just something about it that makes my nails feel sexy to me. I'm not sure if it's the vampy tone, the jelly finish, the holographic sparkle or a combination of all 3. Whatever it is, it makes me happy and boosts my confidence a bit. Have you ever had a polish do that for you? Oh, it's a wonderful feeling, one that makes me fall in love with nail polish all over again. I hope you enjoyed this polish as much as I did. Don't forget to come back next Tuesday for letter M week in the Untried A-Z Challenge. Thanks for Stopping by and Happy Polishing!


Tuesday, June 19, 2018

6:00 AM

Inspired by Robin Moses - 80's Funky French


     I've got another Robin Moses inspired look to share with you on the blog today. While this isn't my best work or something that I'm particularly proud of I think it's important to share it. It's important to me because I want to inspire others to try nail art, I want people to see that even though I've been at this for a few years now I still create manicures that aren't perfect and am always learning. I might be getting really good at stamping, or watermarbling but a technique that I consistently come up a bit short on is my freehand painting. And that's what you'll see in this 80's themed funky french manicure.


     Now normally I would use a polish that looked like my natural nail color as a base but this time around I skipped that step. Thankfully it worked out alright, it seems my base coat is doing a great job of keeping my nails stain free. For the "french tip" I used Sally Hansen Black Out in a diagonal pattern. While I'm a fan of the traditional French manicure I like to put my own twist on it from time to time. 


    The Not Really Neons Collection from Polish 'M came in handy for the lines. I used Harlequin (green) Royal (blue) Tangelo (orange) and Rosé (pink) I should have used Lemonade for the yellow but I wasn't sure it would show up so I went with an acrylic paint instead. I topped everything off with a glossy top coat. 


      I do like how this turned out, I need to work on my angles and painting straight lines. Which is what I meant earlier when I said my freehand skills come up just a bit short. But that doesn't stop me from trying, in fact, it makes me want to do more so that I can get better. 

     After looking at this mani for a bit in a glossy state I decided to see what it would look like matte. 


     I used the matte top coat from Pure Ice just to see how well it worked and I have to say I'm pleased with the results. 


     While I love my indie polishes, we all have a budget and mine is a bit tighter than most plus I like to be able to run out and get a product if I'm in a crunch, so I'm always on the lookout for less expensive alternatives from brick and mortar stores to use. My favorite matte topcoat is Matterial Girl from Blush Lacquer because it gives a true matte look instead of the semi-matte looks you can get from other top coats. The Pure Ice matte top coat also gives a true matte appearance.

     Which look do you like better the glossy or matte? Do you have a technique that you struggle with a bit? Let me know in the comments and as always Thanks for stopping by and Happy Polishing! 

Thursday, June 14, 2018

10:30 AM

Liquid Sky Lacquer - Chocolate Obsession


     I'm back today with another swatch post from the vault. I actually wore this polish last summer but because my nails were so short at that time I didn't want to share it on the blog. I feel very self-conscious when my nails are super short but I've realized that I need to get over that. My poor nails can't be long all the time, especially with the abuse I put them through between all the polish I wear, the sports I play and all the camping I go on. So here is Chocolate Obsession in all its beautiful holographic glory on my super short nubbin nails. 

Chocolate Brown Linear Holographic nail polish

     Chocolate Obsession is a milk chocolate brown linear holographic polish released by Liquid Sky Lacquer in the winter of 2014. I don't believe it was part of a specific collection but please correct me if I'm wrong on that. 

Chocolate brown holographic nail polish

      This polish has a delicious formula that's extremely opaque. I'd consider this a one coat polish but applied two coats for that extra wow factor of the holo glitter.  Shown here is 2 coats plus top coat. 

Chocolate Brown holographic nail polish

     This is a gorgeous polish, beautiful on my shorter nails but is probably a color best suited for the fall or winter months. Unless you're like me and like to wear off-season colors every once in a while. Thanks for stopping by and Happy Polishing!

Tuesday, June 12, 2018

10:54 AM

Untried A-Z Challenge Letter L


     It was just a few days ago when I shared my letter K polish for the Untried A-Z Challenge and here it is, time for my letter L polish. I guess that's what happens when you get behind on blogging! So here is my Untried A-Z Challenge letter L polish, enjoy!


     Since it's summertime and been abnormally hot here lately I chose to go with a bright shade this week. And there's no better way to go bright than with a neon polish. Or in this case a Not Really Neon. Check out Lemonade from the Not Really Neon's Collection released last summer from Polish 'M.

Neon yellow nail polish with a creme finish

     Lemonade is a bright lemon yellow creme polish. Typically yellow is a hard color for me to wear but I actually like this one. It's so fun and bright plus it makes me look like I have a nice tan. Any polish that makes my tan look better gets bonus points from me. 

     
     Like most neons Lemonade applied a bit streaky on the first coat, thankfully it's a self-leveling polish so the streaks weren't a major issue. This polish builds up nicely on the second coat and I probably could have stopped there if I'd used white undies. I had a few places on my nails that appeared to be patchy so I opted to use 3 coats. Shown here is 3 coats plus a matte top coat. 


     Lemonade dries very quickly and with a matte finish. Just what I would expect from a neon polish. Like I mentioned above I like this polish and would probably wear it on its own in the future. But for this post, I opted to add a little nail art to the mix.


    For this marbled look, I used Creative Shop plate 31 and stamping polishes Straight Up Black and Bami White from Bundle Monster and Slate Stamping Sauce from Sassy Sauce Polish. 


    The completed look is a bit much for me but I do really like how my middle finger turned out. In this case, less is more and I'll have to keep that in mind in the future. And as you can see once again I was inpatient when applying my top coat and smeared my pinky finger terribly. 


     What are your thoughts on yellow polish? Is it a color you can easily wear? If you'd like to join in on the Untried A-Z challenge we will be staring letter M week on June 25th and ending on the 29th. Thanks for stopping by and Happy Polishing!


Friday, June 8, 2018

6:00 AM

Untried A-Z Challenge - Letter K


     I've been a bad blogger lately and there is no excuse for it. It's been almost a month since my last post which makes me sad. If you remember back to my last post I talked about how my nails are in rough shape which has left me feeling unmotivated to blog and life is getting busy with summer upon us. And I'll admit I just haven't tried to make an effort to squeeze in time for blogging. But that all changes now with my letter K polish for the Untried A-Z Challenge. 


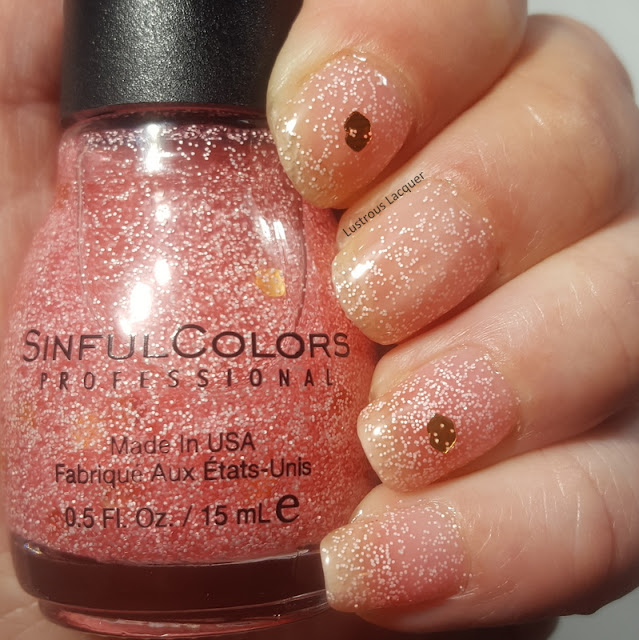
     For my letter K polish, I chose Kissful Thinking from Sinful Colors. This polish was released in 2017 as part of the  S.W.A.K Collection. This was a limited edition collection but Sinful Colors has a history of rereleasing colors in their Holiday collections so it may find it's way back to store shelves next year.  While I believe this is meant to be more of a topper than a regular polish I've opted to show it on its own. 


      Kissful Thinking is a pink tinted jelly polish with small white glitters and a few lip shaped gold glitters. 


     The first coat applied easily with a large amount of the smaller white glitters but showed no sign of the pink tint. As you might be able to see from the bottle this polish is very thin so getting the larger shape glitter was pretty much impossible. I had a hard time even getting one on the brush let alone on the nail. After 2 coats you are able to see some of the pink tint but again I had nothing as far as the larger glitters were concerned.

     It took me 20 minutes of fishing around in the bottle to get the 2 glitters you see on the nail. At that point, I was frustrated and decided to give up on getting any more. 


     To be completely honest I'm not a huge fan of the shaped glitters so the fact that they don't easily come out of the bottle isn't that big of a deal. I actually like how this polish looks without them but won't be wearing it alone again. I can see myself using it in a winter manicure though because it reminds me of falling snow. Thanks for stopping by and Happy Polishing!



<!-- end InLinkz scri

Like what you see? Share it with your friends!