Showing posts with label Free Hand Art. Show all posts

Tuesday, September 11, 2018

6:00 AM

Marbled and Floral Manicure


    You guys, it's already the second week of September! How the heck are we almost halfway through the month already? It's my third week back to work and I feel as if my summer vacation just started. I suppose that's because I was off and running for almost 3 months straight with lots of little trips and visiting with friends. My life is just as busy now as it was then but I'm still finding time to blog which makes me very happy. Typically by this time of year I'm a bit burnt out and end up pushing blogging to the very bottom of my to-do list. Not this time, this time I have a nail art look to share with you that I am very proud of! 

     I have been trying for months to do a marbled nail look that actually resembles stone marble. I thought I was on the right track with my Neutral Marbled nails manicure but once that was completed I realized it was too uniform looking and really wasn't what I wanted. I've come close to the effect I wanted with my Holiday Fluid Nail Art but it still wasn't quite right. Then I remembered the glitter topper nails I did a few years ago for a challenge and decided to try a spin on the technique I used for that manicure and it worked!


     What do you think?  I am so happy that I didn't give up because I am still floored by how this turned out.  And it was so simple to do in the end, but quite messy if I'm being honest. 


    I started out with one coat of Sally Hansen Whited from the Crayola collab in the Insti-dri line. To protect my skin and help with clean up I used UN-Frog-gettable cuticle cover. I then painted a very thick layer of the Sally Hansen White onto my nail art mat and placed random drops of polish onto the wet surface. The polishes I used were all from China Glaze in the colors Elephant Walk, Cosmic Dust, Kiss My Glass and Stone Cold. 

     Using my squishy stamper from Creative Shop I placed it on the polish and gave a slight twist. This swirled the colors giving the marbled effect which I was able to stamp directly onto my nails. I've found that a squishy stamper works best for this because it allows you to really press down firmly on your nail without distorting the design. You will also want to press the stamper straight down onto your nail, and pick it straight up, there will be a lot of polish on the stamper and will most likely slip and slide if you try rolling it. 


    If there are any portions of your nail that seem to have too much solid color you can do the process again and use the edge of the stamper head to fill in that area rather than stamping the entire nail again. I ended up doing this to a few nails and it worked out really well. 

    I've been watching a ton of nail art videos on youtube lately, mostly from Naio Nails and she always does these extreme nails which inspired me to add some nail art on top of the marble. Now I do floral manicures all the time because they are my favorite but they are usually stamped and I haven't done any hand painted roses since 2013 and figured it was time to give it another go. 


     I tried to strategically place the roses over parts of the marble that were my least favorites which put them on the sides of my nails. Not the best placement I know because it seems sort of unbalanced to me but overall I really really love how this turned out. 


    I used acrylic paint in red, green and white to paint my roses. The pink and light green you see was created by adding a small amount of white to the red and green. The veining I did with a gold glitter striper from Jordana I picked up on clearance several years ago. 


    I have mixed feelings about the glitter. I think it was needed for the marble effect but maybe not quite so much. What do you think? 


     That's all I have for you today. Be sure to stop back on Thursday when I'll be unveiling a Minnesota Nice collab that is releasing this Saturday at Polishcon Minneapolis from 4 Minnesota makers. Also, I will be attending Polishcon again and hope to meet a few of you there. Until then, thanks for stopping by and Happy Polishing!


Tuesday, September 4, 2018

6:00 AM

Untried A-Z Challenge - Letter R


    I'm back this week with another installment of the Untried A-Z Challenge. This is a laid back challenge where every other week a new letter is chosen and you swatch a polish that starts with that letter. You can go by brand name or polish name, do one polish or a few, share a plain swatch or add nail it. It really is up to you with what you share and how often you join in. 


     This week bring us to the 18th week of the challenge and as you may have already guessed, the letter R. For the letter F I shared with you 2 polishes from KBShimmer and will be revisiting the brand again. This week I've gone with a not completely untried polish, but one that I have yet to actually wear, Run! It's the Coppers!

   
Copper colored linear holographic nail polish

     Released in 2014 as part of the Early Summer Collection, when this perfectly copper colored linear holographic nail polish arrived at my door I immediately painted one nail so I could bask in all its beauty. Sadly that was it for this polish and it was tucked away in my helmer, collecting dust until I pulled it out again 4 years later. I know, I know, I have hung my head in shame over this. 


     The application was an effortless experience. The formula is one of the best I've worked with allowing for the polish to flow evenly from the brush onto the nail with complete control. I did notice a slight VNL after the first coat and a second coat achieved full opacity.

     I did notice minimal brushstrokes once the polish dried but I had to really look for them. In fact, my camera picked them up more than what my eyes actually did.


      I really like this color, but it's a bit much for a full manicure even for me. I'd love it as an accent nail but ended up using it as a base for some Autumnal nail art.


     Now, this didn't turn out quite like I had envisioned but that's partly because I had to switch tactics in the middle of it. I thought I had a specific image for stamping but I was wrong and ended up going with an image that I'd consider a distant cousin of my original idea. 

     This image is from the Totally Negative 02 plate from Lina and while it still looks a little like leaves, it falls short of what I wanted. The gradient I did using another KBShimmer polish called Oh My Ganache from the 2016 Fall Collection and Run! It's the Coppers!

     I absolutely love the accent nail however and am quite proud of how it turned out. I decided to dust off my freehand skills and painted the tree with acrylic paint. Seeing the success I had with this has inspired me to try more freehand looks and will have another one to share with you next Tuesday. Or if you just can't wait until then I shared a teaser pic on my Facebook page. In the meantime be sure to check out the other polishes in the challenge this week and as always, Thanks for stopping by and Happy Polishing!


Tuesday, August 14, 2018

6:00 AM

Sydney's Style - Baseball nail art


     It's time once again for Sydney to take over the blog. This time around she's chosen to do a baseball themed nail art. Now I have to admit even though I play softball and have for years, we are not a huge baseball family. Recently we've gotten into watching our local team, it's small town ball at it's finest. No admission to the games, neighbors gathered together to cheer on the local boys, and a hat passed for donations to keep the traditions going. Maybe that's where she got the idea from but not her color scheme. Our team wears black and orange while Sydney went with red and white.


    Her look was completed by alternating Sinful Colors polishes in Ruby Ruby and White Board across all 10 of her nails. Notice how she didn't go with the same colors on the corresponding fingers? That's because she wanted to shake things up. I love it when she explains her manicures to me. 


     Speaking of shaking things up, another difference you'll notice is that she added her accent nails to her thumbs instead of the ring finger. To create her lines she used nail stripers in red glitter and a plain white. I am a very proud mama when looking at those lines, they came out so well. She definitely has a steadier hand than I do! 


I know I'm biased but I love her little manicures and spending time with her in my nail room. Watching her pick out her colors and chatting about her day while she puts it all together is precious time I will cherish. I know these special times are limited as she gets older and I love that I can share a bit of them with you. Thanks for stopping by and Happy Polishing!


Thursday, June 28, 2018

6:00 AM

Lustrous Lacquer's Quarterly Favorites Round-up Vol. 2


      It's the end of June and that means it's time once again for a round-up of my favorite nail art looks from the last three months.  Becuase I took a bit of a hiatus for the month of May this post will be less extensive as the previous version. But that's no excuse to not sit back, relax and revisit a few of my favorite post, enjoy!


     April was a busy month for me when it came to marbled looks. I shared a drip marble and a watermarble. You'd think either one of those would have made it into my top 3 looks but I actually liked my Neutral nail art look the best. 


    This simple look had two different accent nails which is something that I don't often do, in fact, I'm not sure I've ever done it before. It was a pleasant surprise when I fell in love with it and that's why it is my favorite look from April.  

     May was the month where I lost my blogging mojo, the weather finally warmed up and so did my personal life. There are only a few posts to pick from but the one that truly stands out is my Parchment Manicure


    I am very proud of how this turned out and even more proud of the fact that I was able to film a tutorial video for my Youtube channel. I have to admit that this is my favorite manicure of the last three months, and let you know that I have a few more that I'm proud to share this summer.

     June was a stressful month for blogging because I fell behind on the Untried A-Z Challenge. Not only did I need to catch up on that but I needed to write posts to cover while I was gone on vacation. That left little time for nail art. I ended up only sharing one nail art look this month unless you count that look I created for my Letter L post. Which wasn't a nail art post specifically, but maybe I'll still count it just to make me feel better. My one and only nail art specific post for the month of June was my 80's Funky French mani


     Now I know this isn't some of my best work, and it might be considered a fail depending on my mood but it made my list of favorites for what it represents. For me, this manicure humbles and encourages me. It humbles me because even though I've been blogging about nail art for years I still make mistakes and it encourages me to keep trying those techniques I'm not comfortable with. 

    I hope you enjoyed this look back at my last three months of blogging. I'd love to know which look is your favorite. Stop back next Tuesday to see my 4th of July nail art, which I'm hosting a link up for and everyone is welcome to join if they want. The inlinkz code can be found on my Facebook page or feel free to send me an e-mail at lustrouslacquer@live.com or send me a dm asking for it. Thanks for stopping by and Happy Polishing! 


Tuesday, June 19, 2018

6:00 AM

Inspired by Robin Moses - 80's Funky French


     I've got another Robin Moses inspired look to share with you on the blog today. While this isn't my best work or something that I'm particularly proud of I think it's important to share it. It's important to me because I want to inspire others to try nail art, I want people to see that even though I've been at this for a few years now I still create manicures that aren't perfect and am always learning. I might be getting really good at stamping, or watermarbling but a technique that I consistently come up a bit short on is my freehand painting. And that's what you'll see in this 80's themed funky french manicure.


     Now normally I would use a polish that looked like my natural nail color as a base but this time around I skipped that step. Thankfully it worked out alright, it seems my base coat is doing a great job of keeping my nails stain free. For the "french tip" I used Sally Hansen Black Out in a diagonal pattern. While I'm a fan of the traditional French manicure I like to put my own twist on it from time to time. 


    The Not Really Neons Collection from Polish 'M came in handy for the lines. I used Harlequin (green) Royal (blue) Tangelo (orange) and Rosé (pink) I should have used Lemonade for the yellow but I wasn't sure it would show up so I went with an acrylic paint instead. I topped everything off with a glossy top coat. 


      I do like how this turned out, I need to work on my angles and painting straight lines. Which is what I meant earlier when I said my freehand skills come up just a bit short. But that doesn't stop me from trying, in fact, it makes me want to do more so that I can get better. 

     After looking at this mani for a bit in a glossy state I decided to see what it would look like matte. 


     I used the matte top coat from Pure Ice just to see how well it worked and I have to say I'm pleased with the results. 


     While I love my indie polishes, we all have a budget and mine is a bit tighter than most plus I like to be able to run out and get a product if I'm in a crunch, so I'm always on the lookout for less expensive alternatives from brick and mortar stores to use. My favorite matte topcoat is Matterial Girl from Blush Lacquer because it gives a true matte look instead of the semi-matte looks you can get from other top coats. The Pure Ice matte top coat also gives a true matte appearance.

     Which look do you like better the glossy or matte? Do you have a technique that you struggle with a bit? Let me know in the comments and as always Thanks for stopping by and Happy Polishing! 

Thursday, February 8, 2018

6:00 AM

Dark and Vampy Valentines Day Manicure


     It's the beginning of February and that means it's time for Valentine's nail art looks. I missed out on doing any last year and I want to make up for it this year. Don't worry I won't be dedicating the entire month to Valentines I only have 2 looks to share with you. The first one is a needle drag look that has subtle valentines feel to it that I'm kind of proud of. 


     For years I have attempted the needle drag technique without success. I must have a heavy hand because no matter how lightly I tried to be with my dotting tool I ended up putting gauges in my polish instead of beautiful swirling designs. That was until I tried using a nail art brush instead of my dotting tool. A little tip, you want to use a striping brush with long bristles and the lightest amount of pressure possible. 


      The polishes I used I recently picked up on clearance from Target. Who doesn't love a bargain right! My main color is Ruby Do from the 2017 Berry Chic Collection. I accented it with Clean Slate which is part of the 2016 fall collection. Both polishes are extremely opaque and have great formulas. To create my hearts I used a medium sized dotting tool and a few drops of Ruby Do. The brush in the complete salon manicure line is great for painting my nails but it too big when it comes to wanting small drops of polish. You'll want to move quickly when doing the needle drag technique so that your polish doesn't have time to dry. I had my dotting tool ready to go before adding my second coat of clean slate which I think was also part of why I was able to do this successfully. A quick swipe with my striping brush through the polish and I had my heart pattern.


     I'm super excited to finally get this technique to work and can't wait to try it out with other colors and designs. Have you had success with this technique? Do you have any other tips or tricks? I hope you enjoyed this simple Valentines nail art look. I'll be back with another look soon until then, Thanks for stopping by and Happy Polishing! 


Tuesday, December 12, 2017

6:00 AM

Christmas Ivy Nails


     Hello Everyone, how has December treated you so far? Are you done with your Christmas shopping or still on the hunt for that perfect gift? Perhaps you need a little push to get you into that Christmas spirit? If that's the case have I got the perfect manicure to share with you today! This Christmas Ivy manicure recently popped up in my news feed from Robin Moses and I knew right away that I wanted to try it.  

     I've been wanting to work on my free hand nail art skills for some time and this manicure looked simple enough that I felt it was a good way to practice. Of course, all the great nail artists out there make these manicures look so easy and effortless but to be honest this one was actually pretty easy to do. Now by no means is mine anywhere in the ballpark of being as good as the original but I'm very happy with how it turned out.I even have a new found enthusiasm to keep working on my free hand skills.


      I started out with Sally Hansen Satin from the Smooth and Perfect line. Typically I would use China Glaze Heaven as my naked nail color but I wanted to see if I had other option in my collection already. Turnes out Satin is the better option of the two and has become my go-to polish when I want this effect. 

     I hand painted my french tips with Sally Hansen Wild Strawberry from the Crayola collab earlier this year. I don't know why but I have always been able to do a decent freehand french tip. I wish I could take that skill and transfer it to other aspects of my nail art. Especially when it comes to brush control when hand painting designs. 


     For my Ivy, I used acrylic paint in various shades of copper and gold. I picked a true gold for the vine and a darker bronze for the leaves. Then I went in with a light gold to add some highlighting and try to add depth. Painting curving lines is a huge hurdle for me that I can't quite seem to get over but my hand painted leaves have improved. 


     The glitter on my tips is Fantasy Makers Once Upon a Time. I started off by just brushing it on but noticed that I was getting more of the blackened base than I wanted. To fix that I applied the polish to a sponge and that dabbed it on my nail. I like the sponged option much better, don't you?  I topped everything off with Darling Diva's Preformance Enhancing top coat to give it a super glossy finish.

     Anyone remember the very first mani I tried to recreate from Robin Moses? I had an awful time getting the angles right and things just looked off. I haven't mastered the angles yet but see improvement in those tiny little leaves. It's those little victories that I want to share with others, especially those just starting out with nail art, in hopes that it inspires them to not give up, or try something new.  It's the very reason I started this blog in the first place and I'm glad I'm getting back to that after losing my focus for awhile.

     I hope you enjoyed today's post and maybe were inspired to tackle a nail art technique or look you haven't quite mastered yet. Thanks for stopping by and Happy Polishing!


Thursday, December 7, 2017

6:00 AM

Finger Paints - Winter Glaze Collection


     During my Thanksgiving break from school I did a little brick and mortar shopping for polish. My coworkers had given me a gift certificate to Sally Beauty supply and it was burning a hole in my pocket so of course I had to spend it. I came across the Winter Glaze Collection from Finger Paints at the firsts Sally's I stopped at. I grabbed 4 polishes from the display and happily made my purchase. It wasn't until I got home that I found out only 2 of the polishes were from the collection. The other 2 were left over from a summer collection. Of course being the polish hoarder I am I just had to get the rest of the collection. I went to 2 more Sally's but came up short. I was only able to find 4 of the 6 polishes in the collection. Not to worry though, I was able to order the missing 2 online and they should be here shortly. Needless to day this is not an easy collection to track down. 

     I'll be sharing the 4 polishes I was able to find with you today, and I have to say I am extremely impressed with this collection.  Mainstream polishes seem to be stepping up their game lately. Just like Orly, Finger Paints has changed their brush. They no longer have the skinny round brush but have switched to the wider flat brush I'm used to seeing the in the Sally Hansen Insta-Dri line. 

     This will be another picture heavy post so I'll get some particulars out of the way right now.All photos are taken in my light box using daylight bulbs. I'll include how many coats I used for each polish as I go since that is different from polish to polish. Now let's get to the polish!

Piece De Resistance

Burgundy-wine-nail-polish-with-red-shimmer

     Color: Deep rich burgundy wine color with red shimmer.

     Application: The application was a dream with smooth even coverage. Piece De Resistance is extremely pigmented and very opaque. Shown here is 1 perfect coat plus top coat.

Burgundy-wine-nail-polish-with-red-shimmer

Burgundy-wine-nail-polish-with-red-shimmer

     I wouldn't recommend adding a matte top coat to this one as it seems to have made all the shimmer disappear. Although it does look pretty dark and vampy that way. And it does remind me of Mentality Tempest so this would be a great and much safer alternative.

Burgundy-wine-nail-polish-with-red-shimmer


     For my nail art look I stamped with Bundle Monster plate Winter Kingdom BM-XL482 and Hit the Bottle A Glint of Gold. 


     I love everything about this polish. The deep rich color, the smooth formula, the 1 coat coverage. I wouldn't be surprised if it worked well for stamping. 

Easily Noticed

Dark-Navy-Blue-Creme-Nail-Polish

     Color: Extremely dark navy blue creme nail polish that almost looks black on the nail.

      Application: Shown here is 1 perfect, effortless coat plus top coat. Easily Noticed is another highly pigmented, extremely opaque polish with a smooth formula and easy application.

Dark-Navy-Blue-Creme-Nail-Polish

Dark-Navy-Blue-Creme-Nail-Polish

     To dress this color up I added a few Ice Chips from Dollar Nail Art in the color White AB. I'm going to have to play around with these again to see if I can get a smoother application.


     Overall I like the formula and opacity of Easily Noticed. I do think the color is just a bit too dark for me to wear alone again. I do want to test to see if it works for stamping.

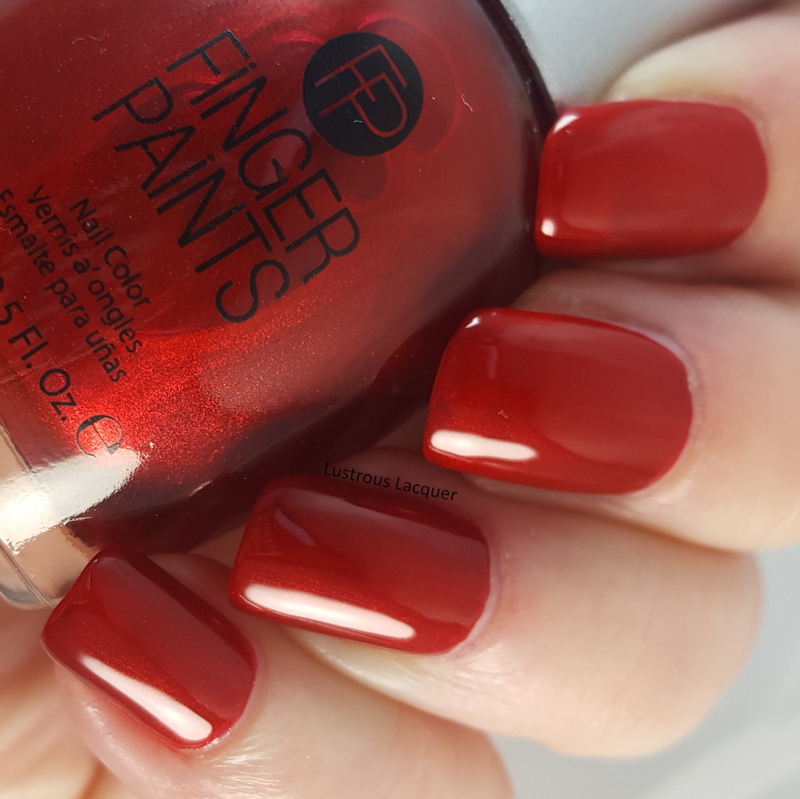
Cubism Crimson

True-Red-Jelly-nail-polish-with-red-shimmer

     Color: A true crimson red nail polish with subtle red shimmer and a jelly like finish. 

     Application: The formula was the thinnest of the collection but still very easy to work with. I was able to get smooth even coverage with each coat. I do still have a slight VNL after 2 coats which is typical of a jelly polish. I have a feeling if I'd added a 3rd coat full opacity would be reached. Shown here is 2 coats plus top coat.

True-Red-Jelly-nail-polish-with-red-shimmer

True-Red-Jelly-nail-polish-with-red-shimmer

     For this nail art look I went with the waterfall technique. I used some striping polishes from China Glaze in Black, white, and Silver. You can find these stripers at Sally Beauty Supply also.


     This is another favorite of mine from the collection. I just love how shiny and squishy it looks! Plus I'm a huge fan of bright red nails.

Oh My Gauche

Gold-micro-glitter-nail-polish

     Color: Clear based polish jam packed with yellow gold micro glitter.

     Application: Great coverage with each coat. Typically I'd apply the 2nd coat of glitter polish with a sponge to get full coverage but not this time. I was about to get full even coverage by applying this one just like any other polish. No sponging required! Shown here is 2 coats plus top coat.

Gold-micro-glitter-nail-polish

Gold-micro-glitter-nail-polish

     For my last nail art look I went the free hand route using my China Glaze striping polishes. My idea was to create the look of argyle wrapping paper. The good news is I'm getting better at my freehand work. The bad news is I'm still having issues with the angles of my strokes. But this just gives me something to work on in 2018 and I'm up for the challenge. 


     I have to say I was very impressed with the coverage I was able to get with Oh My Gauche and I like the bright gold color.  The 2 colors I'm missing are also glitter polishes and this one is giving me high hopes for them.

     I'm very glad I picked this collection up and have to say if this is any indication of how Finger Paints polishes are going to be I'll have to pick up future collections. If you can find this collection I suggest snatching up the colors you want,you wont regret it.  Thanks for stopping by and Happy Polishing!

Saturday, February 18, 2017

12:13 PM

Where have I been and the Future of Lustrous Lacquer


     It's been pretty quiet on my blog so far this year and that makes me quite sad. Like most people, I start out this year full of enthusiasm and lofty goals. I was ready to buckle down and really focus on my blog this year and then well life happened. But unlike when most people say life happens, things have been awesome, they've just kept me away from blogging. I decided it was time to end my silence, not only because people deserve to know what's going on but also because I missed blogging. So for today's post, I'm going to catch up on some Christmas nail art looks that never got posted and explain what's been going on lately.

     For starters, you might remember my post about Never Mind Polish Hedaphillia, in that post I talked about waiting for a proposal. Well just before Christmas he asked! We were at an ugly Christmas sweater party and I'd done my nails for the occasion.


     I call these my ugly patchwork nails. The nail art is free handed on my stamping mat so that I could apply them like decals. Sadly in all the confusion here packing I have misplaced my notes and I don't remember what polishes I used to create this look. I do know that the Kleancolor is Bite Me and it is a stainer!


     Speaking of packing I am in the process of buying a house. We were supposed to have closed by now and moving in but our closing date has been pushed back. I actually don't have a firm closing date right now so I'm in home buying limbo. I was so excited to move that I've packed up most of my polish things. But on the plus side, the new house has a room that I can use as my polish haven! I'm so excited to have space for everything and be able to leave things out if I'm not done with them. Right now my helmers reside off to the side in my little kitchen area with the nail art supplies piled on top. I have to paint my nails using our chest freezer as my table, and it's not the most comfortable or convenient place to work.

     Don't worry I plan on doing a series of posts about how I get my polish room set up as well as sharing pictures of my stash. I know how much I like seeing other people's collections and spaces and figured I'm probably not the only one.

     Another manicure I haven't shared yet was the one I wore for New Years. I've been enamored with the geometric manicures people have been doing so I did a twist on those. Nothing too fancy, but I liked how it turned out.


     This simple french twist was done with Pirate Princess Polish Looking for Booty, my black striper and Hit the Bottle As Black as Night. The image is from Plate UR Beautiful 18.

     Pirate Princess Polish to me is a relatively unknown polish maker that I stumbled upon during my black Friday shopping spree. As you can guess by the name all of her polishes have a pirate, or nautical theme to them. Looking for Booty is part of the Gone Plunderin' collection and it a gorgeous gold glitter. My only complaint is that there is so much glitter packed in there that it had a gritty consistency which made getting a nice line for the french manicure a tedious task. It also was a top coat hungry polish and required 2 thick layers to get a smooth finish.


     Well that's about all I needed to catch everyone up on. I'm still around, but busy moving and planing a wedding so my posting schedule is a bit sporadic right now. I've got a few manageable goals set for this year which include continuing with my dupes posts and my stamping comparison series. I have started swatching my entire collection on swatch sticks, which if you're thinking about doing this I highly recommend starting before your collection reaches 1500. I do have a few polishes swatched that haven't made it to the blog yet so there are a few posts in the near future along with some Sinful polishes that I just picked up to blog about while I move and get things set up. So stick around because fun things are in store for this year, I'm just off to a very very slow start. Thanks for stopping by and sticking around. Happy Polishing!

Like what you see? Share it with your friends!