Showing posts with label Clear Jelly Stamper. Show all posts

Monday, May 6, 2019

6:00 AM

Japanese Cherry Blossom Nail Art in 4 Easy Steps


     Have you ever sat down to paint your nails and had the end result be completely different than your original idea? That's just what happened to me when I created this Japanese Cherry Blossom look. I've actually wanted to do a manicure like this for quite some time but just never seemed to get around to it. I've either had other ideas come first or just haven't been inspired to sit down and actually create it. 

     Now I could get all philosophical and say that fate stepped in and in its way pushed me to finally create this nail art but I think it was more of a case of being inspired by the colors that I used.

     Back in February I rushed out to Walmart to find the latest core colors from Sinful Colors and have had them sitting on my desk ever since. We all know by now that I have a habit of doing this and I'm really trying to get better about it but old habits are hard to break I guess. Anyway, I've been looking at Violet Riot and Strike a Pose for months thinking that they would look great in a gradient. Which I finally put to the test last week and I was right. They go together beautifully. So beautifully in fact that they created a canvas that just begged to have nail art applied. And that is how my 4-step Cherry Blossom nail art was created. 


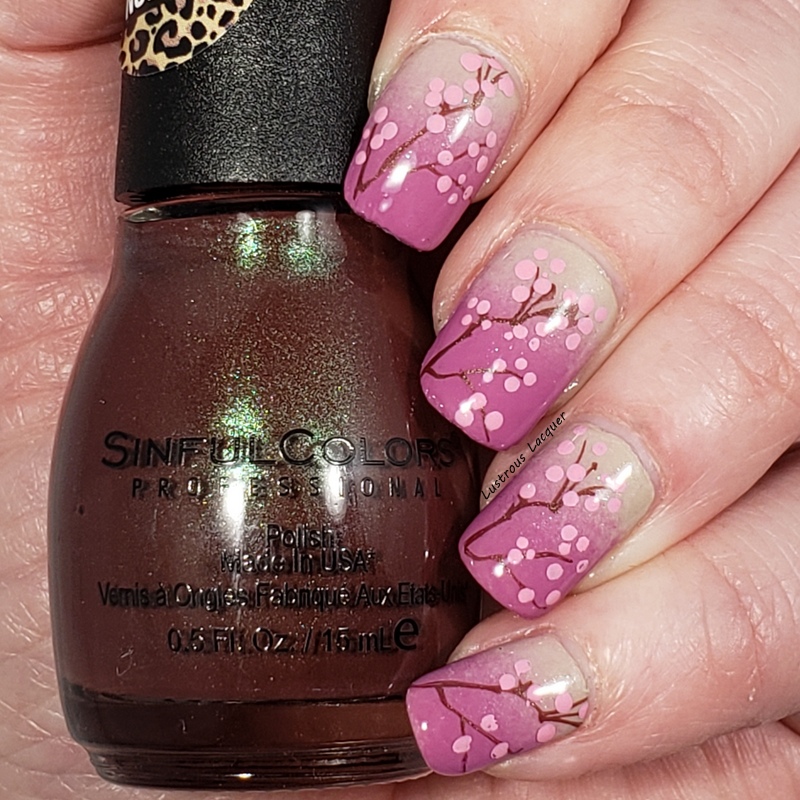
     Step 1: Paint a layer of Sinful colors Strike a Pose and let dry. This doesn't have to be a thick layer or even have full opacity since we will be doing a gradient over it. You just want to get a layer down so that you'll have better coverage on the gradient. 

     Step 2: Crate the gradient using Strike A Pose and Violet Riot. I like to use a sponge to create my gradients because I tend to get a better blend of the colors but you can do yours however you're comfortable. (The one I use is from Born Pretty Store and if you use code LAUNX31 you can receive 10% off your order.) Remember to use a liquid latex barrier around your cuticles to cut down on clean up. If you don't have liquid latex or are allergic you can always use scotch tape. Add a layer of topcoat and allow to dry fully. 


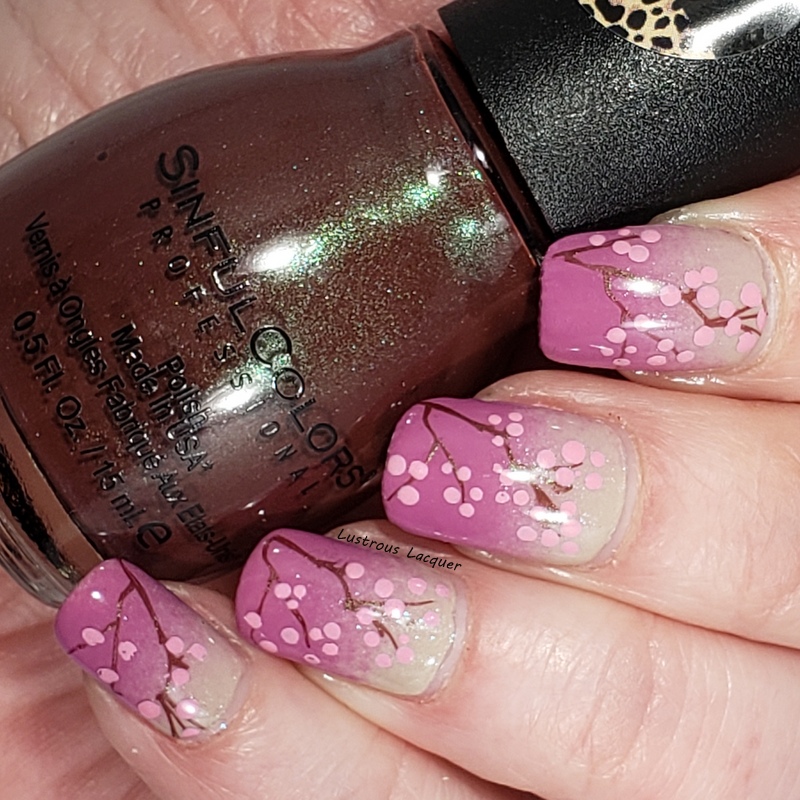
     Step 3: Stamp your desired image onto the nail. I used Clear Jelly Stamper plate Cjs-05 and Sinful Colors Body Language from the Naughty Nudes collection to create my branches. 

     Step 4: Using a small dotting tool you can create the blossoms. I used the smallest of my dotting tools and Hit the Bottle Drunk Tank Pink to create mine. I randomly placed dots along the branches and in bunches on my nails. Another layer of glossy topcoat and you're all done. 


     I've also included a step by step video tutorial for those of you who like to see how manicures are done. 


     And there you have it. My 4 easy steps to create a Japanese Cherry Blossom manicure. Pretty simple right? I actually loved how this turned out and didn't want to take it off. But like all nail bloggers know, the switching must go on and I was only able to wear this for about 8 hrs. 

    Have you ever had a manicure just sort of come together as you were doing it? Does your base color ever inspire your nail art? Let me know in the comments. Thanks for Stopping by and Happy Polishing! 


Wednesday, November 22, 2017

11:25 AM

Clear Jelly Stamper - Holiday Plates 2017 (Press Release)


     The holiday season is upon us and that means new collections! Check out the latest plates from Clear Jelly Stamper below and then let me know which ones are on your wish list.

     I'm always a sucker for plates with snowflakes on them and the one with the snowman has caught my eye also! I see a purchase in my future.  As always thanks for stopping by and Happy Polishing! 

Monday, July 3, 2017

6:00 AM

4th of July Manicures


    I've got a very quick post to share with you today as I've got holiday plans to get back to. But I really wanted to share a few nail art looks I did for the 4th. I realized recently that it's been 2 years since I've shared a 4th of July manicure and that just wouldn't do.

     The first look I did is super easy and can be done by pretty much anyone who has access to nail polish and some sort of dotting tool, whether it's an actual dotting tool or a toothpick.


     For this look, I used the American Bundle from Different Dimensions. The bundle contains a cuticle oil that smells amazing and 3 polishes in Red, White, and Blue.  


     The white is called One Heart, One Hand which I used for my base color. Once that dried I went in with my dotting tool and placed random dots along the tips with One Flag, One Land (Red) and One Nation Evermore (blue) and One Heart, One Hand.  All 3 colors are holographic and really sparkle in the sun! 


     I need to work on my random dot placement a bit but overall I liked the way this turned out. It a patriotic take on the French manicure, and as I mentioned above super simple to do. 

     Now for the look that I'm actually wearing for the 4th. This one was a bit more complicated and took quite a bit of time but I absolutely love it. I wanted to do something a little outside of the box instead of the typical fireworks or flags but still, have that 4th of July feeling. And I'm pretty excited about how it turned out. 

    Once again I used Different Dimensions One Heart, One Hand as my base color and let it dry. 


      I just received the mandala plate (Cjslc-18) from Clear Jelly Stamper and thought the designs looked a little like exploding fireworks but with a twist and was anxious to use it. Honestly, I'm a little obsessed with this plate right now so you'll probably see it quite a few times on the blog. There are just so many looks you can create its mind blowing.


     For the stamping colors I used Hit the Bottle Poison Apple, Snowed In and I Blue it all on Polish. They worked great! I was able to get all the details in the images to transfer, even the super small inner circles which is really impressive. 


     So there you have it. 2 looks I created with the 4th of July. Which one is your favorite and what are you wearing on your nails for the holiday? I've got to run, there's a BBQ calling my name but as always Thanks for stopping by and Happy Polishing!

Like what you see? Share it with your friends!