
|
Monday, December 5, 2016


Friday, December 2, 2016
Today I'm sharing with you a gorgeous red jelly polish that is perfect for the Holiday Season. Colores De Carol's Bogus Journey was released earlier this year as part of the Hitchhiking Adventure Collection.

Bogus Journey is described as a cherry red Holo with holo flakes and micro holo. I call it red jelly deliciousness with a sprinkle of sparkle.

The application was smooth and even with full opacity reached after 2 coats.

I really like that even though it has a jelly finish there isn't a lot of VNL and that holo glitters seem suspended between the layers. This is my 2nd polish from Colores De Carol. The first was Bling! and just like with that polish I had to add a bit of stamping to this.

Once again I reached for my new Uber Chic plates using 10-2 and Orly Luxe to create the accent nail. What do you think of this look? Do you like the subtle hint of gold or would you have continued it on every nail? Thanks for stopping by and Happy Polishing!
Wednesday, November 30, 2016
Hey everyone and welcome to the middle of the week. I hope you all had a nice holiday with your family if you celebrate Thanksgiving and that everyone survived Black Friday shopping. I know I put a small but still noticeable dent in my wallet. In honor of the holiday season and my protest to the cooling temperatures I decided to share with you a nail polish released this past summer from Lollipop Passe Lacquer called The Get-Fresh Flow. I know I know this time of year I should be showing you glistening white or cream colored polishes, or maybe deep velvety greens sprinkled with Gold or even a Bright red that would make Rudolph jealous, but I'm a rebel and I pretty much do what I want with my blog.
So you remember that wonderful boyfriend I mentioned in my last post, you know the one featuring Nevermind's Hadephilia? Well, he's not only wonderful but also extremely supportive of my blog and when he found out that I wanted the Summer of '96 collection, which The Get-Fresh Flow is from he bought it for me. Now I normally don't get entire collections but this one was particularly special to me because now I'm going to date myself here, '96 was the year I graduated Highschool. Some of you are doing the math now aren't you, figuring out just how old that makes me... while you finish adding that up I'm going to go ahead and get to the polish.
 |
| Photo was taken in full sun |
 |
| Photo was taken in a lightbox |
The Get-Fresh Flow is a multi-chrome polish that shifts between blue and teal with a hint of green. This color really comes alive in direct sun, but still, has a playful color shift in regular lighting. I was lucky enough to have a bright sunny day to photograph in. I won't be getting those now that winter has started to hit Minnesota.

The Application was smooth and easy with the first coat being a bit on the thin side and slightly sheer, Full opacity and a nice even finish can be achieved with 2 coats. I've shown The Get-Fresh Flow here as 2 coats plus top coat. As you might notice there are a few brushstrokes visible but you really don't notice them unless you really look.

This color also makes a great base for nail art. I decided to go with just an accent nail because I didn't want to cover up all that gorgeous blue color. but also thought it needed something. Check it out...

This simple yet delicate design came from Uber Chic plate 10-2 which is the same plate I used for my Bling and swirls manicure. I may have gotten a bit excited when these plates showed up at my door and used them for a few manicures, so you'll be seeing a lot of them coming up on the blog. But don't worry there are a lot of images so you shouldn't see the same one twice.
The Get-Fresh Flow is still available for purchase if you'd like to pick up a bottle for yourself. The rest of the collection is also available if you want the whole set. And don't forget to check out Lollipop Posse Lacquer on Facebook for all the information about upcoming sales and new releases. Thanks for stopping by and Happy Polishing!
Friday, November 18, 2016
Today I'd like to share with you a new to me indie on the scene, Nevermind Polish. This brand was first brought to my attention by a few swatch photos floating around the internet of a Polish Con limited edition nail polish. Yes, I'm still bummed that I wasn't able to attend the actual event but eventually I'll get over it. While I missed out on the limited edition polish I ended up discovering the Holophilia collection that was just released around the same time. (fall 2016) Well, I quickly snatched up 2 of the polishes and eagerly awaited their arrival. Today I am sharing Hadephilia with you. Hadephilia is the love of hell in case you were wondering and I've got a funny story to share that fits in perfectly with this theme.
So in the middle of October, my mom let it slip that my boyfriend asked my dad for permission to marry me. I was super excited at first and then more than a little ticked because well there went the element of surprise. (Chad if you're reading this I'm sorry) And of course, I was now anxious for him to pop the question, which I thought for sure was going to happen while we were at the cabin the following weekend. Well as every nail polish addict would, I wanted my nails painted and looking perfect for that must have picture of the ring. I didn't want to go with a traditional french manicure even though I know that's his favorite style of manicure so I opted for a sexy red. Long story short, he still hasn't asked and I've been in a perpetual state of hell wondering just when exactly it's going to happen. Hence Hadephilia was the perfect polish to wear that weekend in more ways than one. While I sit here driving myself crazy thinking every time we go out will be "the time" why don't you check out the awe-inspiring beauty that is Hadephilia.

Hadephilia is a vibrant true red linear holographic nail polish that radiates off the nail. Sadly it was only a partially sunny day when I took these shots so the full linear effect gets a bit lost. Shown here is 2 coats plus top coat.


I had smooth even coverage during the application process with no streaking. I was also pleasantly surprised by how opaque the first coat was. However, 2 coats are needed to reach full opacity.

I snapped one quick picture in the shade to showcase the true red color. And also so you can see what it will look like while indoors. Unless you're standing under some amazing lighting that is.
The Holophilia collection is still available for purchase if you want to at Hadephilia to your collection. The full collection (8 polishes) is $90 U.S. individual bottles are also available for $10 each. And be sure to check out Nevermind polish on Facebook, Twitter, and Instagram. Thanks for stopping by and Happy Polishing!
Wednesday, November 16, 2016
Wow, it seems like forever since I've written a blog post! I was just starting to get my momentum back for blogging and then life struck again. Between house hunting, a promotion at work, and the kids getting involved with after school activities my days have turned into a whirlwind and a daze all at once. I've still been painting my nails, taking photos and writing notes but never seem to find the time to sit down a write the actual posts. I seriously have half a notebook filled up with things to share with all of you and I decided to start with the Stat-Ick-Stics collection from Parallax Polish which is available for purchase right now.
This 5 polish collection was inspired by the events in Erin's research area ( statistics and psychology) along with the general whines she has to listen to while teaching the class. What a great way to get out some frustrations right? Just make a nail polish collection based off of your stress!
"Power is the ability for our research projects to work out the way we hope them to, while Alpha and Beta are mistakes that can happen in research. These mistakes are Errors but I have also started teaching the class with a program called R, which gives you lots of errors when trying to learn. Do I have to is the most common thing I hear students say – unfortunately, the answer is always “if you want to pass”. "
This post is going to be picture heavy so I'm going to keep it short and sweet from here on out. I know most people come for the pictures anyway. All photos are shown as 2 coats plus top coat and taken in a light box.
Beta


Color: Dark shimmery purple polish that in the right lighting will show you some very sparse holographic sparkle.
Application: I had smooth even application for the most part but did notice if I tried to use a very thin coat there was slight dragging.
Finish: Dries to a sparkly matte finish.
Alpha


Color: A vampy red nail polish with dark blue holographic glitter.
Application: Smooth but a little sheer on the first coat. Builds up to full opacity after 2 coats.
Finish: Dries to a matte finish with some slight texture from the glitters.
Power


Color: Black nail polish with silver foil flecks.
Application: This beauty was a 1 coater for me that flowed seamlessly onto the nail.
Finish: Dries to a matte finish.
Do I Have To?


Color: Silver scattered holographic.
Application: Smooth even coverage with zero dragging.
Finish: Dries to a Matte finish with TONS of sparkle.
Error In Your R


Color: Shimmery deep emerald green.
Application: Smooth and even. This one was almost a 1 coater for me.
Finish: Dries to a satin finish, There are a few brushstrokes, but they almost disappear with the addition of top coat.
Overall I like this collection. It's full of nice rich deep colors perfect for the cooler temperatures. I love how the matte finish combines with the silver flecks in Power to look like a night sky full of stars. I might have to try it as a base for a galaxy manicure. And don't even get me started on that sparkle in Do I Have To?! You know me, I love a good sparkly nail polish especially one that applies so smoothly.
This collection is available for purchase right now in a variety of sizes and prices that are sure to work with anyone's budget. Just hop on over to storeenvy and check it out. And don't forget to keep up with all the latest news from Parallax polish by checking out the Facebook page, or following on Instagram and twitter! Thanks for stopping by and Happy Polishing!
Wednesday, September 28, 2016
Lustrous Lacquer
6:00 AM
reverse stamping
Leadlighting, Reverse and Advanced stamping. What are they and what's the difference?
You hear a lot of terms in the nail art community. Cindy hand, glitter bomb, ruffian, smoosh manicure to name a few. If you're just starting out it can be a bit overwhelming. Heck even if you aren't a newbie some of these terms may still confuse you. For me, my biggest issue is remembering the difference between leadlighting and reverse stamping. And that got me thinking that maybe I'm not alone and a blog post might be helpful. So I sat down, did a bit of research, watched some youtube videos and asked questions. This is what I found.


Leadlighting - is the technique of using transparent jellies, alcohol inks, or watercolors to color in open images stamped in a darker opaque polish. This can be done directly on the nail, onto a mat (Like making your own decal) or directly on the stamper head itself. The effect is a stained glass look allowing you to "see through" to the base color. Below is an image of a leadlight manicure I created to wear to a wedding.

For this look, I opted to stamp directly onto my nails and then color in the flowers with a sheer yellow polish. (full details can be found in my Leadlight post)
Reverse Stamping- is a lot like leadlighting in the sense that you are stamping an image and filling in the open space. The big difference is that you are using opaque colors to fill in effectively covering up your base color. This technique can be done on a mat or a stamper and sealed with top coat. Once dry the image is peeled off, flipped over and placed on the nail. The easiest way for me to remember this is to think in terms of coloring in the opposite side of the image than what you will see in the finished manicure. I recently shared a reverse stamped look in my Queen of Hearts manicure. But my favorite reverse stamped look was a floral manicure I created for a Hobby Polish Bloggers link up.
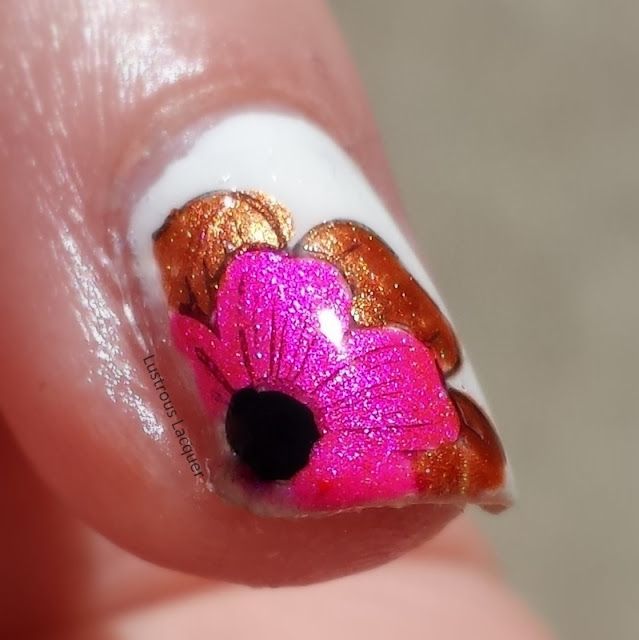
You can find all the details for the polishes, and image plate I used by following this link. Because you are filling in the back side of the image for this technique it can not be done directly on the nail.
Advanced Stamping - is a lot like reversed stamping but you do this one entirely on the stamper head. You start out by painting your nails the desired color, but do not apply top coat. Then stamp the image onto the stamper and color it in. Let the image dry for about 30 seconds. While the image is drying apply your top coat. Once your top coat is tacky to the touch, firmly press your stamper onto the nail.
This is one technique that I have yet to try myself but I found a detailed blog post and a video for you to check out. Maybe it will help you decide if you want to try this technique out for yourself.
Blog Post: Advanced stamping by Didolines Nail & Co. There is a video linked within this post
or check out the video
Video : Advanced stamping by Opal Hazlett I just love the butterfly she created.
I hope you found this post to be helpful and that I answered some of the questions you may have had. Have you tried any of these techniques? Which one is your favorite, or which one intimidates you? Let me know in the comments if there are any other terms or techniques you're unsure about and I'll do my best to answer your questions. Thanks for stopping by and Happy Polishing!
Sunday, September 25, 2016
MoYou London looks like they are jumping on the latest stamping trend with their newest collection. At the beginning of the year everyone went crazy for the clear stampers and the layered images that could be created while using them. Not wanting to be left in the dust MoYou has created 5 image plates for our stamping needs. Check them out below.


