Wednesday, May 13, 2015

6:00 AM

Parallax Polish - The SeCience Collection


     I'm so excited to share toady's blog post with you. Not only did I have the chance to swatch a collection before you could buy it, but it's a great collection full of fun vibrant colors. Ladies and gentlemen I give you the SeCience Collection from Parallax Polish!  And no that's not a type-o with the name, but a very clever twist on the collection theme. These polishes or the entire collection can be yours starting Friday, May 15th. 

Parallax-Polish-The-SeCience-Collection


     "The SeCience collection was designed to highlight the ongoing research and educational goals at major universities in the SEC conference. While these schools are normally thought of as “football” schools, each one has unique accomplishments in the classroom and laboratory. Facts are shared on social media, so be sure to follow Parallax Polish!"

 Before I start showing you swatches here are a few facts about how this brand has grown in the last year. New square bottles! They are bigger than a traditional mini at 9 ml each. This makes them smaller than a full sized but lets 's be honest, how many of you have finished a full-size bottle of polish that wasn't black, white or top coat? Also, the new flat brushes make application a breeze with more control over where the polish goes and fewer strokes required. They remind me of the brushes in the Sally Hansen Insta-dry line but not quite as wide. 

     This post is going to be very picture heavy so I'll try to keep my words short and concise. Each polish will be shown with 2 coats plus top coat (Seche Vite) unless noted otherwise.

Parallax-Polish-Choppin-The-SeCience-Collection

     CHOPPIN - LSU Home of the Tigers
     A dark purple polish with gold sparks.                           


     The first coat was slightly sheer and uneven and I did experience a little dragging when using multiple strokes on the same nail.  I still had a small amount of VNL after 2 coats, shown here is 3 coats plus top coat.

    
     I love the colors you get from the gold flecks in this polish.  It's so pretty on the nail, you really miss out on the depth this polish has by looking at it in the bottle. 


Parallax-Polish-Scen-The-SeCience-Collection
     
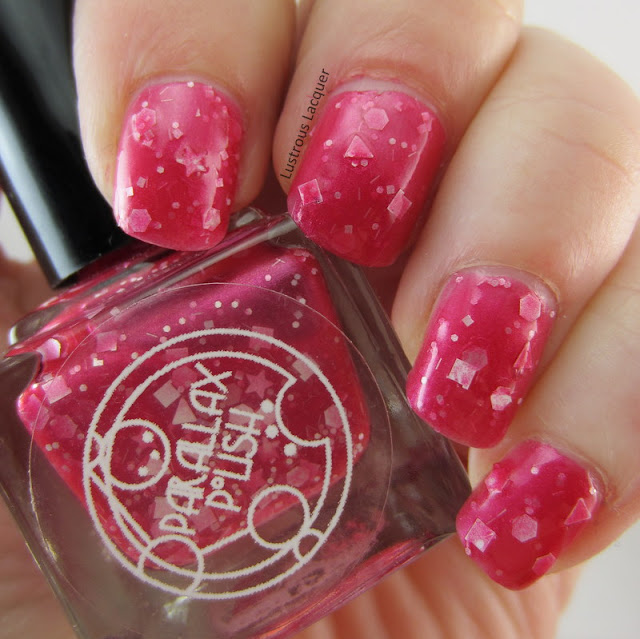
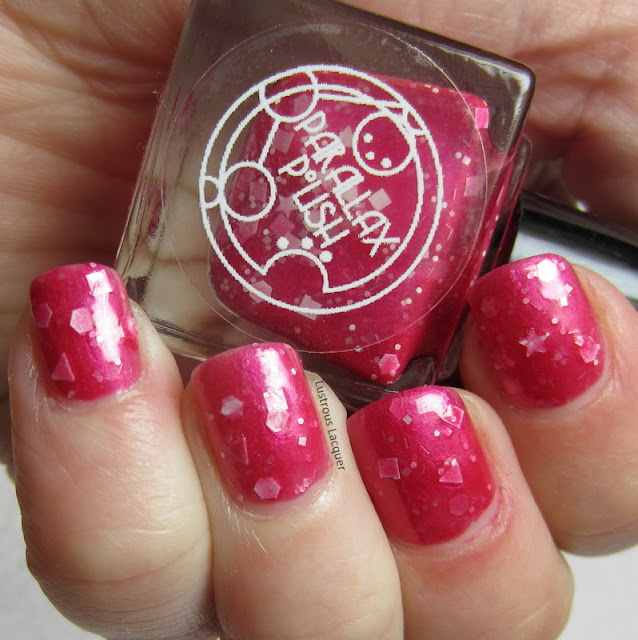
    SCEN - Arkansas Home of the Razorbacks.
     A deep red polish loaded with a variety of white glitters.


     Fishing for glitters was required for this polish, but only for the larger ones. I found I had an abundance of the smaller glitters with each coat. Sadly there are some large circle glitters that I was never able to get out of the bottle.


    The jelly-like finish of the polish made it easy to move the glitters around on the nail so I could place them right where I wanted them. 

Parallax-Polish-McClung-The-SeCience-Collection

     McClung - Tennessee Home of the Volunteers.
     A bright orange polish with white glitter.


     The application was extremely easy with even coverage and lots of glitters in each coat. 


     I thought for sure this would be at least a 3 coat polish but it's amazingly opaque. And the bright orange actually looked pretty good with my skin tone. I call that a win-win.

Parallax-Polish-Bryant-The-SeCience-Collection

     Bryant – Florida Home of the Gators.
     A navy blue polish with an orange shimmer.


     This is one of those polishes where you need to use a slightly thicker coat during application and only 3 strokes on each nail or you'll get dragging. I also recommend waiting until each coat is dry before applying the next.  Before top coat Bryant dries to a rubbery finish that looked pretty cool but didn't showcase the shimmer very well.


     Even with the not so user-friendly application, I think this polish is totally worth it. I mean look at how pretty that shimmer is! A bit of patience is all you really need. My photos captured a slight VNL but I couldn't see it when looking at my nails. 

Parallax-Polish-McAlester-The-SeCience-Collection


     McAlester – Missouri Home of the Tigers.
     A black polish with small and large gold holographic glitters.


     Very smooth application with even coverage and surprisingly opaque after 1 coat. 2 coats are needed for full coverage.


     I really like how the glitters seem to dance on the nail as the light reflects off it.

Parallax-Polish-Halbouty-The-SeCience-Collection

     Halbouty – Texas A&M Home of the Aggies.
     A maroon polish with chrome shimmer.


     Very opaque polish but slightly uneven on the first coat. Builds up nicely after 2 with a smooth application of the polish.


     Leans more to the berry side than maroon on me, but I love this color. It was also a big hit with my friends and coworkers. In fact, there's a list of people waiting to borrow my bottle. I might just have to have a polishing party to keep it from "walking off". 

Parallax-Polish-Morgan-The-SeCience-Collection

     Morgan - Kentucky Home of the Wildcats.
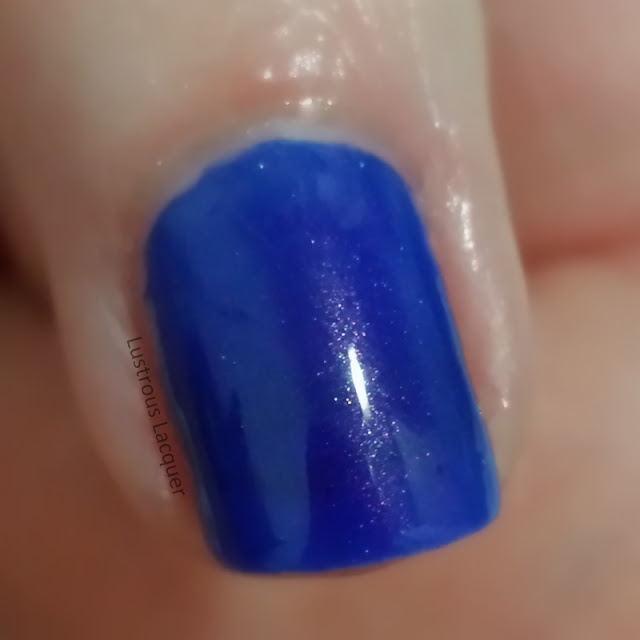
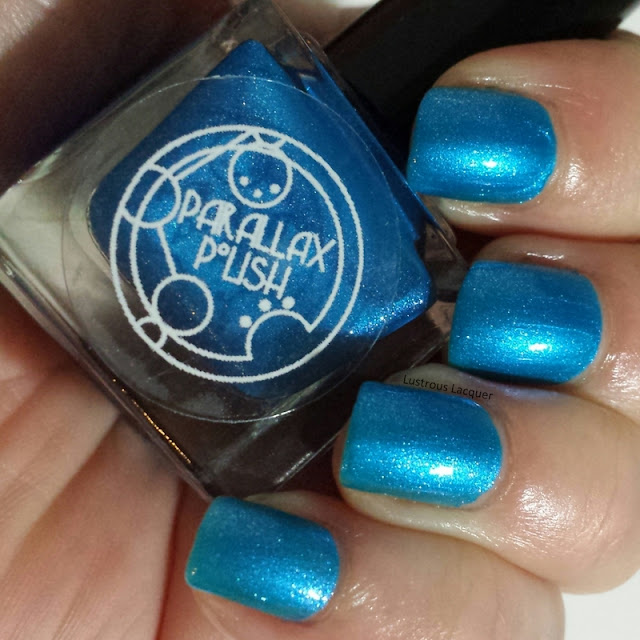
     A true blue polish with chrome sparkle.


     Smooth application but sheer on the first coat. This is a great shade of blue and very similar if not an exact dupe to Midnight on NYE that I blogged about last week. Since that one is no longer available this is a great polish to pick up instead.


     I love the quick flashes of sparkle this polish has. It almost radiated off the nail when in direct light and looked awesome!

     Whew, that was a lot of photos. If you've made it this far thank you for sticking with me. Overall I really like the colors in this collection. Do all of them have perfect formulas, no but none of them are terrible or impossible to work with. Id have to say my favorites are Halbouty, Bryant, and McAlester.

     As I mentioned above this collection releases on Friday, May 15th  from Parallax Polish. (time to be announced) To make sure you don't miss out be sure to follow Parallax Polish on Instagram or Facebook. Thanks for stopping by and Happy Polishing!


Monday, May 11, 2015

6:00 AM

Smokey Mountain Lacquers - Radiant in Orchid


     How was everyone's weekend? Mine was busy busy and busy with some fun thrown in but now it's time for me to get back into the work week mindset. Today I have a pretty nail polish and a personal mani fail to share with you. Let's start off with the good stuff, shall we?

     Radiant in Orchid was released by Smokey Mountain Lacquers last year and I ordered it right away, but like a lot of the polishes I purchase it ended up in my helmer and forgotten. Until now that is. Radiant in Orchid is a dusty lilac creme that I thought would be perfect for this time of year. Especially since my lilac bushes are just starting to bloom and fragrance the air as I walk to and from my house. 


     The application was slightly tricky but that might have been because my bottle is over a year old and I didn't exactly mix it up really well after sitting for so long. This polish is sheer with the first coat and was prone to dragging when doing multiple strokes.  I was able to achieve full opacity after 3 thin coats. 

 As for my accent nail, well that's where the failure comes in for this post. I tried making my own nail decal for the first time and ran into a little trouble. I stamped the flip-flop image onto my stamper using Bundle Monster Plate BM-309 and Finger Paints Black Expressionism, filled in a few places with some striping polishes, added a top coat and waited for it to dry.


     While my decal was drying I painted 1 coat of Finger Paints Paper Mache on my ring finger and when it was tacky I added my decal. The only problem was my decal felt really stiff and didn't want to curve onto my nail. I thought a layer of wet top coat would help, but nope I was wrong.  The top coat made my base color mushy and it smeared over the sides of my finger when I pressed my decal on. 

     It was a fun mess to deal with let me tell you, and a little disheartening to be honest. I'm not sure if I let the decal dry too long or if it was the top cost I used. I haven't given up on this technique yet, but I'm not jumping at the bit to try it again soon. If you have any tips or tricks I'm all ears. Thanks for stopping by and Happy Polishing!

Friday, May 8, 2015

6:00 AM

OPI - It's Totally Forth Worth It


     Today I have another quick post to share with you. This time around I've gone mainstream with OPI's It's Totally Fort Worth It from the 2011 Texas Collection.

OPI-Texas-Collection-2011-It's-totally-fort-worth-it

     It's Totally Fort Worth It is a silver frost with purple micro-shimmer. Shown here is 3 coats plus top coat. As you can see even after 3 coats this is still a very sheer polish. Id have to say that this would work better as a topper, than wearing it all alone. Unless you're going for a subtle hint of color look.


     The application was pretty easy with even coverage for all 3 coats even though this polish is a little on the runny side.  Staying true to the frost finish there were a few minor brush strokes which thankfully seemed to almost disappear once my top coat was added. There's nothing that can ruin a polish quite like those annoying brushstrokes.

     The micro shimmer is slightly more visible than shown here in my photos which I think saves this polish from being a boring pearl like color and more like mother of pearl.  I can see this looking great over a darker color so that shimmer can really shine.

     What are your thoughts on polishes like this? Wear them alone or layer over a darker shade? Let me know in the comments. As always thanks for stopping by and Happy Polishing!

Thursday, May 7, 2015

6:00 AM

MoYou London - The Illusion Collection (Press Release)


     It's been a few weeks since MoYou London had released some new plates but I promise you it was worth the wait. I am so excited about the entirely new collection and I cant wait for you to see it. The Illusion collection is the biggest set of plates released at once that I know of so far from MoYou. This 11 piece set,  that's right I said 11 piece set, has my mind thinking up all sorts of manicure ideas and just looks like so much fun. I haven't been this excited about a collection release since the Kaleidoscope Collection from last year.  But enough about my excitement, let's show you these plates and let your own excitement begin.

Hi!
 

Meet ELLE, she’s so much more than meets the eye. With just one glance, her optical illusions will catch you in a trance!
 
These eye-catching plates will be available as part of THE ILLUSION COLLECTION starting this Friday, 8th May. 
 
Have a spellbinding day,
The MoYou-London Team


     MoYou plates can be purchased in their shop. As mentioned above these plates will be available Friday May 8th. each or about $8 US.  Plates are £4.99 each or about $8 US. Thanks for stopping by and Happy Polishing!

Monday, May 4, 2015

6:00 AM

Ruby White Tips - Midnight on NYE


      I know it's been pretty silent on my blog and Facebook lately but life has thrown me a few curve balls. And to be honest when my nails busted down so low I lost a lot of motivation. Anyone else feel uninspired when they have super nubbins? Today I have a quick post to share in hopes that it brings my blogging mojo back. 

    Midnight on NYE from Ruby White tips is a beautiful true blue holographic polish that I picked up on a blog sale a while back. It is the only polish I own from this brand but I was seriously impressed. I wore the blue beauty for almost 2 weeks with minimal tip wear.


     Application was similar to most holographic polishes where the first coat was a little sheer and full opacity was reached after 2.  While under most lighting the holo has a subtle effect you do get intense flashes from time to time.


     I ended up wearing this alone without any nail art but think it would make a great base for some galaxy nails.


     I mean it already looks like a sky just before the last rays of sunlight disappear and everything goes black.  And while this color is no longer available I know there are a few out there that are really close if not an exact dupe.

     I know this was a quick post, and there wasn't a lot to it but as always Thanks for stopping by and Happy Polishing!


Monday, April 20, 2015

6:00 AM

Embossed Metal Manicure


     Today I have a tutorial of sorts to share with you on how to achieve that embossed metal manicure look that has been floating around the internet lately. I say a tutorial of sorts because I didn't quite achieve the look I was going for and this is more of an experiment that I tried and decided to share. Plus I have an ulterior motive,  I'm hoping some of you talented ladies will have some tips or tricks to share so my next attempt will be a success. 

     Let me start out by showing you what I ended up with and then I'll get into the steps I took to get there. I really do love this look and my goal right now is to master it!


     I started this manicure off with a coat of Orly Bonder on a nail tip. I wanted a semi sticky base to hold the design. Which was a good idea, but ended up not working quite as well as I had planned. I'll get more into that later on in the post but if you look closely at the picture above you might get an idea of what Im talking about. 

       For the design I chose a 3D sticker from Born Pretty Store
6pcs 3D Nail Art Stickers Gold Embossed Texture Heart Star Lace Pattern Decals.


     I really liked the look of a few of these stickers but for my experiment I went with one of the designs with all the curls. (Far right of the picture) Here is where I made my mistake. I placed the sticker on the nail tip but I didn't make sure to press down firmly near the edge. You know, right where the tip starts to curve.


     Can you guess what happened? That's right the stickers popped off of the nail surface, only I didn't notice it until after I had added my first layer of polish. Can you say face palm moment! When it comes to my own nails I press the tape or decal down and hold it there for a few seconds and then repeat until I know it's good and stuck. I knew I needed a semi sticky surface for this to work, but I think the Bonder gave me false hope about the sticker sticking without the extra pressure I normally apply.

     Now for the magic! How do you transform a 3D sticker to embossed metal? Cover it up with a metallic finish nail polish of course. I chose Essie Blue Rhapsody although Penny Talk was a tempting choice.

How-to-create-an-embossed-metal-manicure
2 coats of Blue Rhapsody without top coat

    Like I mentioned above this is pretty close to the look I was going for. I have to fix the problem of the sticker sticking up at the side, which seems simple enough to do. What I need suggestions for is how to avoid seeing the edge of the sticker along with the 3D design. I think that is what's keeping me from absolutely loving the finished look. What do you think, am I being too critical? Id love to hear your thoughts on this new nail trend or any suggestions you have. 

     If you'd like to try this technique out but need the stickers make sure to use code LAUNX31 to save 10% on your entire order from Born Pretty Store. Thanks for stopping by and Happy Polishing!

Saturday, April 18, 2015

9:06 AM

Girly Bits - The Neon Brights Collection (Press Release)


     Get your bank cards ready! This Sunday Girly Bits has a new collection that's sure to brighten anyone's day. Check out the photos and get all the details here. 

Inspired by the hottest exercise craze (and my newest hobby), hula hooping, I am excited to announce the upcoming release of my latest collection
"Hoop! There It Is" is a super fun, extremely colourful collection of neon brights, coming just in time to pretty up your pedi's for the warm weather!

The collection consists of 10 neon bright cremes and one silver/holo/black/white glitter topper to add more variety to your mani's and pedi's.
Hoop! There It Is Collection of 11 - Launch Promo Price

Save $1 off each polish for a limited time! That's $121CAD for the 11 piece collection.
{Did I mention that includes free shipping within North America}
Get your sunglasses ready and check out the beautiful, drool worthy swatches* below of the individual shades, courtesy of Lisa at Cosmetic Sanctuary(Bottle shots by Girly Bits Cosmetics)

*All of 
the swatches are over a bare nail, and not over a white base
I've Got High Hoops

I've Got High Hoops is a bright blue creme with purple undertones. Best described as a deep periwinkle.

Summer cannot come fast enough for my new hooping obsession, especially for my family and dog. My "high hoops" have bounced off the ceiling and walls of my living room so many times now that everyone clears the room when they see me get my hula hoop out!

$12.00
Get Indie Flow

Get Indie Flow is a vibrant grape purple creme.

The merging of my two current loves inspired the creation of Get Indie Flow. I love 'Indie' anything, from polish to bath and body, to jewelry. Independent artists have my heart. And flow arts in general are simply mesmerizing. Finding my hooping flow is my long term goal.

$12.00
Hip Hoop Hurray!

Hip Hoop Hurray! is a neon violet purple creme.

In my excitement to dive right into my new hobby the day my custom hoops arrived in the mail (Hip Hoop Hurray!! hoop mail!!),  I failed to consider the injury possibilities.  Note to self: polish name inspirations should come after beginning a new exercise regime - see Thump Your Melons!

$12.00
Don't Paddle Break A Nail

Don't Paddle Break A Nail is a bright pink creme with violet undertones.

Paddle-breaks is a hula hooping trick that I am really excited to learn. There are so many crazy variations of it and it just looks so cool and FUN! I have yet to succeed (remember I've Got High Hoops?) but I keep practising breaks and reversals and in the process I have come really close to breaking a few nails instead. Seems fitting!

$12.00
You're My Hooper Hero

You're My Hooper Hero is a hot pink neon creme, with coral undertones. SO bright and fun.

I was inspired by @smashley_spins to begin my ‪hoop journey, and I have since met lots of other fabulous hoop mamas.

$12.00
Hoop! There It Is

Hoop! There It Is is a neon coral/pink creme.

Named just because there had to be one called Hoop! There It Is, and I would LOVE a hoop this colour!!

$12.00
Thump Your Melons

Thump Your Melons is a fun neon orange creme that is perfect for summer!

This beauty was inspired by some of my failed attempts at chest and shoulder hooping. And Thump Your Melons is a much funnier name than "Give yourself a fat lip with your hula hoop"!

$12.00
These Hips Don't Lie

These Hips Don't Lie is a vibrant neon yellow creme.

No exciting inspiration for the name on this one, other than the song name seemed to suit the collection theme well! And I bet Shakira can hula hoop in her sleep with those hips!!

$12.00
Hooperchondriac

Hooperchondriac is a bright neon green creme.

Marrying one addiction with another - hooping and polish. I need help, but that's nothing new!

$12.00
It's Hoop To Be Square

It's Hoop To Be Square is a vibrant neon lime green creme.

I bet it's hard to hula hoop with a square hoop. Unless you are Shakira. I bet she can do it!

$12.00
You Spin Me 'Round

You Spin Me 'Round is a super sparkly glitter topper with various sizes of black and white glitter, silver flakes and silver holographic dust in a clear base.

Just like my hula hoops spinning 'round and 'round, this versatile glitter topper will get around too. Get around the whole collection that is.

$12.00
The 'Hoop! There It Is' collection also looks incredible with our matte top coat, Polish Matte'rs, and might even be my favourite way to wear it.
But wait, how do they water marble you ask?! I've been told "Water marbling with these are the best ever!!"

Check out the ah-mazing job done by @lylynails below. Stunning!
Mark your calendars!
This amazing collection will be launching on Sunday, April 19, 2015 at 12noon EDT.

Happy Shopping!
The Girly Bits Team

www.girlybitscosmetics.com
NOTE: Neon bright shades are notoriously difficult to photograph, my bloggers have shared the swatch pictures that they feel is the best representation of the polish as they see it. Please keep in mind that while these are as accurate as possible, monitor settings can vary and they will look different on different screens. I find the biggest differences when viewing the same picture on my tablet vs. my PC or laptop.
Girly Bits Cosmetics is a Canadian company that has been handcrafting quality nail polish since 2011 in a dazzling array of colours and finishes. As a brand dedicated to providing cruelty free, on-trend and unique products, Girly Bits Cosmetics is well known for outstanding customer service, charitable donations and custom nail polishes dedicated to lost loved ones. Available at 9 on-line retailers around the globe, and a growing number of brick and mortar stores, you can be sure to easily find the season’s hottest new shades, as well as timeless customer favourites.

For more information visit us at www.girlybitscosmetics.com or contact us directly at info@girlybitspolish.com.

Girly Bits Cosmetics can be found on a variety of social media outlets. Be sure to Follow Us!


Which colors caught your eye? Are you loving this Neon nail polish trend? Thanks for stopping by and Happy Polishing!

Like what you see? Share it with your friends!