Tuesday, March 17, 2015

9:39 AM

Orly - Color AMP'D at Target (Press Release)


     Today I have some information about a new collaboration between Orly and Target. Introducing the AMP'D collection, a collection of 36 long lasting shades by Orly. 2015 marks 40 years in the professional nail care industry for Los Angeles-based ORLY. As part of the brand’s first major foray into the mass beauty market, Target is exclusively launching ORLY Color AMP’D, a collection of extended-wear nail lacquers with a first-of-its-kind smudge-fixing technology. The collection launched on Target.com on Feb. 23 and will roll out to all Target stores on March 8. Have you seen these popping up in your local Target yet?


Flexible Color ($9.99 each)
36 shades inspired by Los Angeles.


     How it works:
     The Flexible Color and Flexible Sealcoat synergize to create a strong, flexible layer that moves with the nail for long-lasting, chip-resistant ware. Color AMP’D dries in less than eight minutes in natural or ambient light, and does not require a UV/LED lamp for curing. An ORLY Color AMP’D manicure lasts one week.

     To use:
     * Apply two even coats of Color Blast Flexible Color
     * Brush on one coat of Flexible Sealcoat
     * Use any traditional nail lacquer remover – no need for soaking or scraping

     Also available is the flexible sealcoat and launch kits.

Flexible Sealcoat ($9.99)
Synergizes with the Flexible Color for a durable, high-shine finish.

Launch Kits ($14.99 each)
Three Launch Kits include one Flexible Color and one Flexible Sealcoat.

You can find my review of Surfer Girl here. I not only tested the application but also the wear time.

Monday, March 16, 2015

10:14 AM

White Nail Polish Stamping Comparison


     I hope everyone had a great weekend. The weather was so nice here that some friends and I got together for a BBQ and outside games. I might have even gotten a slight tan! I love the warmer weather and everything that it brings. For today's post I'm doing a comparison of white nail polishes and how well they stamp. You might remember my previous post about black nail polishes or you might not it was quite a few months ago. I sort of got sidetracked when it came to making this a series. oops! 

     For this comparison I used Konad stamping white, Sinful Colors Snow me White, Milani White on the Spot and Finger Paints Paper Mache and image plate SH213 from Shandy. Just like last time I wanted a design that had a lot of detail to it to really see just how well the polishes would work.  Let's take a look at my results. For this test I used Sally Girl Curfew as my base color. 


     As you can see there are a few patchy spot in the Konad design. This is due mainly to user error. I scraped a little too hard and removed a lot of polish. I didn't notice it until after the image was already on my nail.  Not the most accurate for testing I know but I think you can still get a good idea of how it works so I decided to not re-do it. 

     All 4 polishes stamp well but they have different opacity to them. Surprisingly the Milani has the most opaque image even though it was the thinnest when applying it on the stamp. Sinful colors did the next best job as far as a crisp clear image goes.  The Konad and Finger Paints seem to be equal in opacity.

    
   Over all based off of this experience Id have to say that Milani White on the Spot is the best nail polish for stamping out of these 4. Even beating out the stamping specific polish from Konad. Impressive considering it's also the oldest of the 4. I've had this bottle for almost 3 years now. What so you think of these results? Are you surprised at which one's stamped the best?  Do you have a favorite white polish to stamp with? Thanks for stopping by and Happy Polishing! 

Friday, March 13, 2015

12:00 AM

Lustrous Lacquers 3 Year Facebook Anniversary Giveaway! (closed)


     Happy Friday everyone! Today I'm in a great mood and feel like celebrating because its my 3 year anniversary of the Lustrous Lacquer Facebook page!!! Wow 3 years already? I know I wouldn't have stuck with it this long if it wasn't for each and every one of you. Each and every like or comment means a lot to me. Seriously every time I get a notification I do a little happy dance in my mind. But before I go and get all sappy on you let's get to the prize.

     I'd love to be able to give away a ton of prizes but sadly my budget wont allow for that. Also sadly this giveaway is open to U.S residents 18 and over only. Sorry to all my international followers, but the next giveaway will include you.

     One lucky winner will receive a travel sized 6 pc kit from the China Glaze Road Trip collection. The colors include Boho Blues, Trip of a Lime Time, My Way or the Highway, Dashboard Dreamer, Pinking Out the Window and I break for Coral. You can see some gorgeous swatches by the PolishAholic here.

 
     To Enter all you have to do is fill out the Raffelcopter form below. This giveaway runs until 12 am eastern time on 03/20/15. Thanks for a great 3 years and Good Luck! 


a Rafflecopter giveaway

Thursday, March 12, 2015

6:00 AM

MoYou London - The Time Traveler Collection (Press Release)


     Hi there everyone, it's Thursday and you know what that means. It's time for me to give you your weekly sneak peek at the latest releases from MoYou London! This Friday brings us 5 new plates in the Time Traveler collection. The designs on these plates have me thinking of the Great Gatsby all the way to the 60's where things were groovy and far out. Let's take a look below and see what's in store. 

Hello there!

Great Scott! We just powered up our flux capacitor circuit, are you ready to go back in time?

Dance all night in shimmering sequins during the Jazz Age; shake, rattle and roll around the neon jukebox or have a hippie moment in the throws of Woodstock!

Are you ready for a time travelling adventure? Our decade plates launch this Friday!

THE TIME TRAVELLER COLLECTION

These five plates will be available, starting this Friday 13th March!

Have a groovy day,
The MoYou-London Team


     I've got to tell you I'm kind of excited about a few of these plates! 04 and 05 from  Back to the 20's and 05 from Back to the 60's have my mind just filling up with manicure ideas and color schemes. I love it when a product sparks excitement, these days with as much stuff as I have that's hard to do. Are there any plates that have caught your eye?

   MoYou plates can be purchased in their shop. As mentioned above these plates will be available Friday March 13th. Plates are £4.99 each or about $8 US. Thanks for stopping by and Happy Polishing!


Wednesday, March 11, 2015

11:11 AM

Born Pretty Store - Black Iridescent Rhinestones


     Good Morning!! I don't know about you but I'm pretty pumped it's already Wednesday. Why am I so excited? Well I have the rest of the week off from work so I can attend some programs for my kids at school and then Spring Break starts for the school I work at. That means that I have the next 11 days off from work! That gives me time to work on some things for my blog. Like today's post for example, today I'm bringing you a review of the 230Pcs/Box Newly Round Rhinestone Flat Back Acrylic UV Gel Nail Art Decoration Hot Selling Wheel  or as I like to call them, Black iridescent rhinestones from Born Pretty Store.


     This kit contains 230 rhinestones in 4 sizes ranging from 2 mm-4mm. As you can see in my picture the backs are completely flat which means you can get a nice seal on your nail during application. I've used some in the past that have a con-caved back and they tend to pop off easily. That's not exactly a quality I want to have in my nail art supplies.

     So I'll be honest and tell you that I had no idea how I wanted to wear these while showing the different sizes. I've had them sitting here taunting my for a few months just waiting for inspiration to strike. Sadly it never did and I ended up randomly placing them on my nail when a pattern emerged.


     I'm not exactly sure what kind of pattern this is, so let's just call it a star burst for now. Since I'm rocking the nubbins right now the larger 2 sizes looked overwhelming on my nails and I ended up only using the 2 smallest ones. To complete this look I used 2 coats of Chine Glaze Intelligence, Integrity & Courage from the Giver collection and Pure Ice Girl on the Run to "glue" the rhinestones to the nail. 


     That's a lot of bling on one nail isn't it! This is way outside of my comfort zone but it started to grow on me as the day went on. I decided to not add any top coat because I thought it would end up looking gloopy and take away from the finished look.. Even so each rhinestone stayed put while I did 4 loads of laundry. I thought for sure the ones closest to the tip would pop off during the folding process.


     What I really like about these is the way they catch the light and reflect back so many different colors.  It reminds me of the rainbows you can see in the oil spills in parking lots. I know that's not the best thing to be compared to but you have to admit they can be awfully pretty sometimes. That color flash was what convinced me to try these. I love things that are sparkly, and color shifting on my nails.  Also I couldn't decide between two macro shots so you get a bonus one today!


     These rhinestones can be purchased from Born Pretty Store for $3.41 but if you'd like to save 10% on your purchase you can use my discount code. Just enter LAUNX31 at checkout. I'd love to hear your ideas on how I could wear these because they are just too pretty to sit here. Thanks for stopping by and Happy Polishing!


Monday, March 9, 2015

9:41 AM

Proclaim Hair glue for nail art?


     Good morning everyone. I'm posting a little later than normal today, the whole day light savings thing has really messed with my internal clock and has thrown everything off for me. Anyone else feeling it's effects? 

     Today I have a review of the Proclaim hair glue that people have been using  in nail art lately. Hair glue for nail art? No I'm not crazy, it works as a mask around your nails to help with clean up. The product  was first brought to my attention by Amanda of Amanda Loves Polish when she posted a quick video and I immediately knew I wanted to try it.  After all anything that can make clean up easier is my kind of product!


     I picked this bottle up at Sally's for about $1.37. It's available in 2 colors light and dark and is a much cheaper alternative than liquid palisade. I went with the dark version so I could make sure I would be able to see it on my skin. 

     Application was a bit tricky and I ended up making a bit of a mess. I posted a picture on IG and Facebook with it on my fingers and received a lot of comments about decanting it into an empty polish bottle. Unfortunately I don't have any empty bottles laying around so I had to improvise. I started with a base of Milani White on the Spot and applied the glue once that was dry. 


     The hair glue goes on with a med/dark grey color and turns black when completely dry. It's a bit tacky even when dry and my fingers wanted to stick together on the sides. Which made taking the picture interesting to say the least.  As you can see from the picture above that there was a bit of a learning curve to my application but by the time I reached my pinky things had smoothed out.

     I tried to get as close to the nail bed as I could since my cuticle area is what gives me the most trouble during clean up. For some reason my cuticles always feel rough and dry even 5 minutes after applying cuticle oil. Because of this nail polish sticks to them like a magnet and never fully wants to come off. I suspect this is due to years of having my cuticles clipped at nail salons. They are slowly getting better but still are a major issue for me when it comes to messy nail art like gradients and water marbles. For this test I went with a gradient and I love how the colors look together!


     Wow look at the shimmery mess I've got going on! For my gradient I used Sally Hansen Black and Blue and Loves me Not from the complete Salon manicure line. Both are colors that I typically have a hard time cleaning off my skin. As you can see on my pinky I didn't cover quite enough of my finger and I have a little polish by the knuckle. I mention that because I want to make sure you notice how sheer Black and Blue is. That's important to note for the removal photo coming up and knowing what exactly is left on my tips. 

     Removal was not quite as easy as all those quick little videos of the liquid palisade is but didn't give me too much trouble. For the most part it peeled off in one piece, but not in one tug. I had to use my tweezers to slowly work my way around the nail. This may have been cause by my iffy application of the product though and I was left with little pieces around my nails.


     Those little pieces proved to be challenging to get off with my tweezers but came off easily with a little remover and Q-tip.  I did still have the issue of polish pooling at my cuticles which is what I was hoping to avoid. Next time I'll have to remember to apply the glue around the edge of my nail to avoid that. 

     Overall thoughts? This product does work well for clean up, but the application process is a bit of a pain. Will I use this again? Yes but only because I hate to waste a product. Would I purchase it again? Maybe in a pinch since it's easily available but most likely not.  Since picking this up quite a few other alternative products have come out and I'd like to give one of them a try. Thanks for stopping by and Happy Polishing! 


Friday, March 6, 2015

6:00 AM

Sally Girl - Curfew


     Happy Friday everyone! Anyone else glad this week is almost over? I have had a heck of a week at work and am more than ready to just out my feet up and relax. Maybe at the new Cinderella movie, anyone else going to see it? I'm still in my unable to pick a polish funk so this time I had my son pick one out. He opted to raid my mini collection and picked out Curfew by Sally Girl. 

   
     Curfew is a berry pink with lighter pink shimmer. Shown here is 2 coats plus top coat. It's a bit on the sheer side but built up nicely during application. 3 coats would cover that VNL. I opted to only do 2 since that is the typical number of coats people apply. Plus I know most people tend to skim through blog posts and might not catch if I had applied more to reach full opacity. So going for full transparency about this polish you get 2 coats, VNL and all. Did you catch what I did there... hehehe I'm so clever in my overly tired state, or at least I think I am. 

     Application was easy. I did have a minor issue with the smaller brush tonight and ended up with more polish along the sides of my nails than I usually do. Which is odd because the smaller brushes typically work better for me. I'm not entirely convinced it was the brushes fault though, it may have been user error. Did I mention I've had a rough week? 


     I'm sure my daughter actually picked this one out during one of our many shopping trips to Sally's. She seems to think that because the bottles are so small that they must be meant for her.  She's so cute about it and they are cheap enough that I usually give in and let her pick out 2 each and every time. What can I say I'm a push over when it comes to her nail polish logic. After all she does make an excellent point.

     Sydney was a little disappointed that I didn't let her pick the nail polish this time around. But she recovered quickly and decided that she wanted to paint her nails for this post too, but only if she could use a polish she picked out. 6 years old and already a little Diva. Lord help me when the teenage years hit. 


     Sydney decided to stick with the pink theme and use one of her  own polishes and she painted her nails all by herself.  It actually looked much better before she did her "clean up". She has a tendency to remove the polish from the nail and leave it on her skin. This is her non dominant hand and she's making a lot of progress when it comes to painting it, now we need to get her to stop biting her nails. She's taking after her mamma when it comes to the nail polish obsession and I couldn't be prouder. Who knows, maybe when she's a little older she'll have a blog of her own.

     I know this was a little bit of a scattered post and if you've stuck with me this far I'm impressed. I'm going to take the weekend to rest up and hopefully things will calm down next week. Thanks for stopping by and Happy Polishing! 

Thursday, March 5, 2015

6:00 AM

MoYou London - The Festive Collection Easter Edition (Press Release)


     This Friday MoYou London is bringing us 5 new plates in the Festive Collection.  Inspired by the patterns found on those fancy eggs we all would love to make these plates are sure to have something for everyone. Get your first look below and get those shopping lists ready.

Hello there !

❀ Did you just say EASTER? 
Yes, we take it very seriously here at MYL!


This is why we decided to add 5 new plates to the collection this year!
We still haven't been able to create chocolate ones though!

THE FESTIVE COLLECTION

These 5 plates will be available starting this Friday 6th March!

Pssst!  these plates have a special back! :)

Have a great evening,
The MoYou-London Team 
      MoYou plates can be purchased in their shop. As mentioned above these plates will be available Friday March 6th. Plates are £4.99 each or about $8 US. Thanks for stopping by and Happy Polishing!

Wednesday, March 4, 2015

6:00 AM

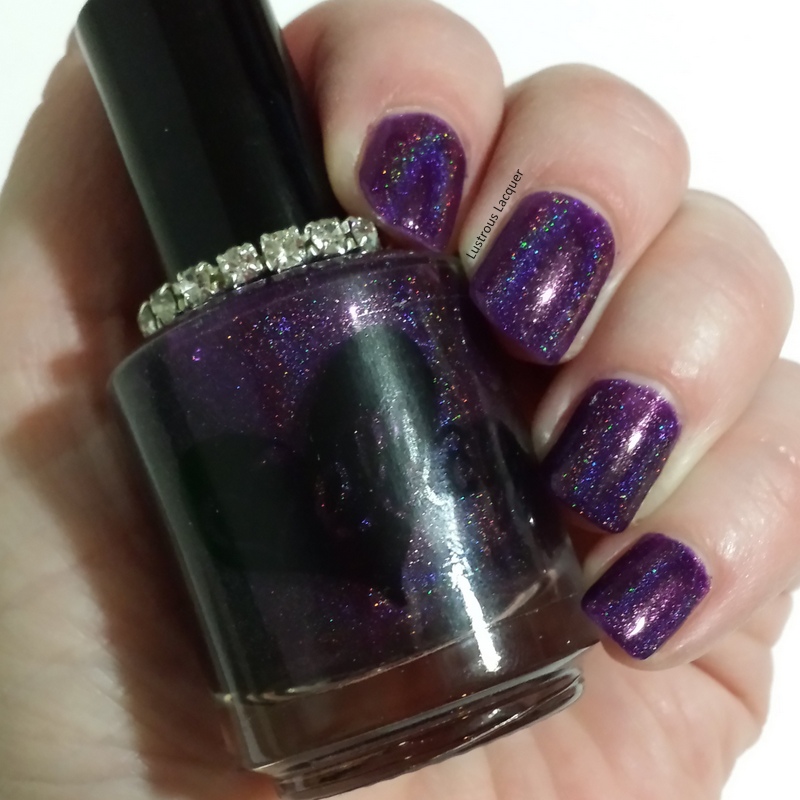
Ellagee - Plum GEE-nius


     For today's post I let my daughter pick any polish from my helmers that she wanted because I was completely overwhelmed and frankly didn't want to make the decision myself. You know we've all been there. 


     Sydney decided that I needed to share with you Plum Gee-nius a group exclusive by Ellagee. Her reason for choosing this one? It has one of those stretchy rings around the brush and she wanted it for herself! Hey her way of choosing was better than my idea of sitting there with my eyes closed and just reaching into a random drawer. 

     Since this was a exclusive polish and is in no way available for purchase I wont go into a lot of detail about the application and such. I will tell you that like all of my Ellagee polishes this one applied flawlessly. I've used 2 coats plus top coat in the following photos.


     Plum Gee-nius is a deep purple linear holographic polish, but its not quite as dark as it wanted to photograph. The struggle of photographing purple nail polish is real people! 


     The holo in this is amazing! It's not quite as strong as the Color Club holo's but it photographed like a dream. 


     Of course I had to include a macro shot! It's a great color on my nubbins but I bet it would be stunning on longer nails!

     Leave it to my cell phone to get the only good color accurate picture of this polish. And it captured the holo too! 


     I just might have to ditch the old point and shoot and stick with my cell phone from now on.  What do you think of my daughters way of picking a nail polish? I think she picked a winner here and I might have to consider giving her that ring now, she earned it. Sorry this was so short and sweet but it's after midnight, I've had a long day and there's another one waiting for me in a few hours when I wake up.  (5 hrs to be exact) Thanks for stopping by and Happy Polishing!


Like what you see? Share it with your friends!