Friday, January 16, 2015

6:00 AM

Parallax Polish - Big Bang

     I hope you have enjoyed Parallax Polish week here on my blog. It's been fun dedicating an entire week to one brand! Rounding things out I bring you Big Bang. A black/blue thermal nail polish with blue glitter from the Controversial Ideas Collection.

The Big Bang, in a nutshell, is that the universe is expanding from a single starting point and the cooling after expansion has allowed for the formation of subatomic particles, which then joined to form our galaxies.

    
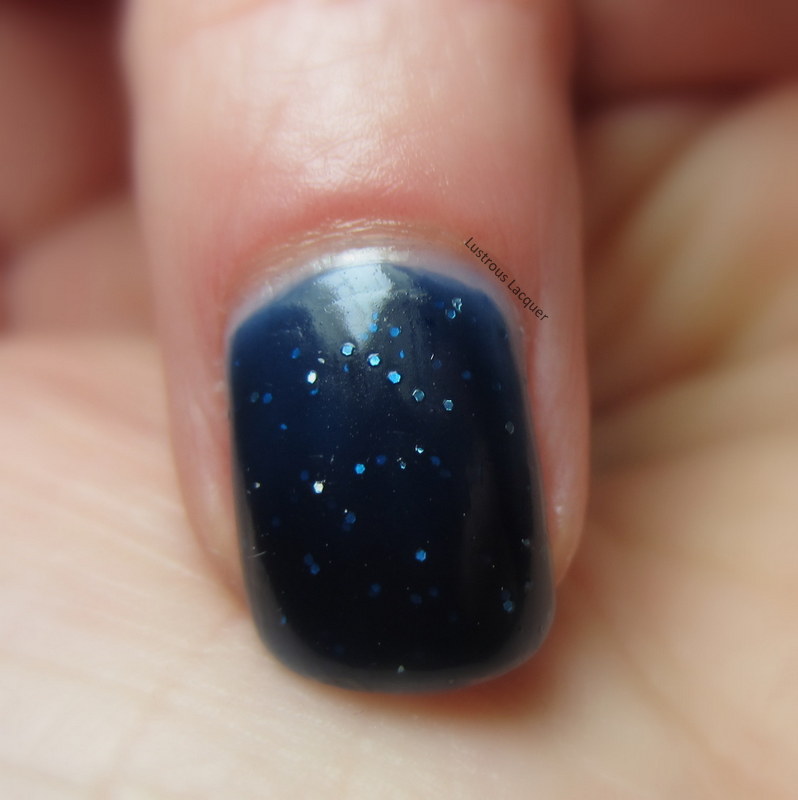
     When I first opened up my package from Parallax Polish, Big Bang was my favorite in the bottle. The deep jelly blue with lighter blue glitter drifting around had me excited with anticipation of getting it on my nails. That's part of the reason I saved this one for last.

     The application was a little tricky for me. The jelly finish was thinner than I expected and I had to adjust my technique to avoid streaking. Once I realized that I needed less polish on my brush things went much smoother. The glitters are abundant and there was no fishing required. The first coat was a bit sheer to wear alone but the color reminded me of a lake, which only seemed to deepen with the 2nd coat. All photos are shown with 2 coats plus top coat. I like that the glitter doesn't take over the nail so that you get a galaxy look on your nails. It reminded me of looking at constellations in a night sky. 
    
Big Bang when warm

Big Bang when cold
     I had a little struggle with photographing this one in transition. It's been so cold here lately that I have an extra heater in my room, not far from my lightbox. I think it may have played a part in the color shifting so quickly on me. And I'm such a wimp when it comes to the cold that I didn't want to turn the heater off.  I was lucky enough to capture 2 shots that I could use for this post.

Big Bang during transition

The start of transition macro shot

     I also have a short video to share showing Big Bang in full transition. It's not a dramatic change in color but enough to keep things interesting. I wish my nails were a bit longer, I have a feeling if I had more of a free edge the transition would be more evident.


     So that's it for Parallax Polish week. I'd love to hear which polish was your favorite Krypton, Marshall or Big Bang. You can also check out some more polishes I reviewed from the Women In Science Collection. If you'd like to purchase any of these or the other colors available they can be found on Storenvy for $8 (14 ml). Be sure to follow Parallax Polish on Facebook for all the latest news. Thanks for stopping by and Happy Polishing!


Thursday, January 15, 2015

6:00 AM

MoYou London - The Pro Collection (Press Release)


    I'm interrupting Parallax Polish week to bring you the latest news from MoYou London. This Friday a new plate will be available from the Pro Collection. Check out the details below and let me know what you think.

It's Almost Friday! 

Joan the Pro came up with a new plate for you! 

We know it's only one plate, but this is the silence before the storm. 
Next week prepare yourself for something out of this world! 
The new site, exclusive video interviews with our girls, a new collection and a few more surprises. 

This plate will be released this Friday the 16th of January.
Have a great day! 
The MoYou-London Team 

     This is my first introduction to the Pro collection and I have to say I like what I'm seeing! That tiger Lily image with the stripes in the lower left corner has my creative juices flowing and the Bee image is too cute.

     MoYou Plates  and products can be purchased at their Shop . As mentioned above this plate will be available Friday, Jan 16th. Plates are L4.99 each or about $8 U.S.  Thanks for stopping by and Happy Polishing! 

Wednesday, January 14, 2015

6:00 AM

Parallax Polish - Marshall


     Keeping with the Parallax Polish theme this week I have the gorgeous Marshall to share with you today. Marshall is a holographic hunter green polish from the Doom Collection.

     "The DOOM lab set is designed around the owner's research lab that investigates computational linguistics and statistical theory. These polishes are meant to showcase the fabulous students she has worked with that make the DOOM research possible! Marshall is a clinical psychology DOOM lab minion who we gladly adopted to do complex scale development research. He is interested in the assessment and treatment of male body disorder."
Marshall-from-the-DOOM-lab-collection-by-Parallax-Polish
Photo was taken in incandescent lighting
     
     The application was easy, which is what I've come to expect from Parallax Polish. 2 thin coats and I was good to go. While the holographic effect was hard to capture on film it was very easy to see with the naked eye. Shown here is 2 coats plus top coat.

Photo was taken in incandescent lighting

     To say that I was in love with this polish is an understatement. The holo added so much depth to the hunter green it was almost mesmerizing on the nail. I had a few co-workers asking me where they could get this for themselves so I figure this one is going to be a hit.

Photo was taken in incandescent lighting
     
     Just look at how pretty this is. I knew I wanted to add a little something to my mani but I didn't want to take anything away from Marshall. I opted to do a stamped accent nail using Zoya Swan and  MoYou plate 05 from the Bridal Collection.

Photo was taken in lightbox

     Parallax Polishes can be purchased on Storenvy for $8 (14 ml). Also, make sure to like them on Facebook to keep up with all the latest news and information. I'll be back Friday with my final Parallax Polish of the week, a thermal from the Controversial Ideas Collection. And don't forget to check out my post on Krypton from earlier this week or the Women in Science post from a few months ago. Thanks for stopping by and Happy Polishing!


Monday, January 12, 2015

6:00 AM

Parallax Polish - Krypton

     It's Parallax Polish week on Lustrous Lacquer! I have 3 beautiful polishes to share with you and I felt that they all deserved their own post. Plus I thought it would be fun to dedicate an entire week to one brand. It's something I'm thinking about continuing throughout the year and I'd love to hear your thoughts. But before you jump to the comments section let's take a look at the polish.

     First up is Krypton from the Noble Gases Collection.  A collection designed to be glitter toppers with lots of sparkles!
A shiny white glitter polish. While you would expect krypton to be green because of popular culture, it actually is a white gas when electrified. Sir Ramsay won a Nobel prize in Chemistry for his work with krypton.
     Based off of that description I'd say this polish matches the name perfectly. What I thought was a clear base in the bottle turned out to be so much more on the nail. There is golden green shimmer mixed with matter and holographic white glitters!

Krypton-Parallax-Polish

      I layered 2 coats of Krypton over Sinful Colors Jungle Trail, a grey leaning brown crème polish. Let me tell you if the green shimmer pops this much over grey just imagine it over black!  I couldn't quite capture it in the photos but I saw hints of a purple shift in the shimmer depending on the lighting.


      The application was smooth with no glitter fishing required.  The glitter lays down nice and flat on the nail, and only 1 coat of top coat was needed for a smooth glossy finish. You can see that there are "patches" or small "clumps" of glitter on my nail. That's exactly how it spread during application. I did no placement what so ever. I think it gives it more of a gas like look or at least how I imagine a gas might look under a microscope. See how I tied this polish into the Noble Gas Collection. Sometimes I can be pretty clever. Or I've just had too much caffeine today to compensate for the lack of sleep over the last week. =)

     
Overall I think Krypton is a unique polish with lots of character. But it's not a color that I would have picked for myself. I'm really glad that I got to try it., but I don't see myself reaching for it often. However I would like to try it as a base for some nail art, Maybe add a matte top coat and see what that looks like.

     Parallax Polishes can be purchased on Storenvy for $8 (14 ml). Before you run off to make that purchase you might want to check out the other polishes I will be sharing with you this week. I've got a gorgeous jewel-toned holo and a thermal polish all lined up. And be sure to check out Parallax Polish on Facebook for all the latest news. Thanks for stopping by and Happy Polishing!


Friday, January 9, 2015

6:00 AM

Born Pretty Store stamping plate review- Black Cat 03


     Recently I was approached by Born Pretty Store to do some reviews of their products and today I will be showing you one of their stamping plates. This one is the Black Cat 03 image plate. 

  
     I chose this plate because it looked like it had a variety of images on it that could be used for different themes. And of course for the cute little cat image in the lower right corner.

I started off with a base of China Glaze Givers Theme. I wanted something bright as my base color to make the images really pop. I used Mentality Touch for the stamping. 

     
     I tried out a few of the images on this plate. With the exception of the smearing on my middle finger from the top coat, you can see they all transferred clean and crisp. I was particularly impressed with the details in the Frame image on my ring finger.

  
     Overall, I was really impressed with how well this plate worked and have heard great things about the other plates available. I will be looking to add a few more to my collection in the future.  If you'd like to purchase this plate or anything else from Born Pretty Store remember to use code LAUNX31 to get 10 % off your order. For a direct link to this plate click here.  Thanks for stopping by and Happy Polishing! 


Thursday, January 8, 2015

6:00 AM

MoYou London - The Geek Collection Part 2 (Press Release)


     This Friday MoYou is releasing 4 more plates in the Geek Collection. These plates range from gamer to computer programmer with the whimsical imagery. Check it out below. 


Siri is back with 4 new plates for this New year of 2015!

she's not anti-social, she is just not user-friendly...

These 4 plates will be released this Friday the 9th January.
Have a great day and Happy New Year!
The MoYou-London Team 

Wednesday, January 7, 2015

6:00 AM

KBShimmer - Men are From Mars-ala


      Just in time for Pantone's color of the year 2015, Men are From Mars-ala brings the rich, deep brick red color to your nails. With a little flair of course. I know most people won't get excited about the thought of brick red, especially in a nail polish. I tend to like this type of shade as an accent color in a neutral pallet for a subtle pop of color. Men are From Mars-ala is so much more than a subtle pop of color if you ask me. This earthy red-brown shade kicks it up a notch with the addition of its holographic shimmer.


     The application was smooth as butter on a hot roll with this beauty. The first coat had more opacity to it that I was expecting. Not enough to be a 1 coat wonder, but based on my experience with holographic polishes I expected a much sheerer coat. Shown here is 2 coats plus top coat. 

     
     Normally I don't test the wear time with a nail polish, but I liked this color so much that I've worn it for a week. In fact, it's still on my nails as I type this. There is some slight tip wear on all of my fingers, and I do mean slight. On my right thumb, it has chipped a little where I banged it while trying to jump start my car on Monday morning. I guess -28 wind chill was too much for my battery to handle. I know it was too much for me to handle! Talk about BRRRRR!!!!

     But back to the polish, you didn't come here to get a Minnesota weather report. If you'd like to add Men are From Mars-ala to your collection you can purchase it at www.kbshimmer.com  for $8.75 a bottle. For sales outside of the U.S. go to www.HarloandCo.org. Thanks for stopping by and Happy Polishing! 

Monday, January 5, 2015

10:51 AM

My top 10 nail art looks from 2014


     I thought I'd start 2015 off with a look back at some of my favorite nail art looks from the last year. Originally I was going to share my top 5 looks but I had a hard time narrowing it down so I went with 10.  It was fun to see how things progressed from an ok manicure to start out with to my all ti,e favorite nail art look. I hope you enjoy this stroll down memory lane and I'd love to hear which look you like the best.

     March brings us the first look of the year with some tiger stripes. This was part of a twin manicure that actually ended up being a triple manicure. 


     All the details for this look can be found at http://lustrouslacquer.blogspot.com/2014/03/twin-blog-post-tiger-print.html

     I finally attempted a Sugar Spun manicure as part of the Spring Renewal Nail Art Challenge in April. This was the look I put together for the Pastel Prompt.


     May was a slow month for nail art for me but I created 2 looks that I absolutely loved in June. Ironically both manicures were for weddings or wedding-related. The first look is a stamped gradient for one of my closest and longest friends in the world. 

    
     I wish I had a picture of the finished manicure. I ended up adding a layer of Fairy Dust after I had taken all my pictures. But there is a quick cell phone pic in the original post. You can find it here http://lustrouslacquer.blogspot.com/2014/06/stamped-gradient-for-alissa.html

     For the second wedding in June, I did the leadlight technique and matched my manicure to my dress. It was a big hit with my friends and I was pretty darn proud of my efforts.


     More pictures including one of the dress I wore can be found in the original post.  http://lustrouslacquer.blogspot.com/2014/06/leadlight-manicure.html

     July brought out some simple nail art from me. I did a few simple dotticures and this simple tape manicure. It just goes to show that not all nail art has to be extravagant. 


     This is also about the time that I started cropping all of my images to the same size and making them square. I like the more uniform look. Check out the full post to see if you agree.  http://lustrouslacquer.blogspot.com/2014/07/nail-art-tape-manicure.html

     August brought another nail art challenge to my blog. This was my Under the Stars look I created for the Let's go Camping nail art challenge. 


     This entire look doesn't thrill me as much as some of the other looks I created. But it's one of my favorites because of the way I was able to get the sky to look like it had Northern Lights in it. And it even glowed in the dark. http://lustrouslacquer.blogspot.com/2014/08/lets-go-camping-nail-art-challenge-day.html

     In September I was given the opportunity to do a guest post over at The Fancy Side. The theme was bridal since Amy was getting married and that's why she needed guest posts. 


     I was really in love with this look and ended up wearing it for almost a week. Find my original post and a link to the guest post here. http://lustrouslacquer.blogspot.com/2014/09/guest-post-at-fancy-side-bridal-manicure.html

     October was another busy month for nail art for me. And while I did like my Halloween manicure 2 others won out for the top 10 list. I did my first Chevron manicure at the beginning of the month. 


     The full post can be found by following this link. http://lustrouslacquer.blogspot.com/2014/10/my-first-chevron-manicure-fraturing.html

     Towards the end of October, I did another first on my blog. Well, 2 actually. I attempted Newspaper nails and Water decals for the first time in this vintage-vibed manicure.


     All the details including a funny story about the water decals can be found at http://lustrouslacquer.blogspot.com/2014/10/newspaper-nails-with-born-pretty-store.html

     Rounding out the year is my absolute favorite manicure. My Ugly Sweater nails for the 12 Days of Christmas nail art challenge. 


     This is also the manicure where I discovered how easy it was to create these looks using acrylic paint instead of just polish. I have a feeling my nail art is going to look a whole lot better in 2015 with this bit of knowledge. Find the full post here http://lustrouslacquer.blogspot.com/2014/12/the-12-days-of-christmas-nail-art_19.html

     I hope you enjoyed this little look back at my year in nail art. It's been a fun journey and I've learned a few things along the way. I have big hopes for 2015 and I'd love it if you'd come along for the ride. Thanks for stopping by and Happy Polishing!


Tuesday, December 23, 2014

6:00 AM

The 12 Days of Christmas Nail Art Challenge Day 12: Freestyle

     
     It's the last day of the 12 Days of Christmas Nail Art Challenge. I hope you have enjoyed some of my designs as much as I've enjoyed creating them. Today's theme is Freestyle. That means that I could do anything I wanted, recreate a design someone else did, do over a design I wasn't happy with, or create something new.  I opted to create a completely new look for today and try out my hand at leopard spots.
  
     I know what you're probably thinking, what does leopard have to do with Christmas? Well nothing really, but if you use festive colors you end up with a Christmas look. Check it out and see if you feel the same.


    To get this look I started out with a base of Finger Paints Paper Mache and then layered 2 coats of  China Glaze Seeing Red over the top. I wanted a simple manicure, so I left only half of my ring finger white and ready for my spots.

     Once everything dried I took my smallest dotting tool and began adding random splotches of Orly Luxe. Currently, my favorite gold nail polish to use, even though it leaves brush strokes on the nail. To make sure I had control over the outlining I used green acrylic paint as my finishing touch.


     At this point, I debated adding a few leopard spots to another nail to try and tie the whole thing together. But less is more they say so a coat of Seche Vite was the only thing I added. I might go in and add some spots before I take it off just to see how it would look, I haven't decided yet. I don't want to be disappointed that I didn't add them earlier if it turns out to look great. lol

     So now that you have seen my final look, why not check out the other manicure people came up with for today. Thanks for stopping by and Happy Polishing!


Like what you see? Share it with your friends!