Thursday, May 30, 2013

9:42 AM

Icing Mood Polish


       Hello Ladies and Gents. Today I have a quick NOTD post for you featuring Mood Polish from Icing. I snagged these two polishes off their clearance rack about 6 months ago and knew it was time I gave them a try. I don't know why it took me so long to try these, I mean who didn't have fun with mood rings growing up? I've had more fun than I probably should have over the last week, looking down at my hands to see what color the polish was.


     I have to say that the color shift in the polish had nothing to do with my moods. I was not feeling romantic and peaceful most of the time. I wanted to show you what the colors were supposed to shift to as my body temperature changed. Also, these polishes have no names or number codes on them. If you happen to find them still in stores you'd have to go by the names on the top.

    Application with both polishes was smooth and even. The lighter color (romantic) needed 3 coats to be fully opaque, the darker color (Peaceful) was almost a one coater, but I used 2 for my mani.

Full sun


     I was originally going to go without any nail art for a change but it didn't look right to me. At the last minute, I added a few dots in opposite colors and I'm glad I did. This simple manicure has gotten me more compliments and comments than the last 4 I've done combined!


     I had a hard time getting a picture of the color change for you. I guess I stay a constant temp when I'm sitting at home with my camera ready, and I might get a few strange looks if I whipped out my camera at work and started taking pictures in the middle of the sales floor. Although that did cross my mind. lol That being said I finally got a picture after 5 days of wear so please keep that in mind for this next picture.


     As you can see this polish held up pretty well after 5 days but there is some tip wear and the polish on my middle finger has a nice little crack in it. I must have been having a rough week since it didn't occur to me to use my hair dryer to get a picture sooner. *facepalm* A duh!

     The darker polish (peaceful) never did shift color for me. I'm not sure if it was because of the top coat or the polish. I have the same amount of top coat on all my fingers though so I don't think that's really it. Maybe I just wasn't feeling very pumped this week.

     What are your thoughts on color changing polish? Do you think it's a passing trend or will this stick around for a while? Id this something you would wear yourself?


Friday, May 24, 2013

1:12 PM

Bachelorette Movie Inspired Manicure


     Hello everyone. Finally, inspiration has struck and I feel slightly out of my polishing rut! I was watching the movie Bachelorette the other day and found myself staring at Lizzy Caplan's nails for most of the movie. If you haven't seen it don't worry you're not missing much. Its one of those movies that doesn't really have a point, but lets you tune the world out for little over an hour. It did have a handful of funny one-liners but that's about it. But this isn't a post about a movie review so I'll try to get back on topic.

    So what is this amazing manicure that had me mesmerized the entire movie you might ask? Why it was a simple half-moon manicure that made a big statement. At least in my humble opinion that is. Now I've kept away from the half moon mani in the past because I think it tends to make nails look shorter. But I knew I had to try it once I saw this one.


    Ok ok enough suspense, it's time to reveal the manicure that inspired me to not only polish my nails again but to try a technique I had sworn off. So, ladies and gentlemen, I give you.....


Image courtesy of google search
    I scoured the Internet for a good hour trying to find a really good image to use and this was the best one I could find. I just fell in love with how this manicure packs a big punch without being too busy. I also liked that it's a manicure that I could easily replicate.  Want to see my version?

    I put together a little picture tutorial showing the colors I used and the steps I took to create this look. First, you will want to gather your materials. For this manicure, I used Milani White on the Spot and Kleancolor Bite Me.

     After applying my base coat and letting it dry I added 2 coats of my base color and waited for it to dry completely. You want this polish completely dry so when you are ready to remove the reinforcement stickers they won't pull the polish up. This is the hardest part of nail art for me. I'm always in a hurry to move on to the next step.


     Once the polish is dry it's time to apply the stickers. I used basic hole reinforcement stickers I picked up in the office supply section at Target. You want to make sure the edges of the sticker are firmly pressed down along your nail so polish won't leak under. Another tip is to make sure the stickers are centered on your nail. As you can see the one on my pointer finger is offset to the right a bit.


    After the stickers are secure and you have them placed where you want them it's time to apply your top color of choice. I did 2 coats for the best contrast. I didn't get a picture of this next step because I wanted to get the stickers off before the polish dried. My sincerest apologies on that. Remove the stickers, wait a minute, apply a top coat and enjoy your manicure.

    
     Not too bad for my first attempt at a half moon manicure. I learned a few things along the way so my next one will be even better. I'm not so sure I like the accent nail being opposite from the others yet, but it might grow on me. What are your thoughts? Anyone have any tips or tricks to share?


Thanks for taking the time to check out my blog. =)


Wednesday, May 22, 2013

8:47 AM

Guest Post Jessica from Be Happy Buy Polish


Today is the third installment of my "How it all got started" series. Jessica the force behind Be Happy Buy Polish shares her story with us.  Enjoy!


Hi everyone! I'm happy to be guest-posting on Lustrous Lacquer today. I remember always being fascinated by my mom's nails when I was a kid - she never had polish on them, but she had long, beautiful nails that she would sit and file at the end of the day. I remember thinking, "How does she keep them so beautiful?" I had awful nails when I was a kid and even into my teen years - I would bite my nails, rip hangnails off - yup, they were a mess! It wasn't until my later teen years when I started seeing one of my older sister's nails, and how she kept them polished and pretty and how much I wanted to emulate her.

Over the years, I would buy a bottle of polish here and there, but it was never "a thing" for me. It wasn't until last year that I really started to get into nail polish obsessively. I'm not sure why it was all of a sudden, but it sort of was! I guess I started opening my eyes to all the beautiful polish colors when I went into the stores, and I started to need them all! LOL

About end of February/beginning of March this year, I started to read nail bloggers' websites, and seeing all these cool designs that they would create with polish. I started to play around with my own nail polish, and making designs, and really enjoying the challenge of trying to re-create a design. Then, in April, I was reading an online brou-haha happening, where people were upset with a nail polish maker - like so upset they were swearing! - and I thought, "Geez, why can't people just be happy and buy polish?!" and a lightbulb clicked on over my head (I swear!). I thought to myself, "I could start my own blog and call it Be Happy and Buy Polish!"

That's what I did, my first post being April 6, 2013. I love the challenge of painting my nails, and I truly love sharing my nails with other people; but I still do it for myself, because like the name says, it makes me happy. The nail polish blogging community is so supportive and helpful, and that's what also makes it fun.

Wednesday, May 15, 2013

10:23 AM

Guest Post. Christina from The Bubbly Brunette

Hello Everyone. Today I have another guest post for you. Christina of The Bubbly Brunette gives us a look into her start in the nail polish world.


Music Notes:
Hello everyone! I'm Christina from thebubblybrunette.wordpress.com! I started blogging in December of 2012, and I just recently got into nail art! since I'm still a beginner, I have been trying simple techniques such as this one: music notes.

Inline image 1


I used a base of Jacqueline from Zoya and then used a bobby pin to place dots of Revlon Knockout onto the nail. I connected the dots using an It's So Easy striper. After everything dried, I applied top coat!


Thank you for featuring me!

-Christina @thebubblybrunette

Tuesday, May 14, 2013

5:26 PM

Cover Girl Outlast Grapevine


     Today on the blog I have for you Cover Girl Outlast in Grapevine. A fun flashy purple for summer. Grapevine is one of their limited edition colors that I had to snatch up as soon as I saw it. The application was flawless with full opacity in 2 coats. No top coat was needed with this polish and it has lasted a full week on my nails with only slight tip wear.


Cover Girl Grapevine
Grapevine in full sunlight

     I love this color so much but I always have to add a little something to each manicure so I tried out a technique I've been wanting to try for a long time. I'm not going to lie I'm pretty proud of how my butterfly wings turned out. Next time though I'm going to do a full mani instead of the two fingers.


     By the way, how do you like the two accent fingers? It's pretty new to me and I'm not sure how I feel about it yet. Normally I only do the ring finger, but I'm trying to mix up my nail polish experiences.

     Cover Girl Outlast polishes can be purchased pretty much anywhere Cover Girl Cosmetics are sold. I got mine from CVS for about $3. I have found them at Target, Kmart, Walgreens, and CVS. I have heard a rumor that Wal-Mart carries them as well but I haven't been to a Wal-Mart in months.


Wednesday, May 8, 2013

4:07 PM

Guest Post: Samantha of Justonemorebottle. "How it all started"


Today I have for you the first guest post in my "How it all started" series. Here is Samantha's story about how justonemorebottle got started.

I have been trying to pinpoint when exactly I started loving nail polish. I have not come up with a specific time frame yet. My mother always had long beautiful nails that she kept painting. So I guess it started as a tiny girl. I remember her buying me Love My Nails brand polish when I behaved well in the store. The display was always close to the register. I would always pick one I didn't already have while she was cashing out.


My introduction to nail art was in late 2010. I got caught at one of the kiosks at the mall. The lady told me "you have nice nails, let me show you something." So, of course, I said "ok", since I was flattered she noticed my nails. $25 later and I now own my own stamping kit. I was terrible at it though at first and quickly gave up. After a while, I went back to it and have been stamping ever since.

As I became more involved with Pinterest, I had more desire to share my nail art. I never took pictures of it before, but all these girls were sharing their work, so why shouldn't I? I would share my photos on Facebook but get very little feedback. My boyfriend then suggested that I start a blog. I went back and forth with the idea for a while. I was worried that the lack of feedback would discourage me. I finally decided to do it. He created justonemorettle.com, and I have been blogging ever since. My first post was July 29th, 2012.

Samantha Dobbs

Sunday, May 5, 2013

7:16 PM

Zoya Summer Collections 2013


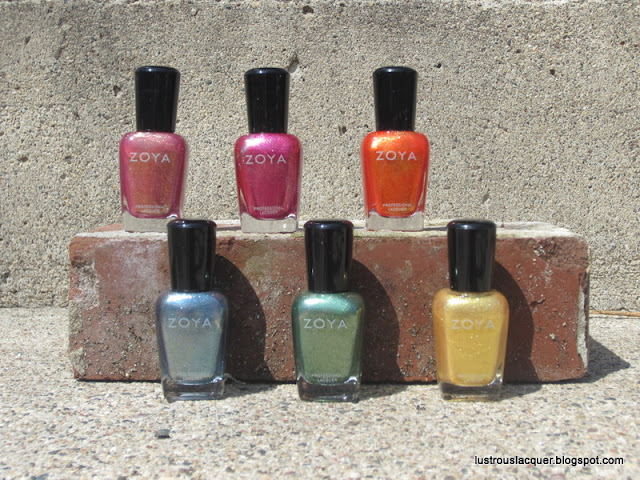
    Today I have for you the Summer Collections from Zoya for 2013. I thought about breaking this into 2 parts But I know that a lot of people have done reviews of these collections already. So I'm going to try and limit this to a few words about each polish. Be ready this is going to be picture heavy.

    Let's start with the Irresistible collection. Full of shimmer and rich colors this collection is sure to please. Like with all Zoya's the formulas were flawless, and the application was smooth.

Zoya Irresistible Collection
Back row left to right: Tinsley, Bobbi and, Amy
Front row left to right: Hasel, Rikki and, Kerry


Zoya Kerry

 Kerry is a golden yellow with yellow shimmer. Shown here with 2 coats no top coat


Zoya Rikki

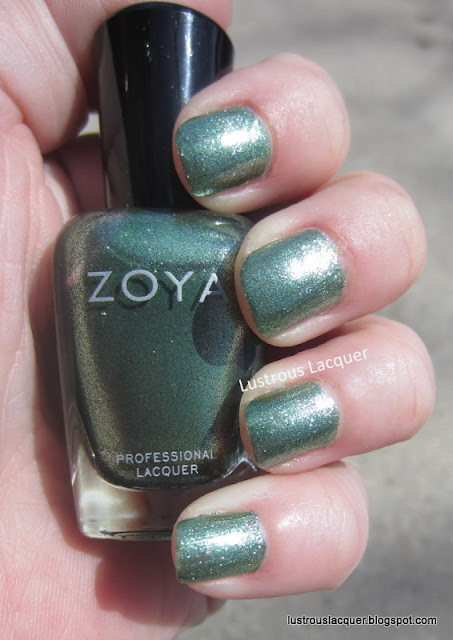
Rikki is a dark green shimmer with flashes of gold, Shown here with 2 coats no top coat


     Hazel is a blue based polish with silver shimmer and a few scattered gold glitters thrown in. This was almost a 1 coat polish. Shown here with 2 coats no top coat


     Amy almost glows like fire on the nails with it's red/orange base and golden shimmer. Shown here with 2 coats no top coat.


     Bobbi is a gorgeous raspberry pink with silver and blue shimmer. Like Hazel, this was almost a 1 coater. Shown here with 2 coats no top coat.


     Tinsley is a rose gold-toned beauty with lots of golden shimmer. The application was smooth but very sheer. Shown here with 3 coats no top coat.

   Next up is the stunning collection. I'm not sure if it was the fact that I swatched these outside in a slight breeze or if it was the formula, but I found a few of these to be slightly streaky during application. All of the polishes evened out nicely after 2 coats though.

Back row left to right: Micky, Yane and, Thandie
Front row left to right: Rocky, Josie and, Darcy


      Darcy is a bright sunshine yellow with subtle shimmer. The application was a tad streaky with this one. (possibly due to the breeze) Shown here with 2 coats no top coat.


     Rocky is a gorgeous ocean blue in a creme finish. Again this was slightly streaky with the application, but it evens itself out nicely. Shown here with 2 coats no top coat.


     Josie is a bright spring green that dries to a flawless creme finish. Shown here with 2 coats no top coat.


     Thandie had a smooth application with almost 1 coat opacity. A fun orange with a touch of coral and a hint of shimmer. Shown here with 2 coats no top coat.


     Yana is a deep pink with subtle shimmer. Shown here with 2 coats no top coat.


     Micky is a bright Barbie pink with subtle shimmer. The application was smooth with this one. Shown here with 2 coats no top coat.

    All in all, I have to say I'm very happy with these collections. It's hard to pick a favorite but I have to say I'm in love with the flash in Amy and Bobbie and the colors of Thandie and Micky. Do you have a favorite from any of these? Which ones will be going on your wish list?


Saturday, April 20, 2013

9:56 PM

Absolut Lacquer- Confetti Intervention

    *gift*

     Back in the beginning of March Absolut Lacquer had a contest to name her new collection of polish. My kids and I looked at the bottle shots and I let them each try and pick a name. It was a fun, and the first time my boys didn't roll their eyes at the mere mention of nail polish. Well wouldn't you know it,  one of the names was picked! Ladies and Gentlemen, I give you Confetti Intervention


    I don't remember which one of my 3 picked the name but if you ask them they will each tell you it was their idea. I, however, am the lucky one that gets the bottle of polish.


    If you've followed my fb page for any length of time you will know that I haven't been a big fan of glitter polish. Don't get me wrong I love it on others. I just didn't like the thought of the texture on my nails or the pain of removing it. This year for 2013 I vowed to change that. You might be asking yourself... Why am I telling you this? Well, I have a feeling that my lack of experience with glitter polish may have played a roll in the slight problems I had with the application of this polish at first.

Before I get into all of that though, let me show you what this gorgeous polish looks like on.


    Here I have 3 coats on my pinkie finger alone and 3 coats over an unnamed silver polish on the other fingers. You can see a slight pink undertone on the pinkie that I thought was my natural nail showing through but I was wrong. In natural light, the pink showed up on the other nails too.

    Now for the application. I found that when I applied the polish like I normally do the glitters wanted to slide up to the tip of my fingernail, leaving the base of the nail bare. I decided to let each layer dry completely between application and that fixed the glitter slipping issue. I still had to do some slight playing around to get the placement that I wanted but that ended up being minimal. The dry time was actually really quick and I ended up only having to wait about a minute or two between finishing both hands and then starting over again. And the wear time was phenomenal. I wore this for one full week without a single chip and very minimal tip wear.


This picture was taken 5 days after application!

    If you'd like to pick up a bottle for yourself they can be purchased at AbsolutLacquer.etsy.com. To see the latest polishes offered check out Absolute Lacquer on FB at www.Facebook.com/AbsolutLacquer


*This polish was sent to me as a contest reward. All pictures and opinions expressed are my own.*


Sunday, April 7, 2013

10:18 PM

Fishtail Braid


      I've been in love with the fishtail braid manicure since the first time I saw one. It's such an intricate design how can you not love it?!? So like with any nail art that I want to get just right I sat down and watched video after video on how to do this. After about 15 videos I felt prepared and set out doing my nails.

  I knew I wanted to use China Glaze Peachy Keen as the base color. Lately, I've been drawn to orange colors for spring, especially the ones that lean toward tangerine. I'm not normally an Orange person so this is kind of fun and surprising for me. I also knew that I needed to use really opaque colors for the braid. This gave me a little trouble because I wanted to use yellow for a bright I'm ready for a spring look. I have maybe 6 yellows in my collection and most of them are pretty sheer. Eek! What should I do? I decided on using my striper polishes. I knew I would have an easier time making my lines with them than a regular polish brush anyway.


 So here's what I came up with to try my mani. As always my trusty Orly Bonder base coat. Nail stripers from Sinful Colors in Sunset and Morning Breath (Ewww who came up with that name?) China Glaze Peachy Keen and Out The Door top coat.


  Here I have 2 coats of Peachy Keen plus top coat. I had some slight trouble with the application because the polish was a tad runny. I had to apply it in thin coats so the first one was a bit streaky. As you can see everything evened out nicely with the second coat and dried a hair darker than it is in the bottle.

 The tutorial I decided to use can be found here. I went with this one knowing that my yellow was going to be an issue if I actually overlapped the other colors.


  Now, normally I do my right hand first even though I'm right-handed. I figure I go slower with my left hand, I can get more confident with the strokes for when I do my left (and photographed) hand. Plus I'm less likely to smudge my right hand when it's wet. But this time I knew I was limited on the time I had to do the manicure and get it photographed so I did the entire thing on my left hand before any polish touched my right. I did learn a few things while doing my left hand but had a hard time applying them when I finally did the right. This is a harder manicure to do than I thought it would be! Its all about the angles. If one angle is off it throws the entire thing off.


Are you ready to see the finished results?


  I'm actually kind of proud of how this turned out. Originally I was planning on doing every nail but I think that may have been a bit much. I did have to do 2 coats with the yellow to get it to stand out but using a striper made that easy. I'm still trying to decide if I want to add some of the yellow on the other nails, but I can always do that later I guess. Maybe add a strip of yellow under the orange tips to keep with the line theme or mix it up with tiny dots.

  But now I have a question for you. I took quite a few pictures of this trying to get just the right shot. On one of them my flash went off , just one out of about 20 shots. I always thought I should avoid using those photos so I could get a more color accurate picture. I have a comparison of the photos for you and I'd love for you to tell me which one you like better and why.


Like what you see? Share it with your friends!