Friday, March 31, 2017

6:00 AM

Sinful Colors - Desert Divas Collection - Super Cooper


     Guess what!!! I was finally able to track down the elusive Super Cooper from the Sinful Colors Desert Diva collection. I'm not ashamed to say that I did quite the happy dance and gained a few side eye glances from my kids when it happened. For those of you who didn't read my previous post on the Desert Divas collection let me catch you up. 

     At the beginning of the year, Sinful Colors released the Desert Divas collection and 8 of the 9 colors began popping up at Walgreens stores around the country. The one color that no one could find was Super Cooper. Which has made it a V HTF color and also creating quite the demand for it. Since publishing my first post people have been spotting this HTF shade at Riteaid and Meijer stores but it has yet to be found in a Walgreens as far as I know. 


     Color: Sage green with silver iridescent flakes.
     
     Application: Super Cooper was a little sheer on the first coat and appeared streaky. You won't need to manipulate the polish though because it levels itself out in a matter of seconds. I think the streaks are because there are so many flakes packed in this beauty that they pile up on each other when applied to the nail. Thankfully gravity takes over and there's no need to worry. Full opacity is reached after 2 coats.

     Finish: Dries to a satin finish but appears to have a slight gloss thanks to all the flakies.


     With the addition of the matte top coat, you can really see just how packed with flakes Supr Cooper really is. It also lightens the color to a more muted shade.

     My overall thoughts on Super Cooper are that I love how the flakes seem to float within the polish. It's almost like a pond manicure but only using 1 polish. Thanks for stopping by and Happy Polishing!

Thursday, March 30, 2017

9:38 PM

Cupcake Polish - Candy Land Collection (Press Release)

*Press Release*


CUPCAKE POLISH - CANDY LAND COLLECTION
AVAILABLE APRIL 2, 2017

 
Cupcake Polish announces its newest collection themed after our childhood favorite board game - Candy Land.  The Candy Land Collection by Cupcake Polish is a 6-piece collection of gorgeous full-coverage holographic glitter polishes.  Every polish in this collection is packed with super sparkly holographic micro glitters.  These bright colors will put a smile on anyone's face!  All polishes in the Candy Land collection are opaque in 2-3 coats.

Cupcake Polishes are handmade, long-wearing, full coverage, and 5-free.
Polishes are $13 each and available at www.cupcakepolish.com .
This collection launches on April 2nd at 2pm CST.


Available collection colors:
Mr. Mint - bright pink full coverage holo micro glitter polish
Lord Licorice - strawberry red full coverage holo micro glitter polish
Princess Lolly - bright yellow full coverage holo micro glitter polish
Plumpy - grass green full coverage holo micro glitter polish
Queen Frostine - denim blue full coverage holo micro glitter polish
Jolly - bright purple full coverage holo micro glitter polish

Wednesday, March 29, 2017

6:00 AM

Oil Slick nails with Watermarble


     Today  I have some gorgeous nail art to share with you thanks to the amazing generosity of my very supportive fiance. He has told me several times that he'd like to pick up some polish for me but has no idea what  I already owned. One day when he made this statement I casually threw out that I didn't own anything from Cupcake polish. Well, he took me at my word and ordered me the entire Luau collection and because his favorite color is purple a polish called Lilac You Mean It.which will have its day on my blog in the near future. But for now, I want to focus on the Luau Collection and how well it worked for water marbling.

     You may have stumbled upon my previous post about oil slick nails from last year and be thinking why am I sharing this same look again. That answer is simple, the oil slick look is one that I'll never get tired of, and this is another way to get a similar look.


     To create this look I started out by creating the water marble design using Cupcake polish The Tiki To My Heart, Hula Do You Love?, Sand By Me, Here Today, Gone to Maui, Be More Pacific and Lei Me Down. I didn't have a specific pattern in mind, I just sort of moved my toothpick in random lines until I liked what I saw.

     I will mention that the polish wanted to dry quickly and I to move fast. I'm not entirely sure if that was because the polish is a bit thinner than your typical creme or if it was because I was working in a corner with a cold draft.


     While I waited for my design to dry in the cup I applied my base color using Wet N Wild Ebony Hates Chris and a layer of top coat.  My go to Quick Dry lately is Pure Ice's Girl on the Run. After about half an hour I removed the design from my cup and cut it into quarters. 

     Just a tip, I think a non-quick dry top coat is the way to go when doing this technique because I had a really hard time getting my water marbled "decals" to stick to my nails. After a few minutes of struggling I got it to work and thankfully I'm happy with the finished results.


       Because my attitude lately is matte all the things I added a layer of MatterialGirl top coat from Blush Lacquers. 


     Now I know you shouldn't matte a linear holographic polish because you lose that signature rainbow flash but there was a method behind my madness. You've all seen those manicures that look like they have little droplets of water on them right. I've wanted to do one for awhile now but never seemed to have the right manicure until today.


     I went in with my largest and smallest dotting tools and placed drops of my Glossy Girl on the Run top coat to create the water drops. As you can see that was not the best way to do this as some of the drops have dimples in them. But you still get the overall effect. The next time I try to create this look I will just use drops straight from the brush to see if I can avoid the dimples.

     So now I've shown you two ways to create an oil slick look on your nails and id like to know which one you like best. Also if you have any tips on how to get the water drops to look like drops, or the decals to apply to my nails easier I'd love to hear them. Thanks for stopping by and Happy Polishing!

Monday, March 27, 2017

6:00 AM

Polish Pickup Northern Star - Scream of Nature


    Hey, everyone, I am so excited about today's post! I have the fortunate opportunity to tell you about the Polish Pickup and share with you one of the colors from its inaugural month. Just what is the Polish Pickup you ask? Well, The Polish Pickup is a new take on the polish collaboration boxes, run by Fair Maiden Polish creators Adrienne and Sarah. Instead of buying one set box, polish lovers have the option to create their own box by selecting from a variety of polishes available each month. Starting in April the theme is "Works of Art". The polish I'm sharing with you today is from Northern Star Polish and is called Scream of Nature, inspired by Edvard Munch’s “The Scream.”

Courtesy of www.edvardmunch.org

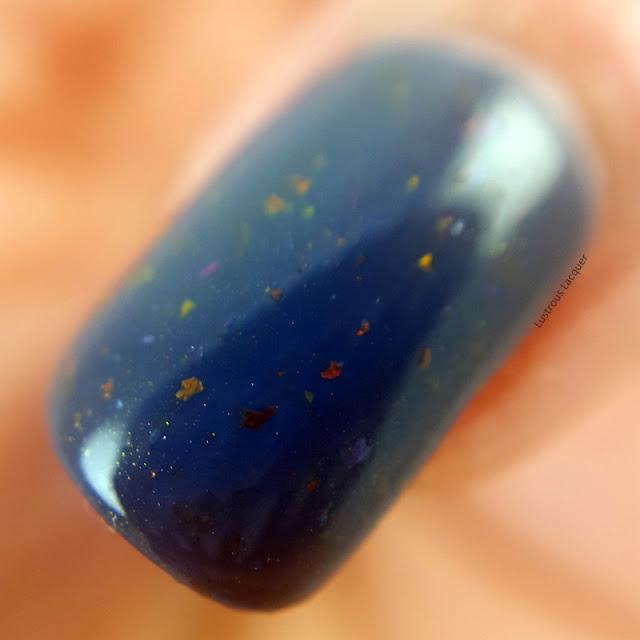
     Scream of Nature is a navy leaning teal based polish with red, gold and orange shifting flakes and pink and copper chrome pigment flashes in the background like bursts of color against a dark sky. Kristin said she was inspired by the quote the author included from Munch’s diary about where the idea came from: 
“I was walking down the road with two friends when the sun set; suddenly, the sky turned red as blood. I stopped and leaned against the fence, feeling unspeakably tired. Tongues of fire and blood stretched over the bluish black fjord. My friends when on walking, while I lagged behind, shivering with fear. Then I heard the enormous infinite scream of nature.”
dark-blue-nail-polish-with orange-and-gold-flakes-and-pink-shimmer

     Scream of Nature has a smooth formula and easy application. The first coat was a little sheer and to me seemed a little flat compared to what I saw in the bottle. Not to fear though everything came together on the second coat. Full opacity was reached and I saw the gorgeous shimmer from the bottle on my nails. Shown here is 2 coats plus top coat.

dark-blue-nail-polish-with orange-and-gold-flakes-and-pink-shimmer

     I have to admit when I first opened my package I thought Scream of Nature was a pretty polish but not really my thing. Then I really looked at it and started to notice the depth that it had. From one angle I saw a flash of the flakes turn the bottle another direction and I was hit with an intense shimmer. I knew my first impression was wrong and I was going to love wearing this polish!

dark-blue-nail-polish-with orange-and-gold-flakes-and-pink-shimmer

     Becuase there is so much going on with this polish I've included some bonus shots to help show all the details off. Now don't get me wrong, there isn't so much that it's overwhelming. Different angles and lighting bring out a different characteristic. It's like a little surprise each time you look at your nails.

dark-blue-nail-polish-with orange-and-gold-flakes-and-pink-shimmer

dark-blue-nail-polish-with orange-and-gold-flakes-and-pink-shimmer
Photo taken outside in direct sunlight

     I think Kristin did a fantastic job capturing The Scream in this polish and am grateful to have had to opportunity to share it with you. Thanks for stopping by and Happy Polishing!


Northern Star Information:
Website: http://www.northernstarcosmetics.com 
Facebook: https://www.facebook.com/NorthernStarPolish/ 
Instagram: @northernstarpolish 
Email: northernstarpolish@gmail.com

Polish Pickup Information: 
Site: https://www.polishpickup.com/
Facebook group: https://www.facebook.com/groups/polishpickuppack/ 
Instagram @polishpickup 
Details: Sale starts 04/07 at 11 am EST and wil be open for 4 days, with a $3 flat rate shipping for US & Canada

Wednesday, March 22, 2017

6:00 AM

Heathers Hues - You've Got To Be Shiftin' Me Collection

*Nothing to Disclose*

     Today I have a gorgeous multi-chrome collection from Heathers Hues to share with you. The You've Got to be Shiftin' Me limited edition collection is currently in it's 2nd pre-order which runs from March 17th through April 3rd. Yes I know I'm getting this post up late. Forgive me, I'm on my second week of vacation and for some reason when I have extra time on my hands I'm very unproductive. Always pushing tasks back thinking I have time to complete them after I do 6 other little things. I actually do my best work and am the most productive when I have a limited timeline. Crazy I know but it's just how I'm wired. Anyway back to the polish.....

      The You've got to be Shiftin' Me Collection consists of 4 polishes and I've got a ton of photos to share with you. Because of all the photos and consistent formula throughout the entire collection, I thought one quick paragraph on the application was the best way to go.

     All photos are shown as 2 coats plus a top coat, except for the stamped images. Those are shown as 2 layers of a black base, top coat, stamped image and another layer of top coat. Each polish has a highly pigmented base and smooth, even application. For the stamped images I used Creative Shop plate #14. And yes each and every one of these stamp beautifully.

Vibrance


     Vibrance is a multi-chrome polish that shifts from vibrant magenta to lime green to shimmery copper and yellow gold.


Scintillate


     Scintillate is an intense multi-chrome that shifts from ocean blue to tropical teal to royal purple. I also saw hints of pink and gold depending on the angle and lighting. 


Lurid


     Lurid is a multi-chrome that shifts from emerald green to tropical teal to soft rose with flashes of purple. For me, I saw mainly a shift from emerald green to lime green and hints of purple. 


Luminous


     Luminous is a multi-chrome that has an intense shift from vivid violet to bluebonnet blue to blush pink to amber orange and a coppery gold. I thought this would be my favorite from the collection because of the rainbow of colors. But it's actually my 3rd favorite. 


     While I love all 4 colors from this collection I have to say that my top two are Vibrance and Scintillate because they showed the most color shift when stamped. Although Luminous is a close 3rd. Which one is your favorite?

     The You've Got to Be Shiftin' Me collection can be purchased as a full set or individual bottles in both full size and mini (I purchased the mini set) and will not be rereleased after this pre-order. So if you want them go get them now. As always thanks for stopping by and Happy Polishing!

Wednesday, March 8, 2017

6:00 AM

Abstract Stamping with Fair Maiden


     It's Wednesday! That means it's half way through the week for most of you, and for me, it means only 3 more days of work until my 2-week vacation! Not that I have a countdown going or anything. The one good thing about working for a school is that I get summers off and a spring break vacation, the bad thing is that I work for a different school than my kids attend. Hence the 2 weeks off, their spring break is the week after mine. Originally I was planning on taking the 2 weeks to move into my new house, but our closing has been pushed back with no new date set so I'm in limbo on the new home front. That means I'll have more time to paint my nails and work on my blog. I'll be able to bring you more looks like the one I'm sharing with you today. An abstract stamped look featuring 2 polishes from Fair Maiden and a Z plate I ordered from MDU.


     To create this look I used Fair Maiden Ice Petals with Fire Frost as an accent. Both polishes are part of the Holiday 2015 Collection, Winter at Dusk.  In a previous post, I shared with you Snow Jewels from the same collection.  As you can see Fire Frost is a bit sheer and there is still some visible nail line after 2 coats. It wasn't as obvious as you see here. The direct lighting brought more attention to it, but it was noticeable at certain angles.


    The image is from a new to me brand of stamping plates called Z Plates. I picked a few up in a group buy from MDU at the end of last year.  This one is from plate Abstractos 3. While I am normally drawn to the more frilly images like lace, flowers and, butterflies lately I've really been into the angular art deco type. Think roaring 20's, The Great Gatsby and such. There's just something satisfying about the sharp angles intermixed with sleek curves.


     From the same group buy I also picked up a couple mini stamping polishes to try. The one I used here is called Old Pink. Which made me a little confused since it is clearly purple. But whatever the name it stamped beautifully and worked well with Ice Petals and Fire Frost to bring the whole mani together. Especially since Fire Frost has a subtle purple shimmer to it. Thanks for stopping by and Happy Polishing! 

Monday, March 6, 2017

6:00 AM

Orly - Terra Cotta

*Nothing to Disclose*

     It's Monday again, and like usual my weekend was too short. Anyone else feel the same way? Thankfully after this week, I'll have 2 weeks off from work thanks to my spring break falling a week before my kids. Speaking of spring break, I thought I'd share with you a very springy color from Orly to help get us past the last of those wintertime blues, Terra Cotta. You may remember I used Terra Cotta as the base to my double stamped manicure.

Warm-coral-nail-polish

     Originally released in 2013 to the core line, Terra Cotta is a warm coral colored polish that leaned heavily to the pink side against my skin tone. While not a true neon, it certainly comes close.

Neon-Coral-nail-polish

     While the application was smooth, the formula was a tad on the runny side, which caused the first coat to be on the sheer side. Everything evened out and full opacity was reached with 2 coats. Terra Cotta dries to a glossy creme finish but I added more shine with a quick layer of top coat. 


     I just love this color for springtime, summer or anytime you need a pick me up. It's fun and flashy and makes me smile. Do you have any colors in your collection that make you feel the same way? Thanks for stopping by and Happy Polishing!

Sunday, March 5, 2017

7:33 PM

Drip Drop Nail Paint - St. Patricks Day sale and discount code


SALE / St. Patrick's 2017 duo release

Set those alarms for Tuesday, March 7th, noon EST!! The drip drop St. Patrick's 2017 duo is releasing! It will be $16 for the set, plus shipping, or $8 each plus shipping. These are limited edition and will not be restocked, so don't miss out! Grab a "lucky shamrock" so you're not "hungover the rainbow!" Seriously, though, March 17th lands on a Friday this year, so it's bound to get a little crazy out there. Stay safe! 

Time to move some inventory to make some room for spring and summer.
Use code: LUCKY at checkout for 40% OFF on retired/discontinued polishes. 

Sale includes:
sentimental journey • holiday spirit • below zero • valley girl • purple breeze • granny smith • autumn chic • fall whispers • evening forest 

Code will be active until remaining inventory is depleted. Feel free to share the code with your friends.


Shop Now

Friday, March 3, 2017

6:00 AM

Neutral Marbled look with Stamping


     Hey Everyone, Happy Friday! I hope you've all had a great week. I've spent most of mine dealing with internet issues, a child with an ear infection and one with Strep throat.  When it rains it pours I guess. But we are all still smiling through our odd week and ready for the weekend. I've decided to share with you a look that Im not sure is what I wanted, but it's not a complete fail either. I figured it fit well with my week.

     I have been obsessed with marble looking nails lately. No not the water marble kind, but the ones that look like natural stone. I know there are a few different ways to get this look, sharpies, alcohol inks, seran wrap the list goes on and on. I decided to go the quick route and try it with stamping. 


     I started with a base of Sinful Colors Prosecco, a color that I've worn a few time but it has yet to make an appearance on the blog. I'm not sure why that is, I love the color. And I feel it deserves it's own post so that's going on my list of  "posts to write". 


     To get that natural stone look I went with the closest stamping polishes I had for colors. Hit the Bottle Everyday I'm truffling and Moonshine. Moonshine is a shimmery silvery white polish and Everyday I'm truffling is a gorgeous caramel brown. 


     The image is from plate BM-416 by bundle monster. It has more of a splatter look than a vein look like in real marble. I tried rotating the image with each color to get away from the uniformity of the image, which seemed to partially work. Sadly I don't own quite the right plate to pull this look off exactly like I wanted. But nail art is about experimenting and learning as you go so I'm considering this my first marble look experiment. I think if I'd used another brown, but a lighter shade that may have helped. Or just taken some acetone to feather out the edges it would be closer to the look I was going for. The sharp edges of color are what bother me , I think I did ok with the color choices. 

     So I will for sure be trying this look again. Even though this one didnt turn out quite right, I'm still infactuated with the concept. And there are so many youtube videos out there for marbalized nails that I'm sure to get some great tips.

     What did you think of this look? Do you have any tips, tricks or ideas for me to try? Leave them in the comments below and as always, Thanks for stopping by and Happy Polishing!

Like what you see? Share it with your friends!